A few years ago I hunted for a photo enlarger for my dollhouse’s darkroom with no luck. I could find miniature cameras and typewriters and computers, but not a single traditional photography enlarger like I learned to use in college. But that’s what Steed’s darkroom has to have.
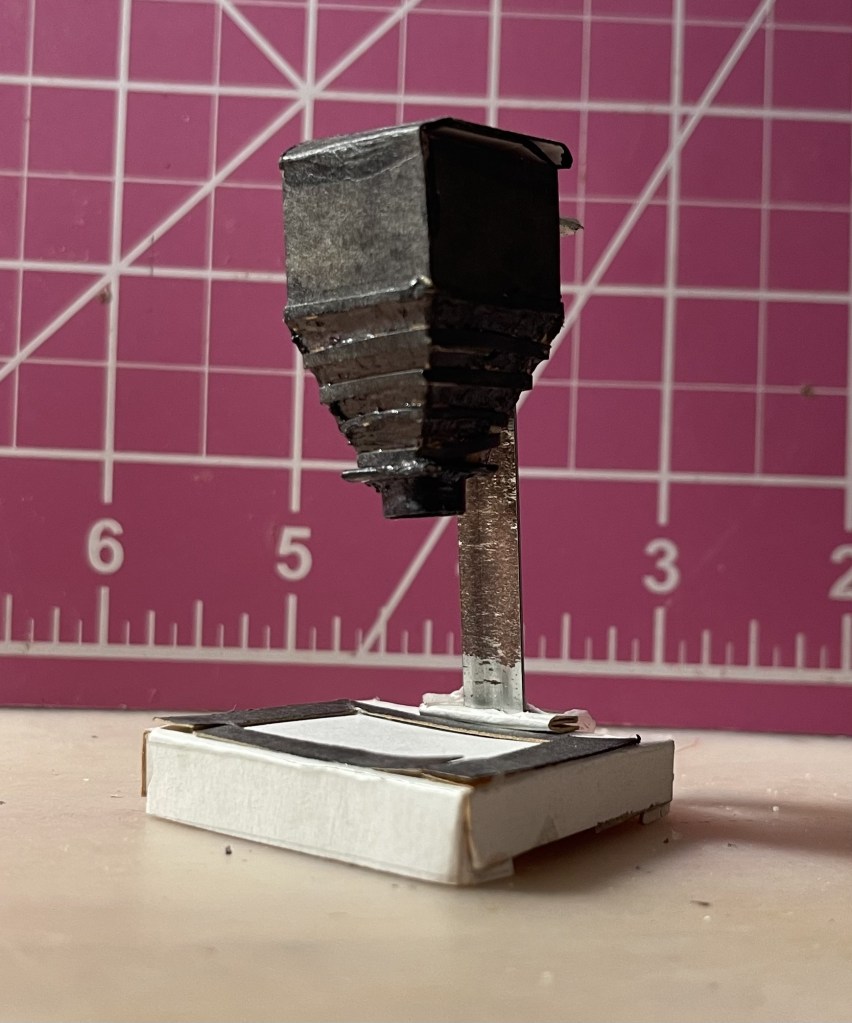
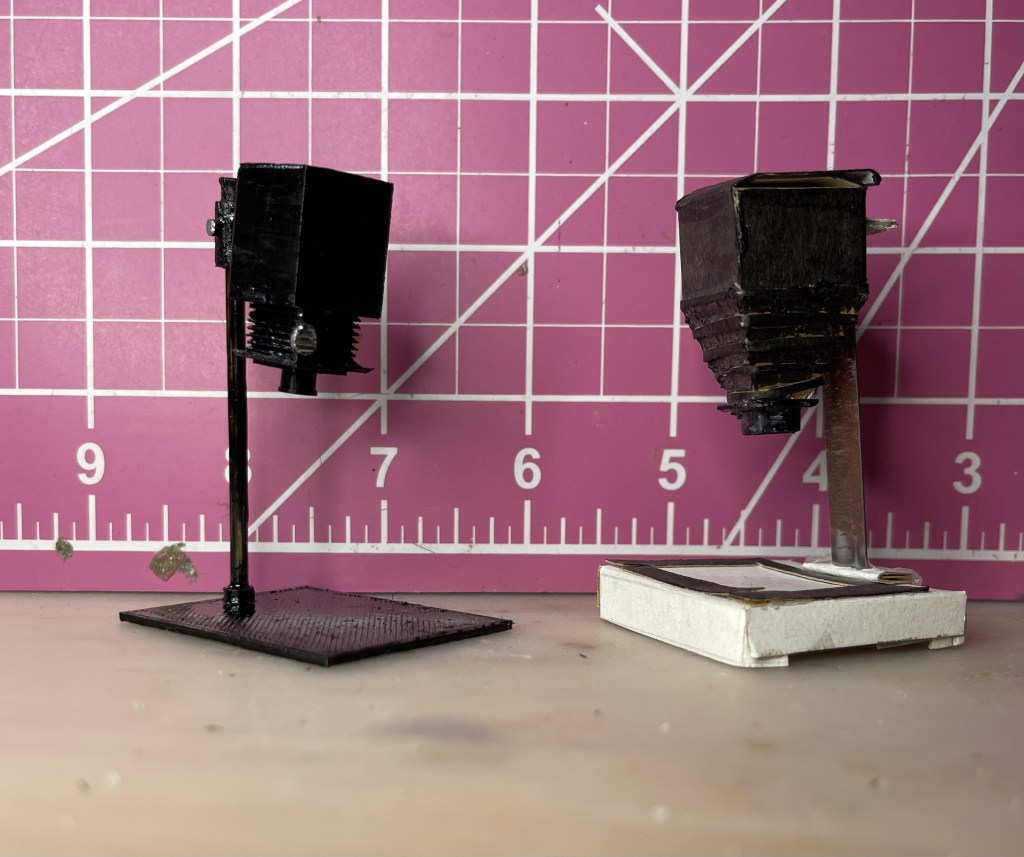
My card stock enlarger.
So I made one out of cardstock and a metal bar from a hanging file folder. I was not entirely pleased with the result, but I moved on. I made cardboard chemical trays for processing photos, and printed logos from photography chemical and paper packaging to paste onto unlabeled miniature bottles, cans, and boxes. I carved tiny clothes pins from toothpicks and printed tiny black and white photos to hang on a drying line in the darkroom. I bought a red gel to insert into the light fixture.
After finishing the fire escape, it occurred to me to search Thingiverse, a database of downloadable 3d printable models. Of course there are loads of dollhouse miniature scale models. Actually, any model can be printed dollhouse miniature scale, although fine detail will be lost. But I did not find a 3d modeled photo enlarger.
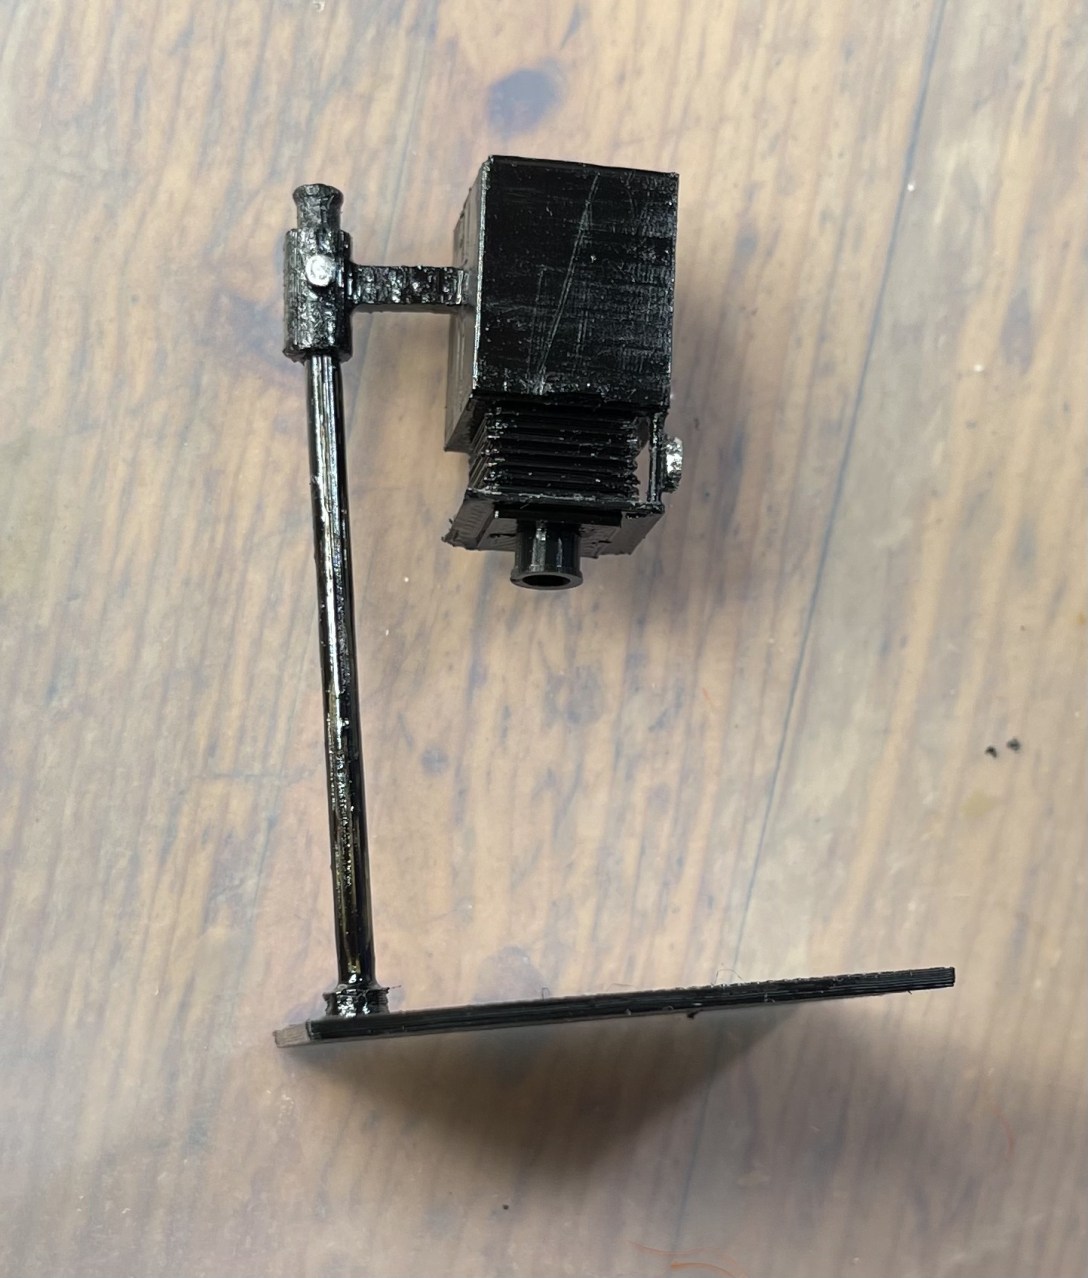
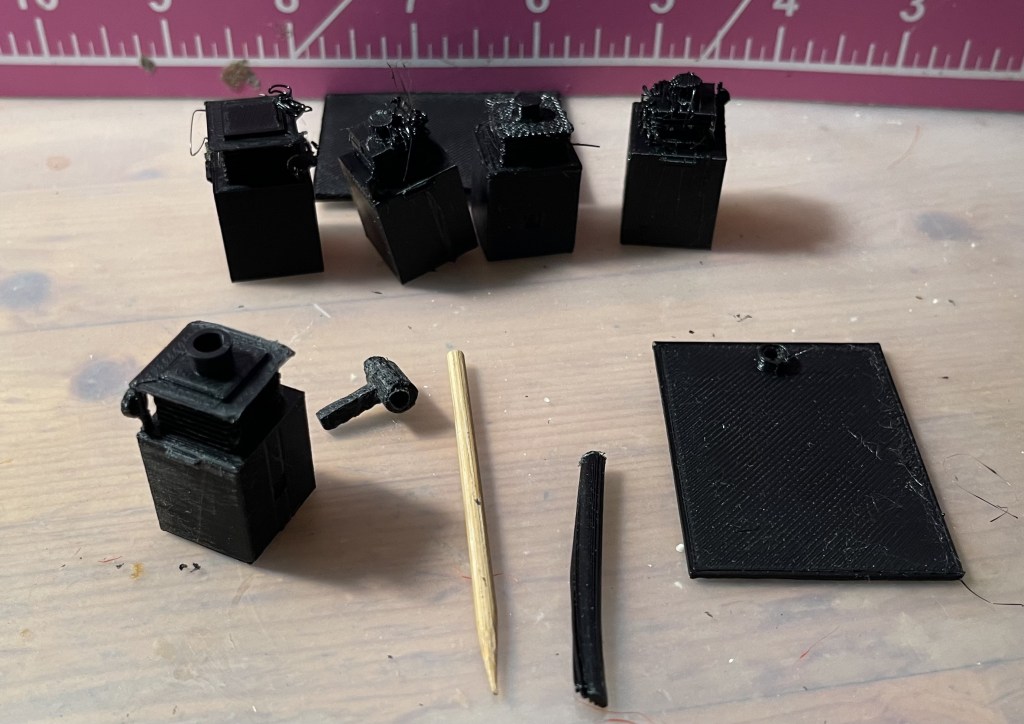
It took a few tries–row of failed enlarger heads in back–to get a good head, mount, and base. The vertical post is a failure, replaced with a bamboo skewer.
So I made one. As with the fire escape, it took a few tries. I model it, print it, and evaluate the results to modify the model. For a short few minutes I considered making the head hollow with the lens hole open and inserting a tiny light inside to shine down on the base. I could put a tiny lens and a negative to project down onto the paper… But either I would have to put the light in while it was printing, or make the enlarger head in two pieces. And either I’d have wiring running down the post, or have to fit in a battery. And if it had a battery, I’d have to reach into the tiny darkroom to turn it on and off. Also, where would I source a 2 millimeter lens and negative image? I stopped there, proceeding with my unlighted enlarger.
When the combined post and mount for the head failed to print, I salvaged the mounting part, cut off the miss-printed vertical post, and got a bamboo skewer from the kitchen. Conveniently, my modeled post was supposed to be 2.8 millimeters, just like the skewer.
The expansion portion of the head–what in real scale would be accordion folded fabric to accommodate adjustments to the lens position–was a plastic clogged mess. I made the folds larger so the printer could print one-fold per layer. I also reduced the layer height to get finer details.
Even my best print needed some touch-up, which I did with fine files and X-acto knife. The bamboo had to be painted, so I put a coat of black enamel on all the parts, and chrome on the two knobs.
It’s not perfect, but it’s orders of magnitude better than the original, and for the moment that’s good enough for me.
It’s been a few weeks since I invested in my 3D printer with the intention of printing a new fire escape for my dollhouse. At least for starters. I do realize one doesn’t buy a printer to create a single object. Since then, I’ve discovered more and more possible projects and experienced both satisfaction and frustration with my efforts.
But for now, I want to provide an update on that initial project.
Unsurprisingly, I had to scrap that first model after I learned a bit more about using Blender, the modeling application I’m learning.
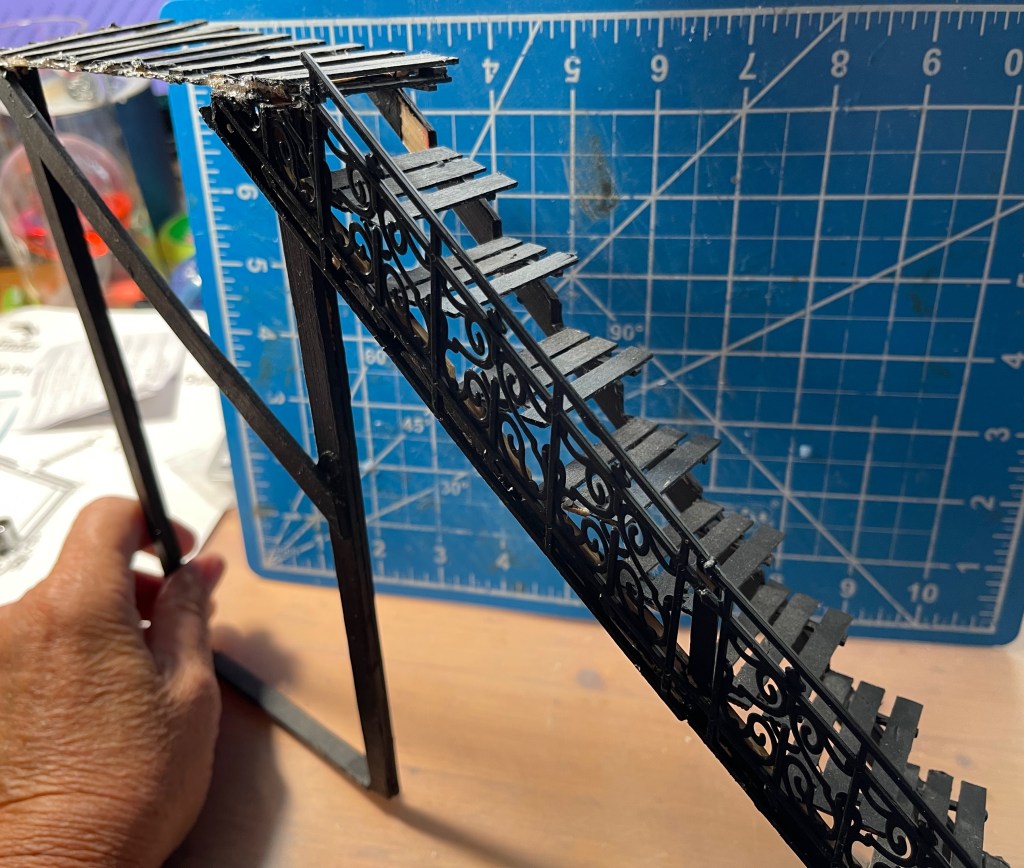
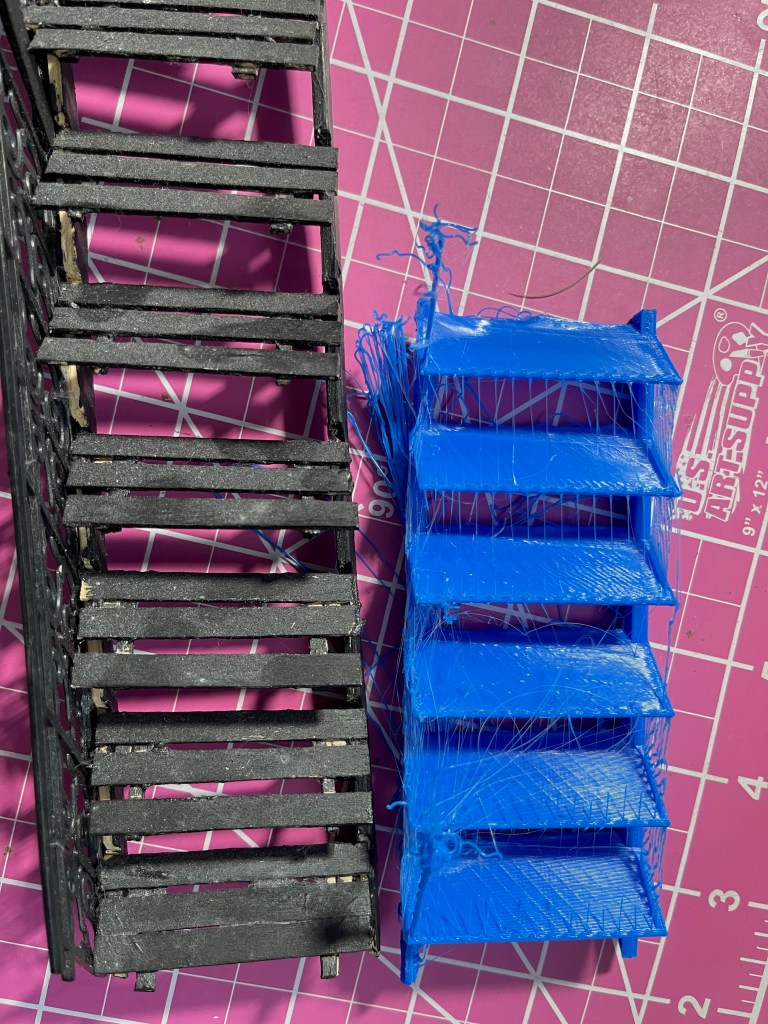
I created a new lower half of the fire escape model and was astonished when it printed relatively properly at scale. Using that model file, I created the upper half of the stairs and this time I added some tiny bolts to the tiny plates where the two halves would join. When they printed correctly I was pretty nearly elated. Onward to the top of the steps. This one was tricky because the horizontal railing needed to mesh with the angled one on the stairs. By working in the same model file as the top half, I was able to design the platform with the correct angle. And a couple more of those clever little plates with bolts on them.
This one gave me printing problems and I had to learn more about positioning the model for best results. It took two or three prints to get an acceptable result. And I still had to reprint the railings. I try not to think about the plastic, but on the other hand, I’ve probably only scrapped the equivalent of a liter plastic bottle.
All three pieces had a lot of “stringing” where the print nozzle extrudes a fine hair of plastic when it moves between printed objects. There are settings to get rid of this. I’m still trying to find the right combination.
The next steps were cleanup with X-acto knife, sandpaper, and ultimately a micro-sized metal file to get into those tiny angles. I glued the three main pieces together and glued on the re-printed railing pieces that hadn’t printed well the first time. I decided to live with some weak points in the railings because it’s an old, weathered fire escape and iron deteriorates.
The printed fire escape–about four pieces in all–glued together.
Finally, I got out aging powders–fine powders in various colors like “rust” and “grungy black”–and a brush. Remember, the fire escape is outdoors in London. It’s gonna rust.
Not yet attached, but in place. Yeah, those vinyl bricks need some attention.
Next project: replace the waterwheel on my garden mill.
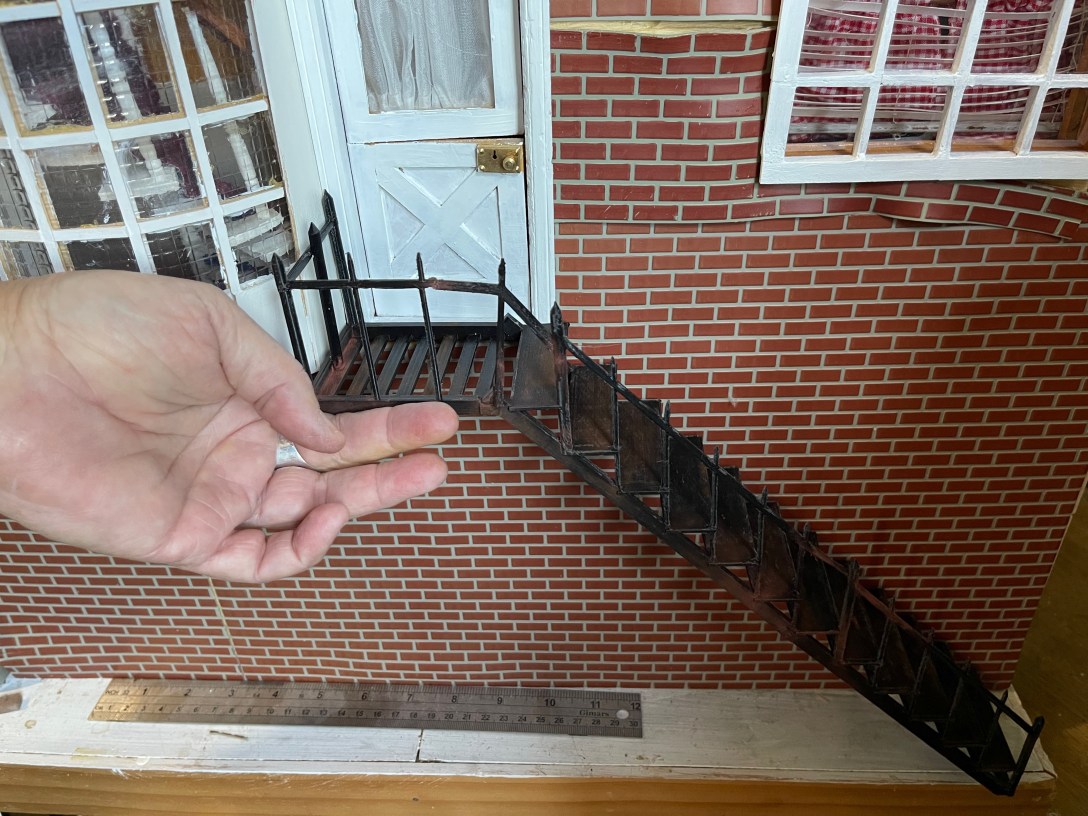
About a week ago I was bemoaning the fragility of the fire escape on my dollhouse. It had once again detached from the wall and been damaged. “I should 3d print it!” I thought, reading that 3d printers have become inexpensive. “Then it could be one sturdy piece.”
Except I didn’t have a 3d printer, nor did I know how to create a model of my staircase (or much else).
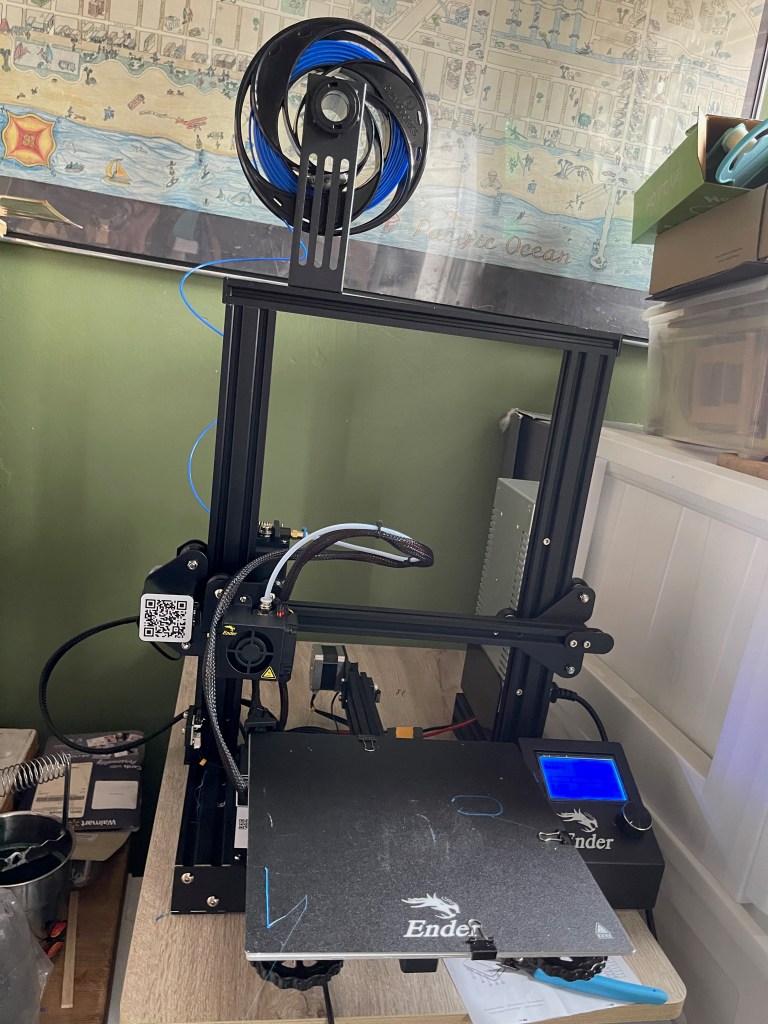
Never one to let reality stop me, I researched inexpensive 3d printers and selected one. Then I watched several “how to assemble your printer” videos.
“It’s okay, I’ve built a lot of Ikea furniture.”
And it was okay–mostly because the videos told me it was going to take a couple hours so my expectations were properly set. The included instructions were no worse than any other Chinese product–in fact the translation was better than many. However, when it came to the wiring it lost me. One photo showing a bunch of sockets, but no clear direction for which of the four four-pin plugs went into which of the four four-pin sockets. I figured out the plugs on short wires could only go to the same size sockets near them. The rest had little tags with X, E, and Z on them. But sockets had no such labels. I realized these referred to the axis, and each axis has a motor. But I didn’t know which was which. Finally I found a manual on-line that helped.
And that’s the sum total of the documentation. No user manual. No guide to the menus and commands. No help with connecting it to my computer (answer: you can’t). It has a micro USB port, so I thought I could plug it into the computer. Nope. It also came with an SD card, a USB card adapter, and an SD slot next to the USB port. I set aside the puzzle of talking to the printer for the moment because I still had to solve…
Where to put it? My little office/craft room/music room is cluttered with a capital C. Oh, but on top of those plastic storage bins would work, except then I would have to move it to get into them and I suspect moving it is not good for it.
Back to Amazon to order an adjustable height laptop desk to go over the storage bins.
And while I waited for that, I researched modeling software. Yikes. I’ve done my share of poor Adobe Illustrating, but never in three dimensions. What’s more, 3d printing is still a pretty hacker-ish activity, with loads of people out there sharing videos and posts about fine tuning their cobbled together systems, blending skills in Rasberry Pi, design, materials knowledge, and who knows what else?
I resolved to take it a step at a time. First, let’s find software to draw my staircase. I tried out Sketch Up–the free web-based version–first and after hours had managed to draw some cubes. So I went to Blender, a native application, and within an equal amount of time had created a six-inch section (because the printer can’t do the whole thing at once, so no matter what it’ll be in two pieces) of my staircase. Unadorned, plain surfaces, no banister. But it looked like a staircase. Yay Blender.
The desk arrived and on Saturday I shuffled things around in the office and got the printer set up on a stable (I even checked the level of the table top!) surface.
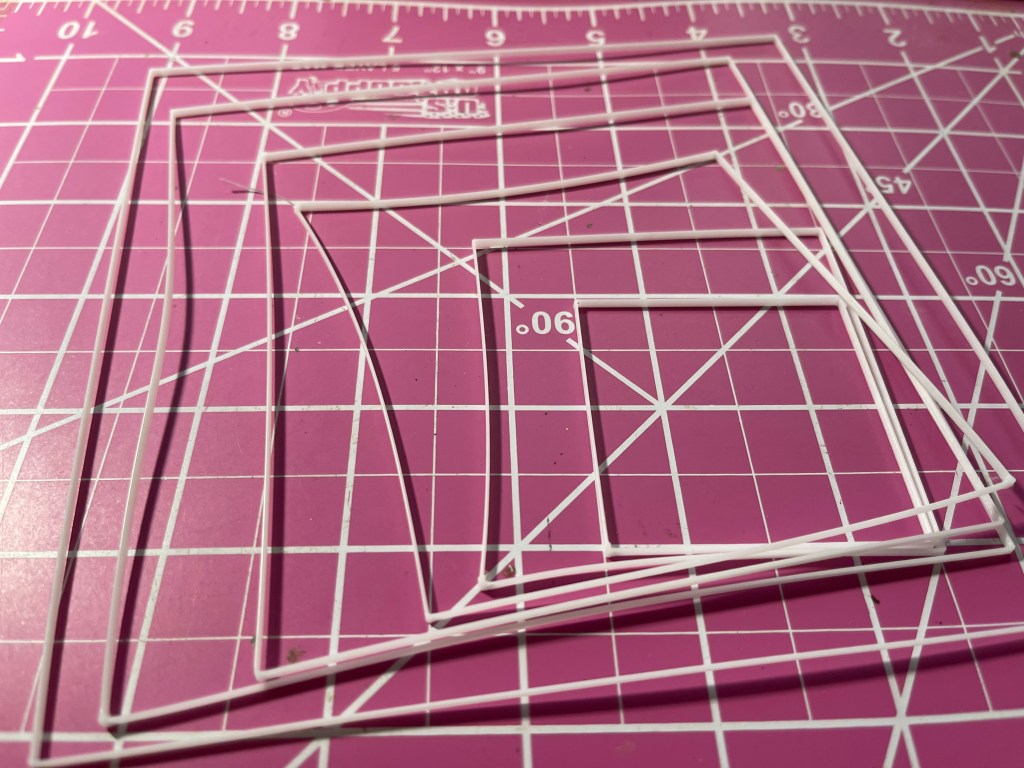
In my research I learned about leveling the bed–the surface you print onto. I found videos, and one creator who linked files to help. I learned to transfer the files from my computer to the SD card and found the “Print from Media” command on the printer. Amazing–the print head moved around over the print surface and stopped so I could check its distance from the surface (slide a slip of paper in between) and adjust the bed up or down in each location. Next I learned from another video how to load the plastic filament into the printer (Ah, there’s a spring loaded arm I have to move!–like I said, absolutely no user manual). And finally I printed the test file–a set of squares.
A few minutes later there they were on the print bed: seven 2mm high by .5mm wide white plastic squares.
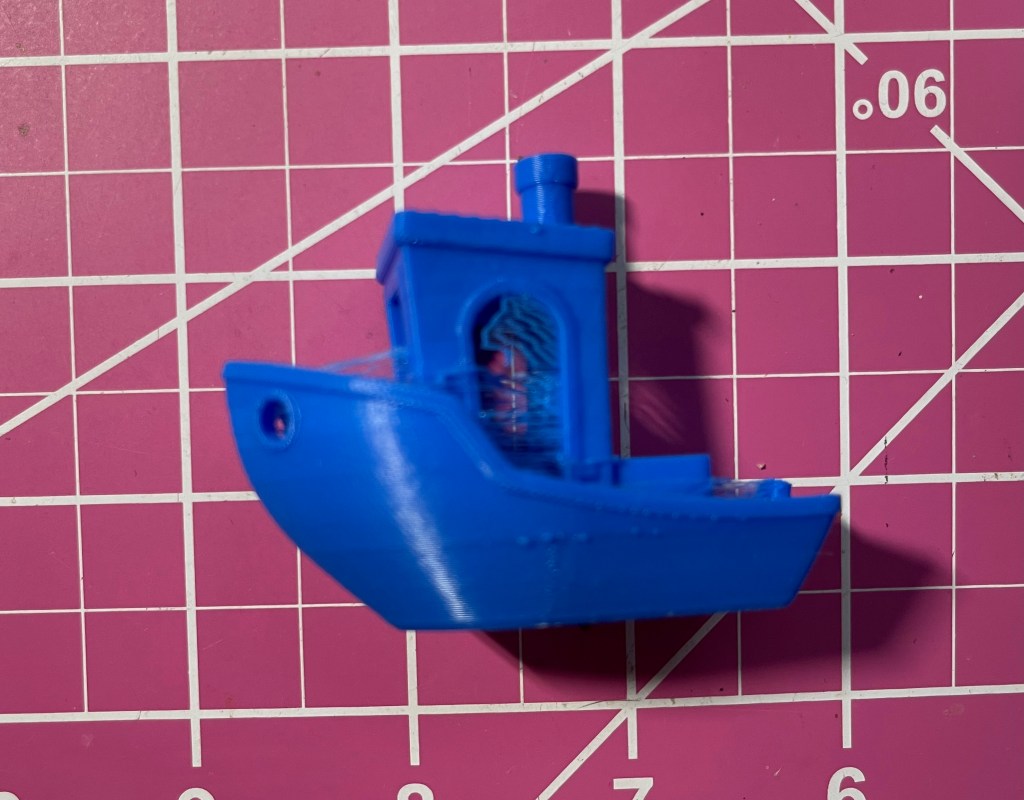
I’d read about Benchy, a cute little tug boat model that’s used to test printers. I found the files for it on thangs.com, a library of free model files. Enter the next piece of software: the slicer. Slicing software prepares the 3d model for printing. I took the coward’s way out and downloaded the Mac slicer from my printer’s manufacturer. I loaded the Benchy model file into the slicer and there it was on screen: the little boat. I hit the “slice” button and when it finished I exported to a format for the printer. Then I had to transfer that file to the SD card, the whole while fearing I’d drop the little card or damage the contacts.
Soon my printer was working on Benchy. About ninety minutes later I had a little blue boat covered in plastic cobwebs. I reviewed a video on what Benchy tells you about your printer and how to fix some of the problems it reveals. My platform was a little too low, and those cobwebs are called “stringing,” left when the nozzle moves across open air between parts of the print.
One step at a time, I said. I re-leveled the bed and reprinted Benchy. That helped the first issue. Then I researched “stringing” and spent a while in the slicer looking for the right setting to change. Found it. Changed it. Re-sliced. Sneaker netted the card to the printer and printed again. Oh well. Clearly I’ll need to mess with that setting some more.
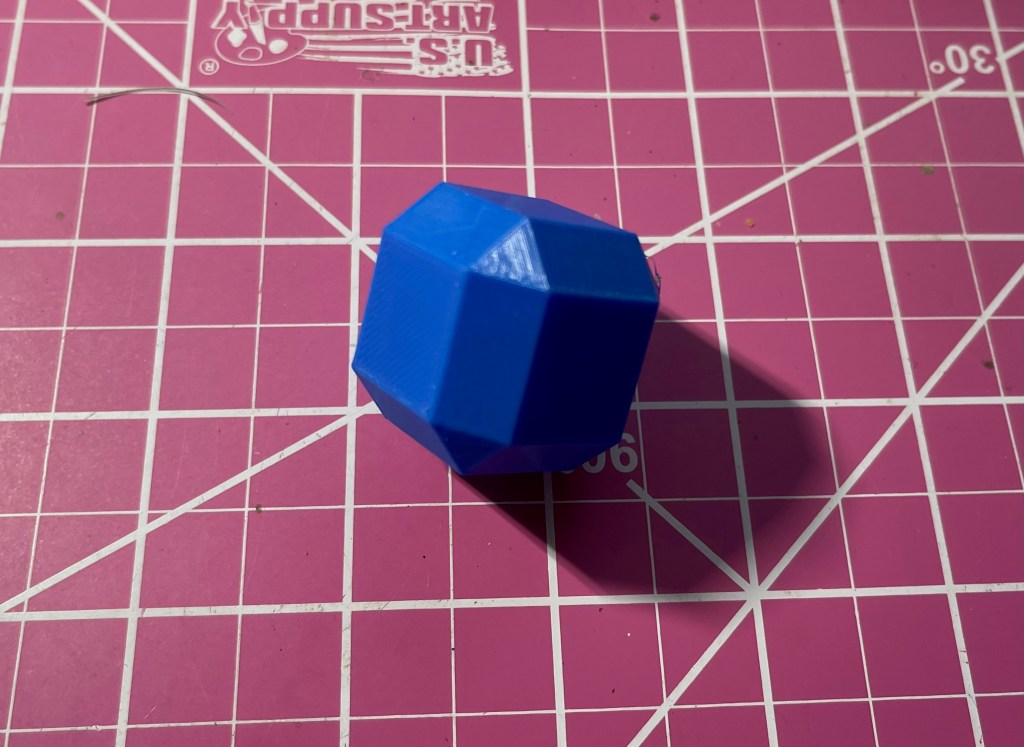
Back to the modeling software–I wanted to print something I made myself. That’s the point of this endeavor, right? So I set aside my staircase and modified a basic cube, exported it from Blender, opened it in the slicer, and there it was, sliceable. This was especially exciting because I’d tried this with the staircase and the slicer didn’t display anything. Or so I thought.
So I sneaker netted the cube and printed it. My first original design!
But by then I was sick of the sneaker net and researched how to get my printer to talk to my computer. I had downloaded a phone app that connects me to my printer manufacturer’s cloud, but the app has to be able to talk to the printer, and the printer, as purchased, has no connectivity other than the SD port and that mysterious micro USB (still no sign of the printer when I look at my computer’s printer config manager). I looked into drivers, and the only info I found was a snarky comment on Reddit to someone else trying to do what I’m doing saying “make your Mac work like a PC.”
Okay, I did find that I could get a wifi “box” (yes, literally called a “box”) from the manufacturer. Whether this box would make my printer a network printer, or whether it has a WiFi network built in that I’d have to join (a la GoPro) was unclear because, you know, no user manual nor even a clear description on Amazon. I ordered one.
The “box” plugs into that Micro USB port. And it talks to the phone app. And the app talks to the cloud. So does the slicer on the computer.
I thought, “okay, it’s time to try to print my stairs.” I knew this would not be my final print, this is just a working model, just an attempt to understand how it all works. Plus I still have the “stringing” problem. But I just had to do it.
I figured out that the model was so small the slicer was show it, it was just tiny–I had to zoom way in. I found the scaling controls and made the model the desired six inches long. At least I knew that unlike with photographs, resolution of the image isn’t relevant in a vector model. I sliced it and uploaded it to the cloud. On my phone, I located it in the cloud and commanded the printer to print it.
And that’s how, in just a week, I’ve 3d printed half of a (granted unusable) fire escape for my dollhouse.
Sure, the steps don’t align with the original, but that’s okay, the printed ones are spaced more to scale. And the newel posts at the top and bottom are a complete mess. They were too fine to print. And I didn’t even do the railing. And then there’s the stringing.
None of that detracts from my sense of accomplishment for going from “3d printing? How does that even work?” to “I just printed a first pass at a miniature fire escape” in a week.