
My father built my first dollhouse from a pattern that my mother found in Redbook Magazine. It had six rooms and a patio and many hours of my father’s love. I found it under the Christmas tree when I was five or six years old. A year later my father took the beloved house back out to the garage and added two more floors, electric lights, and a manually operated elevator. I found this gloriously reformed house under the Christmas tree that year.
My affection for life in miniature predates that first house. Indeed, my parents were merely indulging a pre-existing condition. I still have a few of the many little trinkets that I collected when I was very young.
When I was sixteen and my father had been gone for seven years, my birthday present was a dollhouse kit. Being an odd teenager, I delighted in spending evenings carefully assembling the hundreds of pieces of unfinished wood. The house was soon assembled, but, alas, fine finishing was beyond my skill and attention span. I grew up, my niece and nephews had fun playing with and damaging the house, and then I moved 3000 miles away from it.
But all passions find their way back to us, and eventually I shipped the house across country and ensconced it back in my life. I made some progress, and also made some additions and enhancements. But space and time were limited in my adult life. After another couple moves, the dear old house finally succumbed to demolition. I took it apart, keeping many of the components and all of the furniture and decor. Much of it is stored in the rooms of my childhood dollhouse–yes, I have kept that one all these years, too.
Which makes the third house in my life all the more unusual. Three Stable Mews is a replica of John Steed’s apartment from The Avengers–specifically the color Emma Peel episodes. The house truly combines two of my oldest passions–miniatures, and The Avengers.
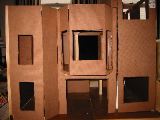
My work on the project flagged for a number of years. I’d used particle board that was very hard to drill and cut, and I’d tried to make the house collapsible with lots of hinges and ways to separate the floors. It had become discouraging. My attempt to install running water was where I really bogged down.

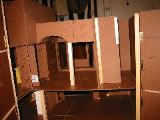
Until, a few years ago when a video of a kid who cleverly created house models using popsicle sticks and balsa sheets inspired me. I ordered tons of bamboo craft sticks and sheets of basswood. I disassembled 3 Stable Mews, measuring and diagramming everything.
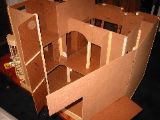
I re-started from the ground up, using the existing base, but building every wall new. All the walls are hollow, with the structural bamboo sticks sheathed in the basswood, and wiring run, for the most part, in the gap between–like real wood construction. I had to do away with the idea of running water, and also the easy collapsibility. Only the third floor comes off now, so that we can look down on Steed’s familiar living room.
Progress goes in fits and starts. Even working at home (which began for me in 2017) does not mean I have tons of time so spend on the project. However, some of it is perfect to do while in large meetings where my role is to listen.
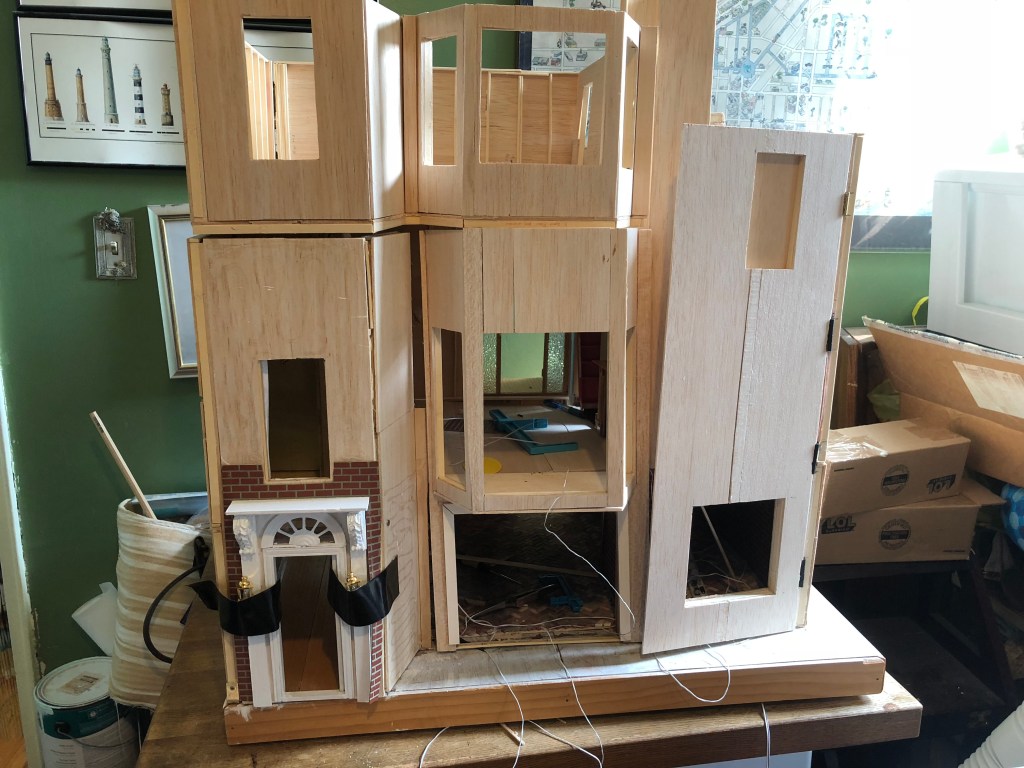
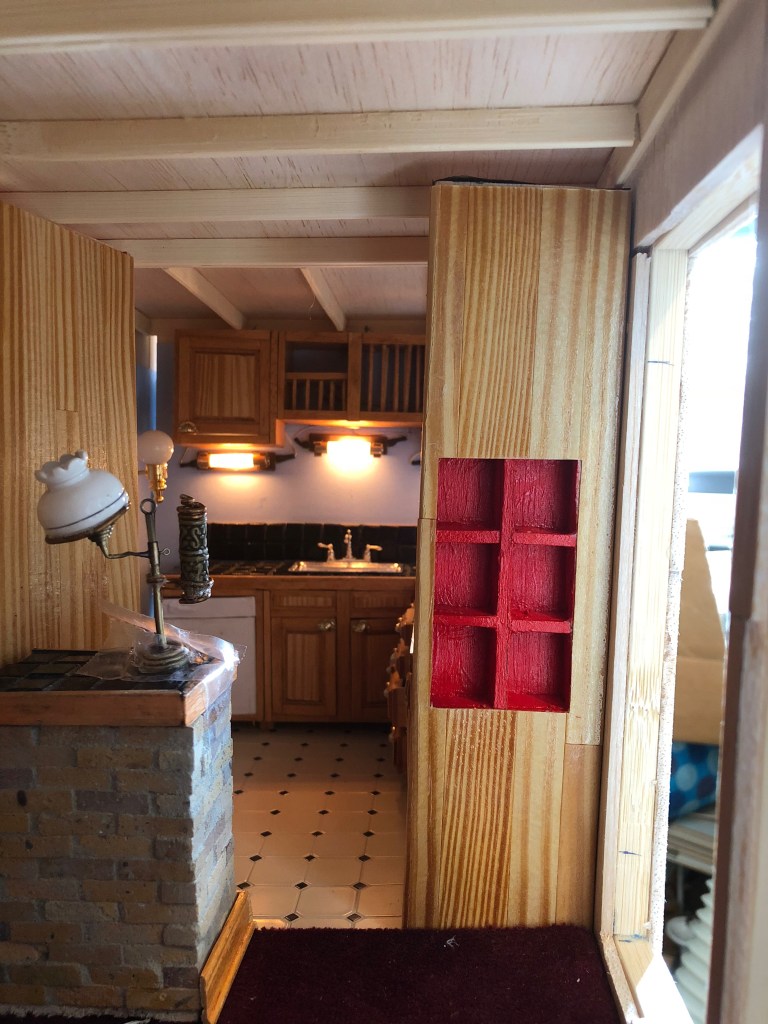
The house has several hinged panels. On the front, the “kitchen wing” is hinged to reveal part of the garage, the dining nook and kitchen, and the upstairs den.
If you know 3 Stable Mews well, you know we never see a garage or the upstairs (other than a brief glimpse upstairs in one of the Tara King episodes). I am having a wonderful time designing these spaces.
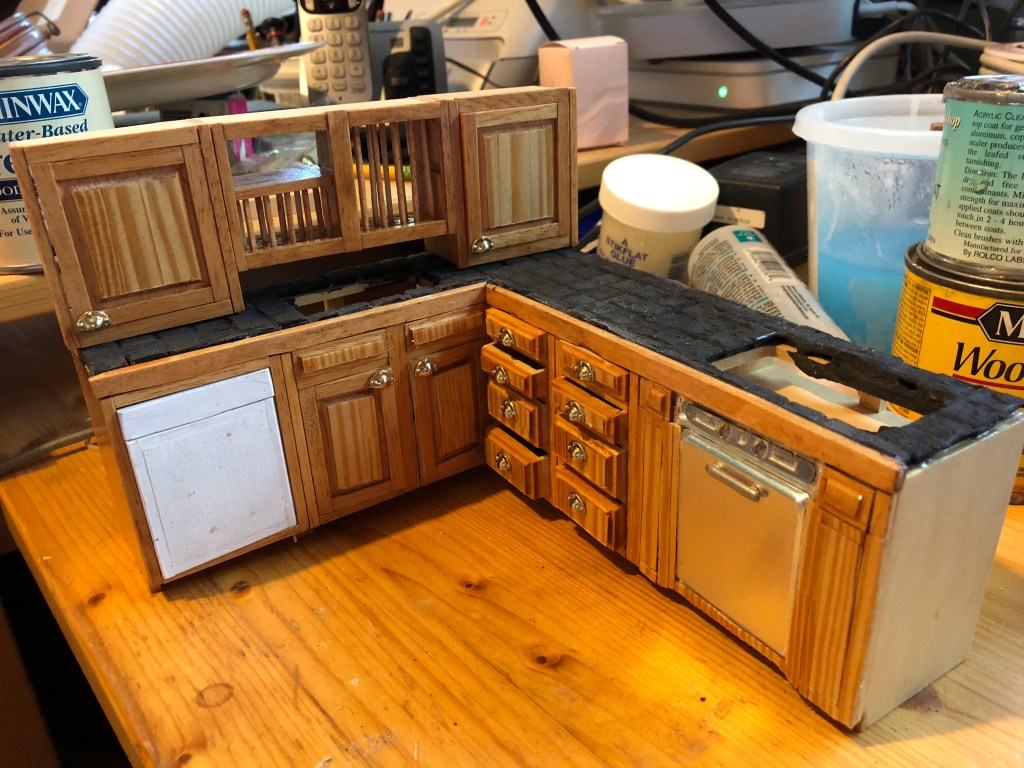
I focus on working parts. Cabinets open, drawers pull, the lid can be removed from the teapot. Achieving that sometimes means I purchase rather than build. I did try to build the kitchen cabinets, but my work was a failure so I bit the bullet and bought them unfinished. I did make the dish rack over the sink.
Miniature versions of some lamps in the flat simply can’t be found, so I make them. The whale oil lamp on the yellow brick counter is one such. This is a working light, although not on in the photo. And it needs some adjustment on the shade.
Wiring is a huge part of the project, and I have elaborate diagrams and inventory of bulbs and fixtures. The lights in the part of the flat we see on TV are not extensive, but my model includes two more floors and additional rooms. Wall fixtures and outlets have to be installed and wired as the walls go up. Other lights are held in storage until final decor.
While building is fun, I’ve taken even more pleasure in creating, or sourcing, decorations and furniture that match, as closely as possible, what we see on set. The dresser by the front door was a kit, but I created the brass supports on the ends of each drawer shelf.
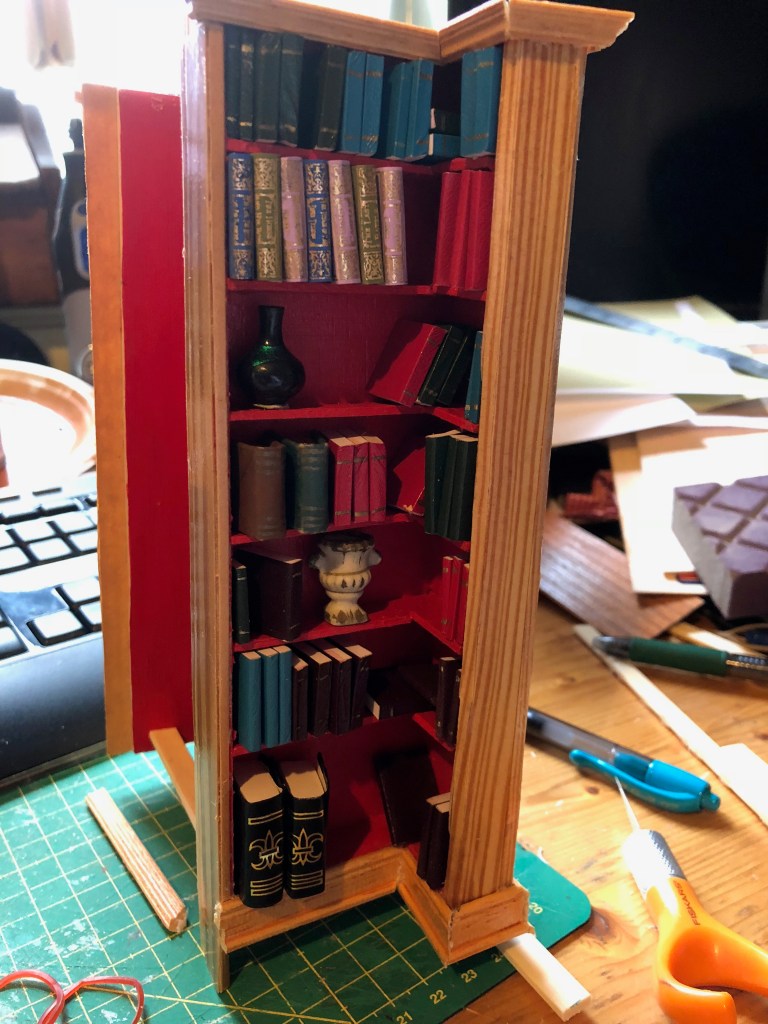
The step up into the “kitchen wing” makes design of the bookcase and chair nook by the door tricky, so it’s entirely hand made. All of the miniature books can be opened, although most are blank. The white chalice is one of those trinkets I acquired as a child. The dark bottle on the shelf under the pink, green, and blue books (the Chronicles of Narnia, in fact) is a raku pot I found in a shop in California.
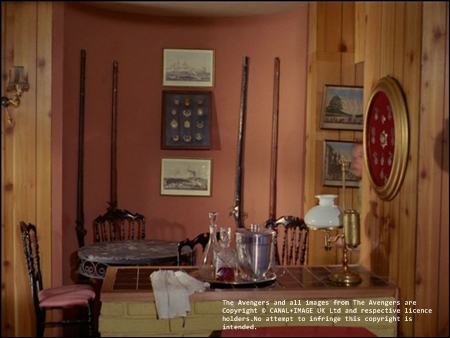
Among the most recognizable decorative items in Steed’s home is the series of pictures of military figures. It took some hunting, but I found ’em.
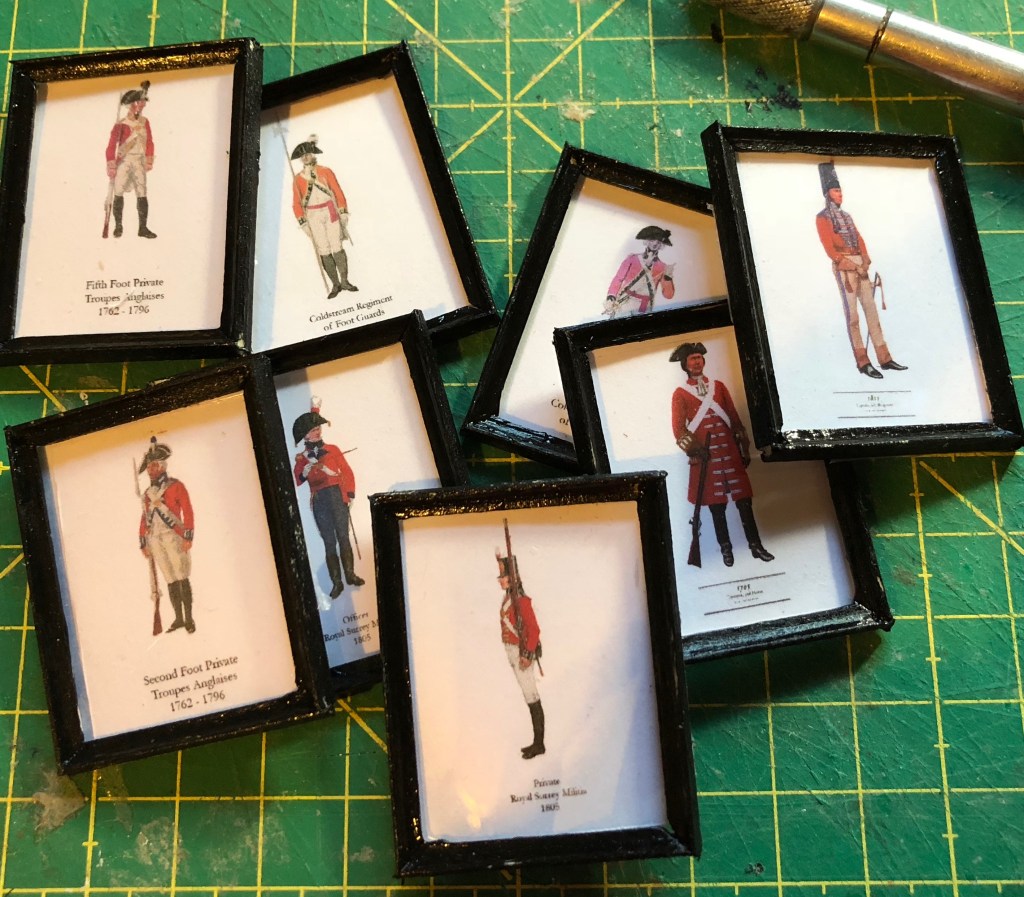
I picked the images that seemed closest to the ones on Steed’s walls, shrank them, and printed them. I made the frames from miniature frame molding.
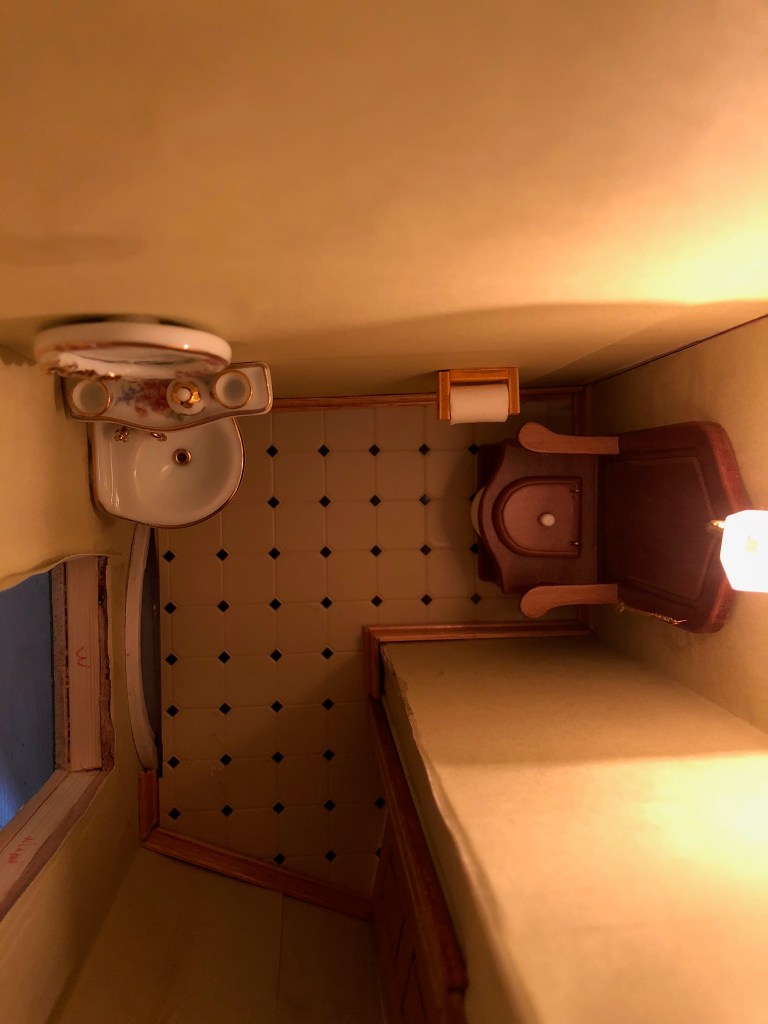
The main floor has two invented rooms. One is a powder room behind a door in the living room that we saw in perhaps one episode. This tiny space over the building entry has a throne-like toilet, a corner sink, and a mirror. And while you’re on the throne you have a view of the street. The odd looking curved space on the left below the sink is the top of the arched window over the front door. It extends higher than the first floor level, so the bathroom occupant can see out through the top of that window, too.
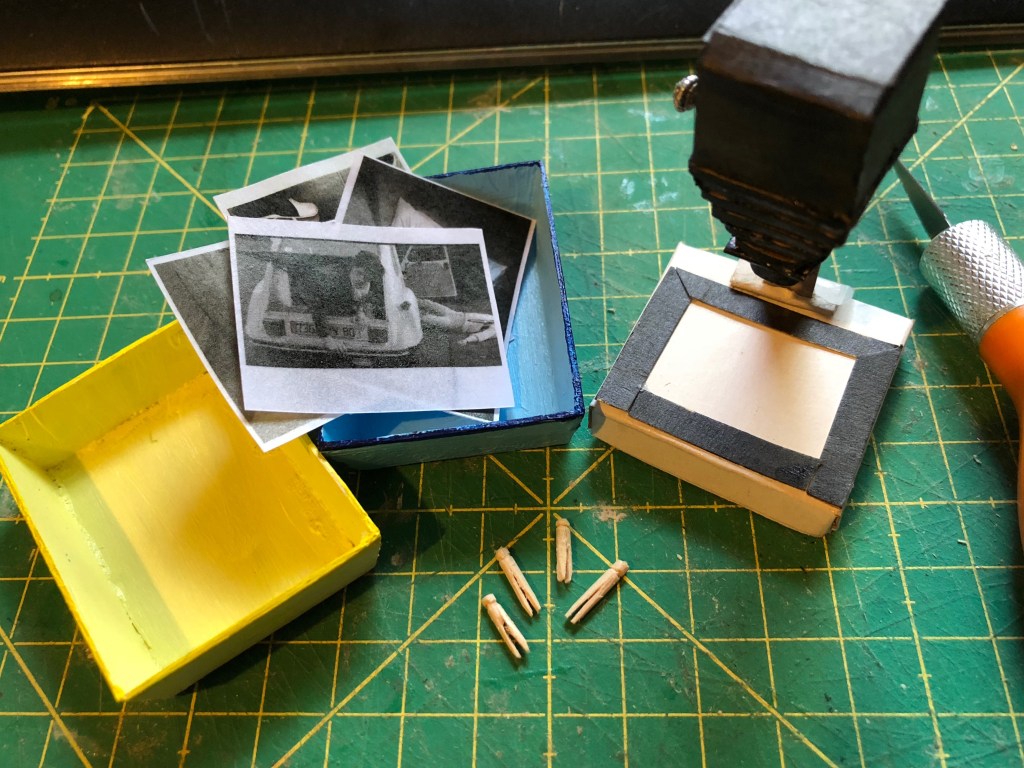
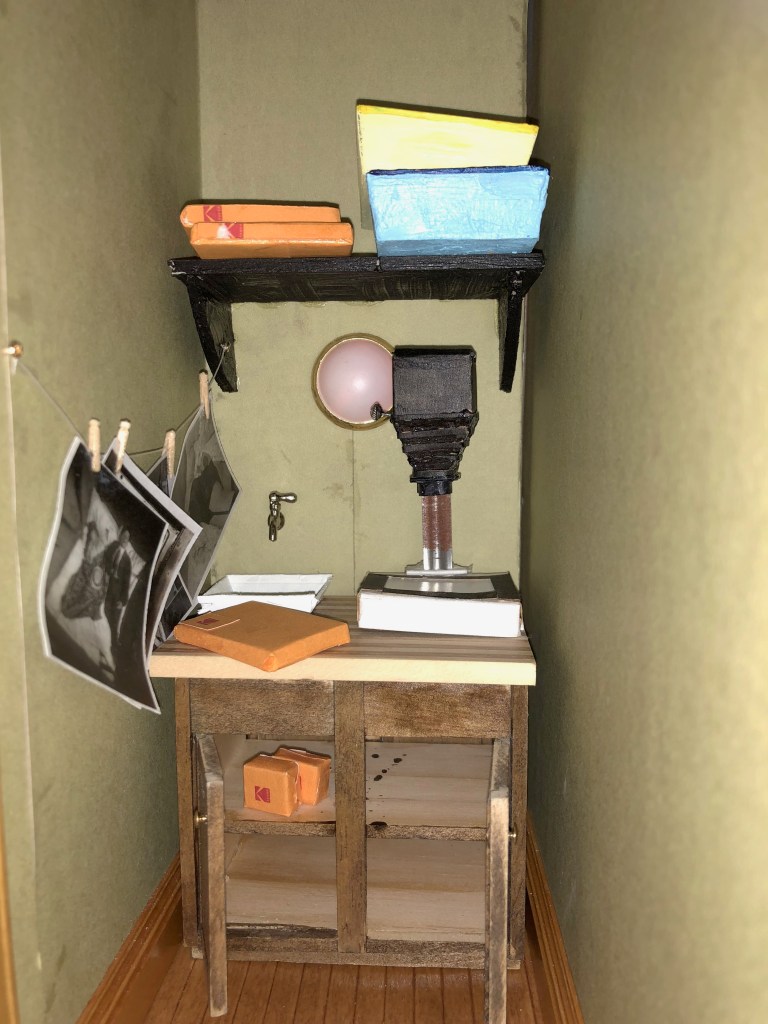
For a number of years I kept a eye out for a dollhouse size photo enlarger. Finally I searched for images of them and constructed it myself. It’s all cardboard, except the bar that holds the enlarger up above the paper platform–that’s part of a metal bar out of a hanging file folder. The clothes pins to hold the wet prints are carved from toothpicks. The photos are old crime scenes I found online. I made the developing trays by hand and color coded them for developer and fixer. I learned black and white photography in college, so I had a good idea of what supplies a well-appointed dark room needs.
The full darkroom has a red light, a sink, and packages of Kodak paper and chemicals. It’s inside that closet off of the living room.
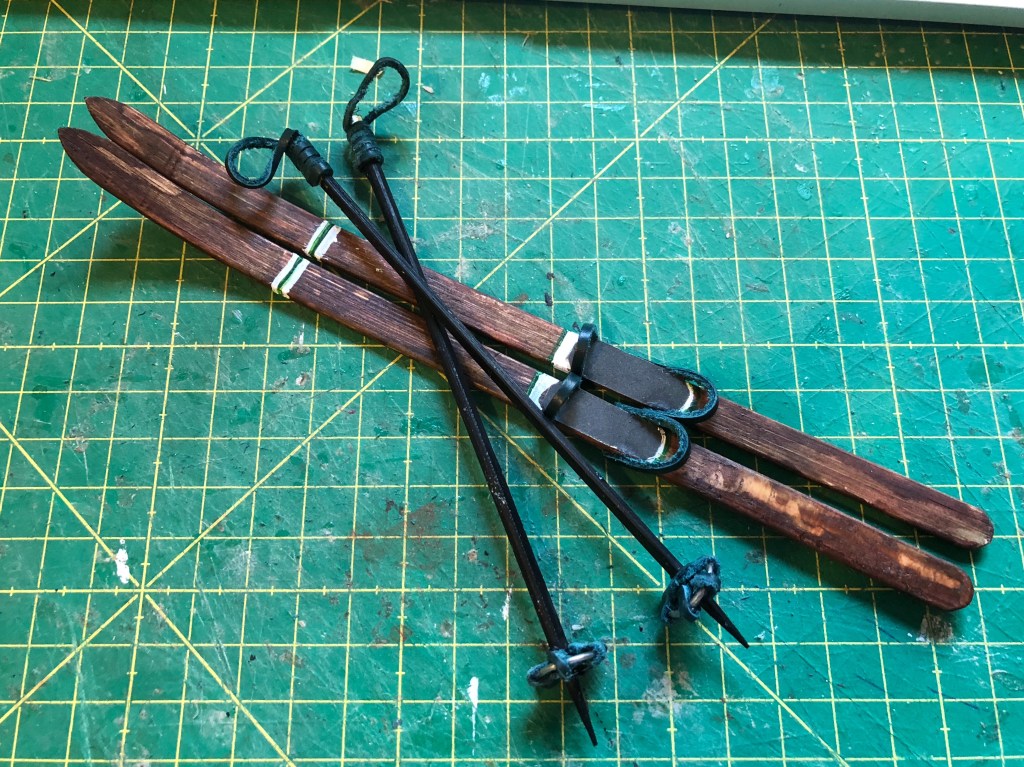
Taking inspiration from an episode when Steed is coming home from holiday, riding in a taxi with a huge collection of sporting equipment and luggage, I decided he must have a massive closet. So I began collecting and making all that gear. The closet, is, of course, the one off the living room that also houses the darkroom.
Unfortunately, until wiring is done and things are somewhat settled, installing everything into the closet has to wait.
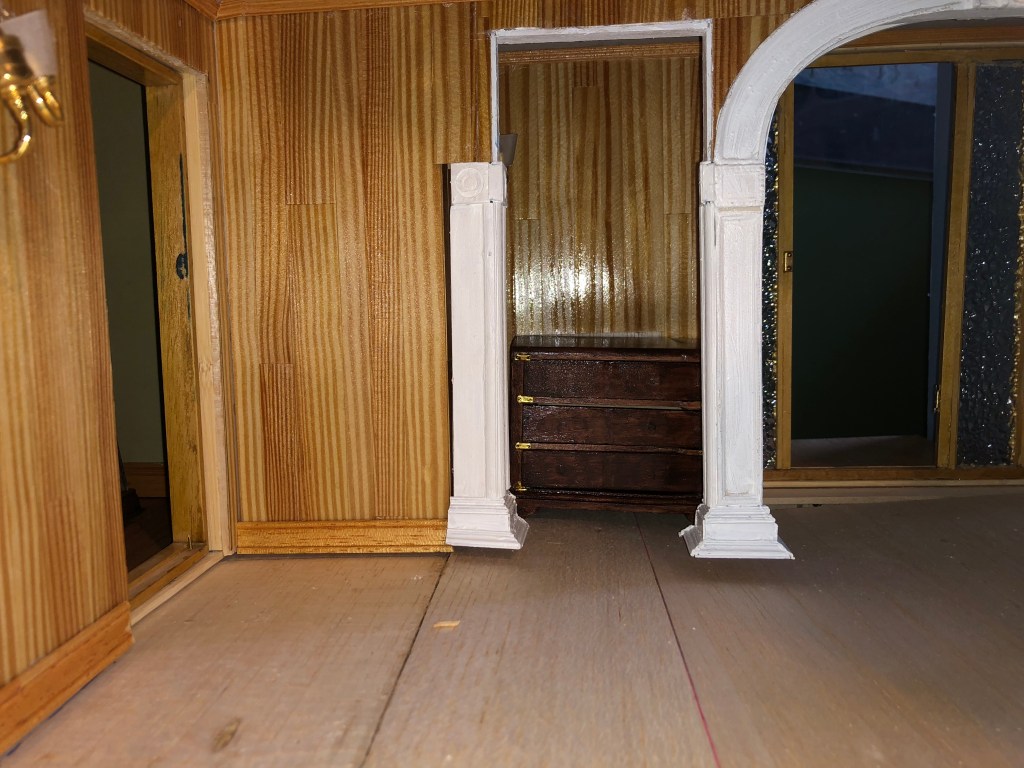
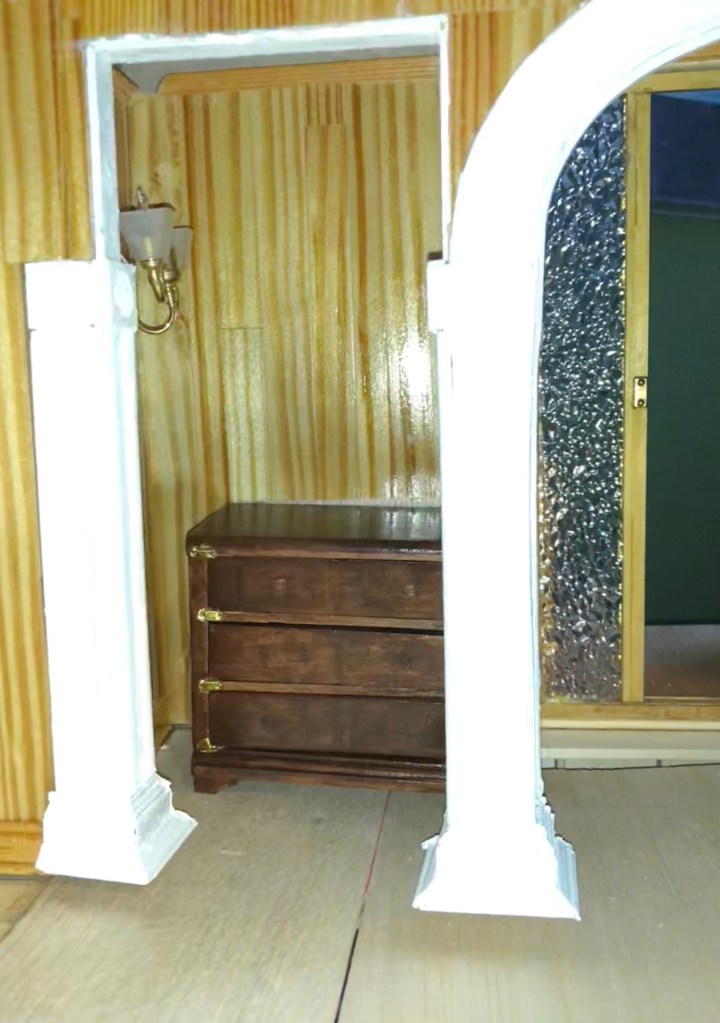
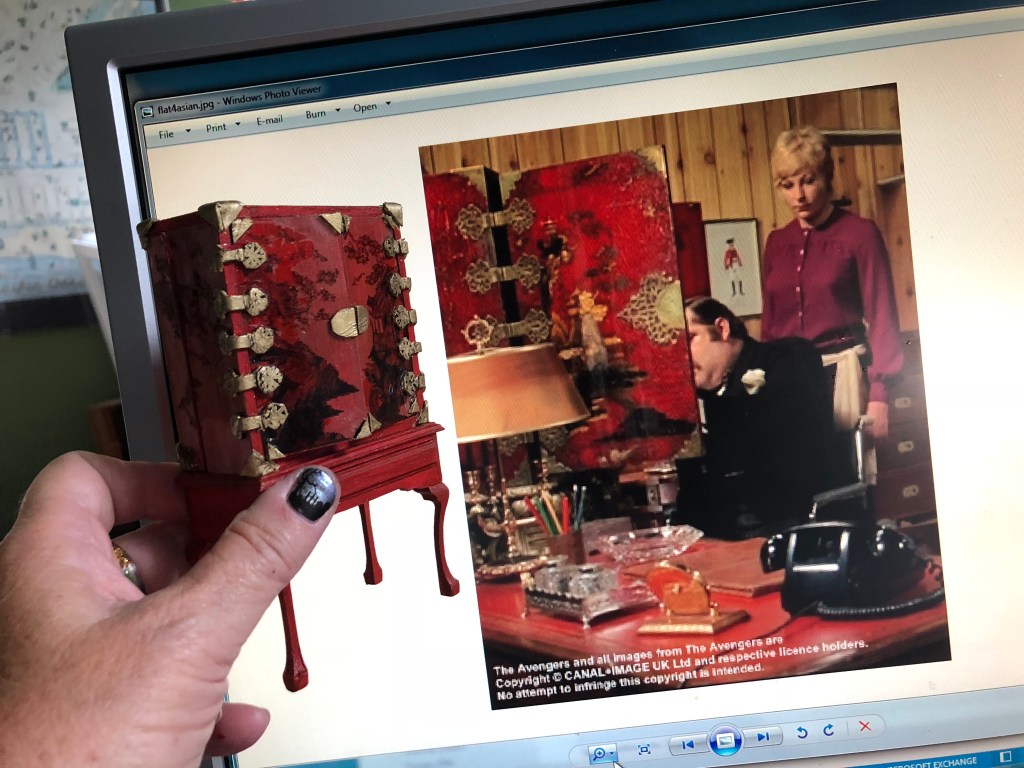
After years of looking for an dollhouse sized oriental cabinet, and finding them available for several hundred dollars, I bit the bullet. I used two furniture kits, a hall table and a cabinet. The table is wider than the cabinet depth, so I constructed a secret space on the back.
The hardware is all painted leather.
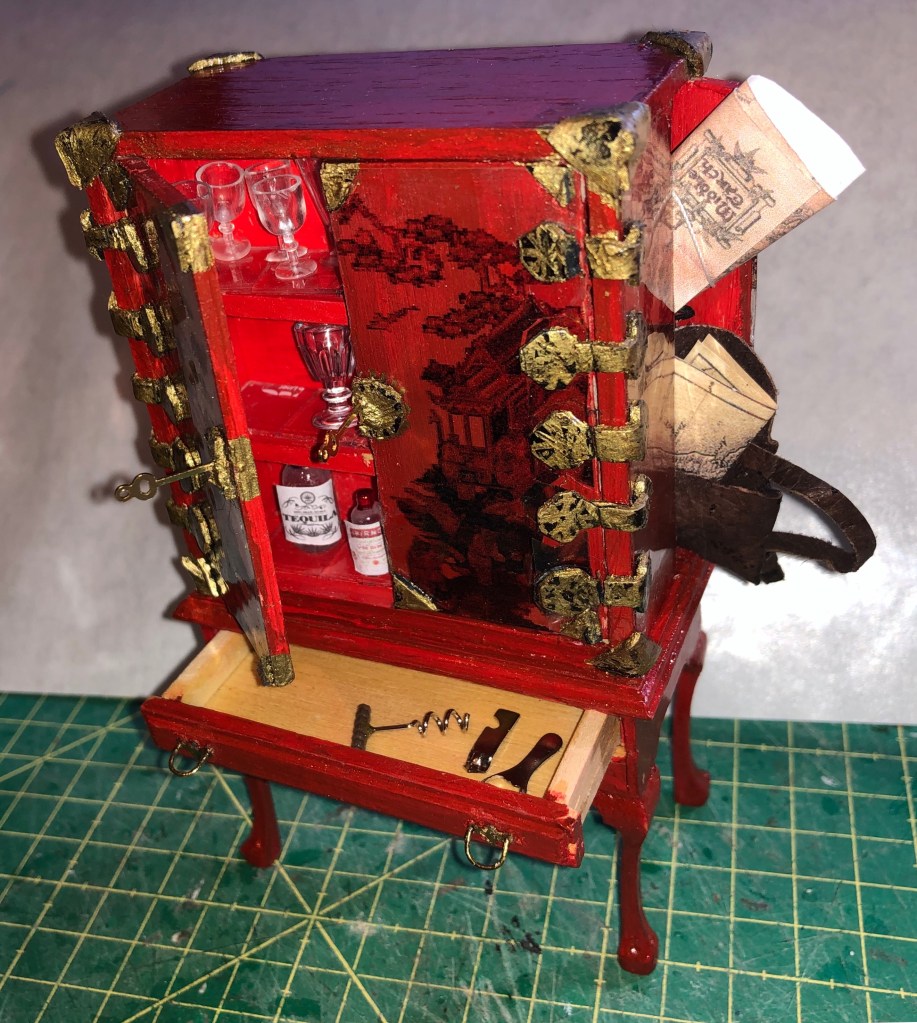
I’m not up to recreating the landscape painting on the doors. I found a similar image online and printed it onto a transparent sheet. I painted and varnished the base cabinet, adding more varnish until it shone. Then I laid the transparent sheet onto it.
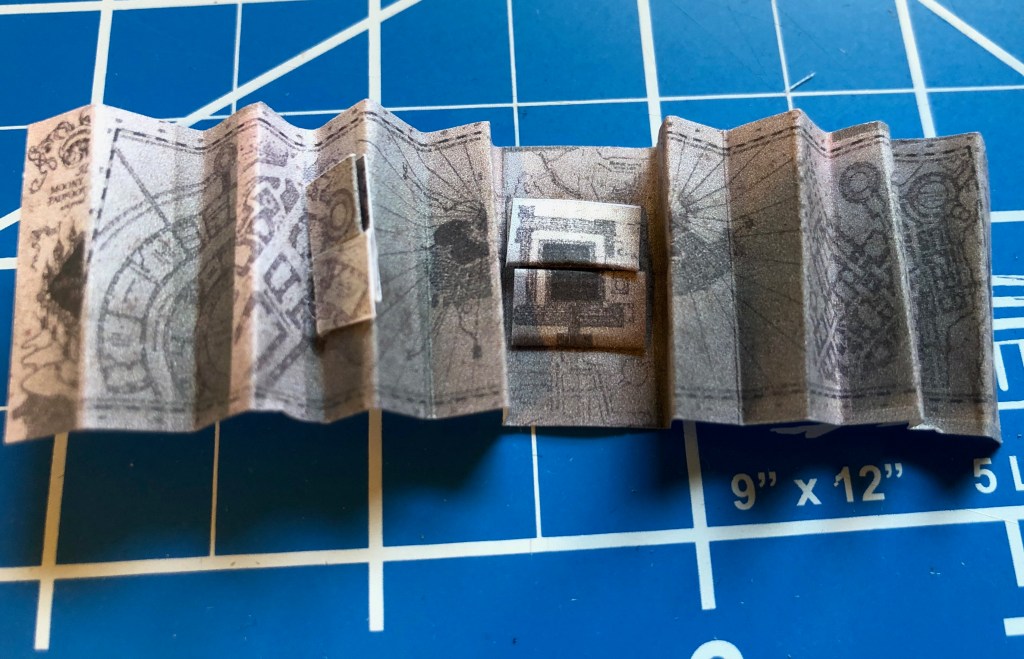
I have a full sized Marauder’s Map, purchased at Universal Studios. I photographed every panel and shrank them all down to the right scale, then reassembled in a photo editor. Printed, attached the extra flaps, and folded. Sounds simple, right? Not.
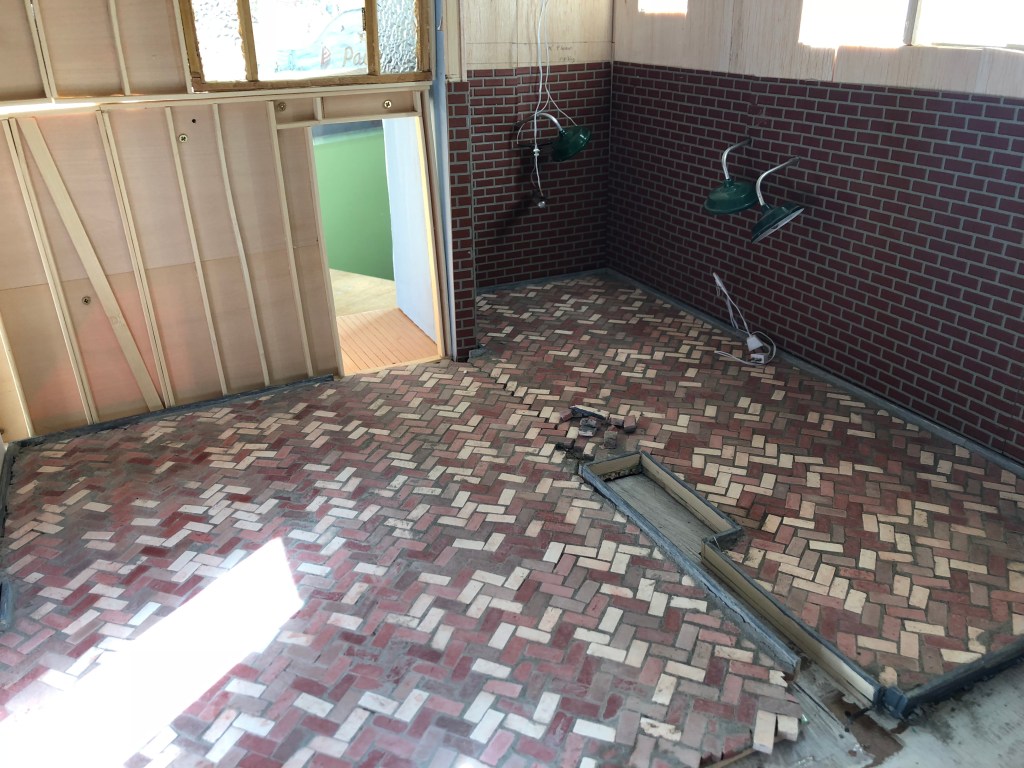
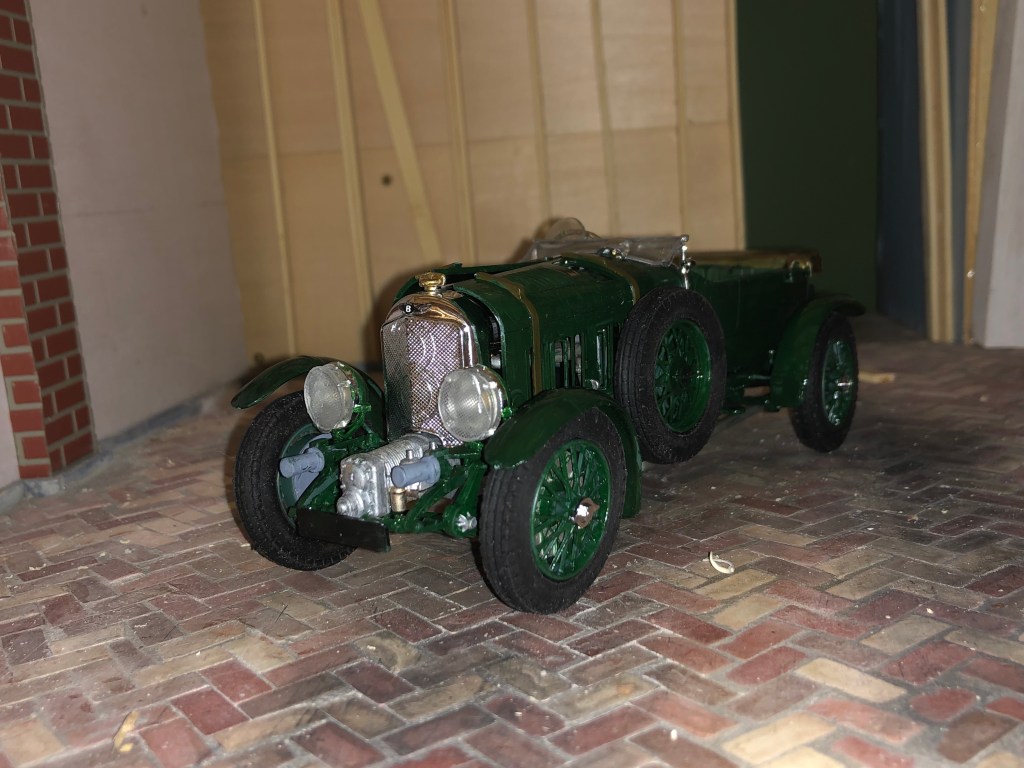
We never see a garage at 3 Stable Mews, but it stands to reason Steed has one for the Bentley. This opened up a whole realm of fun miniature possibilities. I ordered real miniature bricks and mortar and created a frame for the floor. The odd shaped slot in the photo is for a support wall that holds up the living room. this view is from the garage door looking in toward the door out to the inner hallway. There are lights on the right wall where a workbench and tool cabinet will go. And all of the house’s wiring will collect here to attach to the main line in.
One of my favorite items in the garage is the tall tool box. The one on the right is available for purchase, but it has non-working drawers, and when I was shopping for it, it was about $60. I made mine from scratch out of basswood.
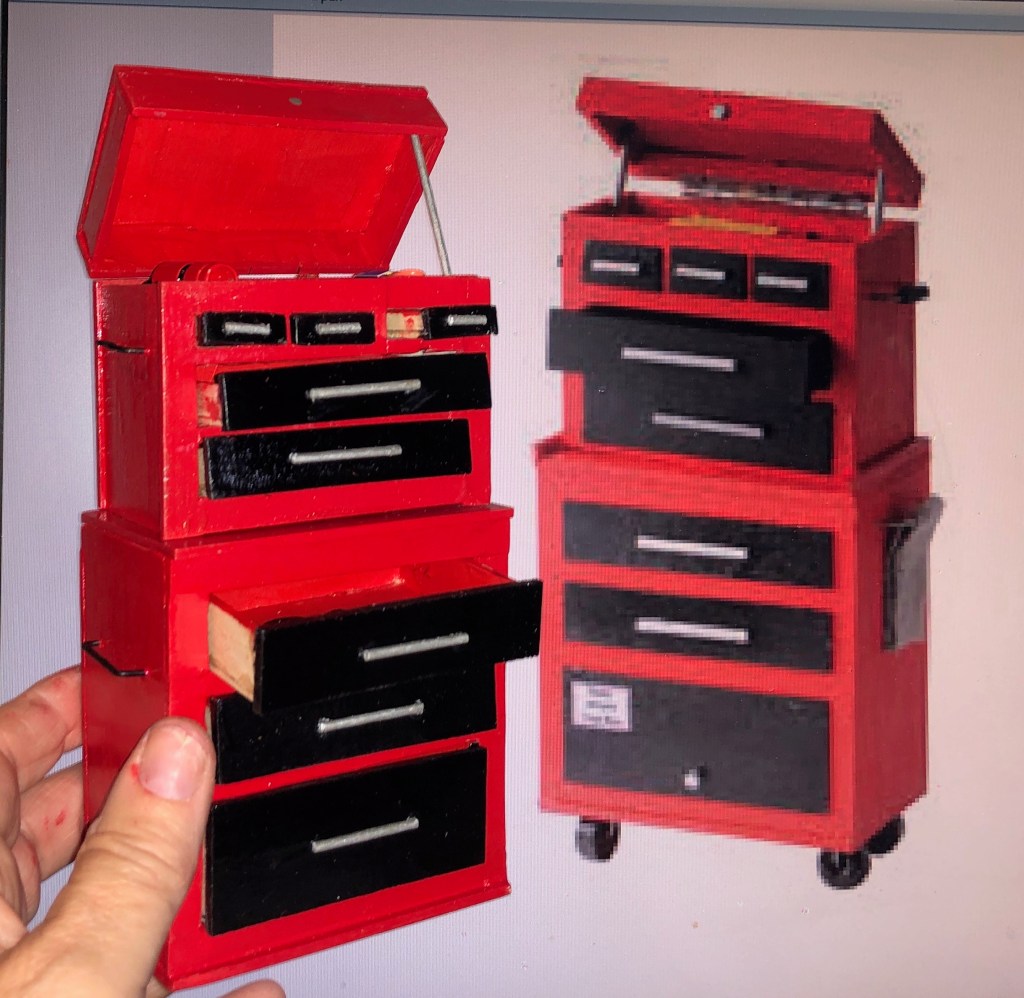
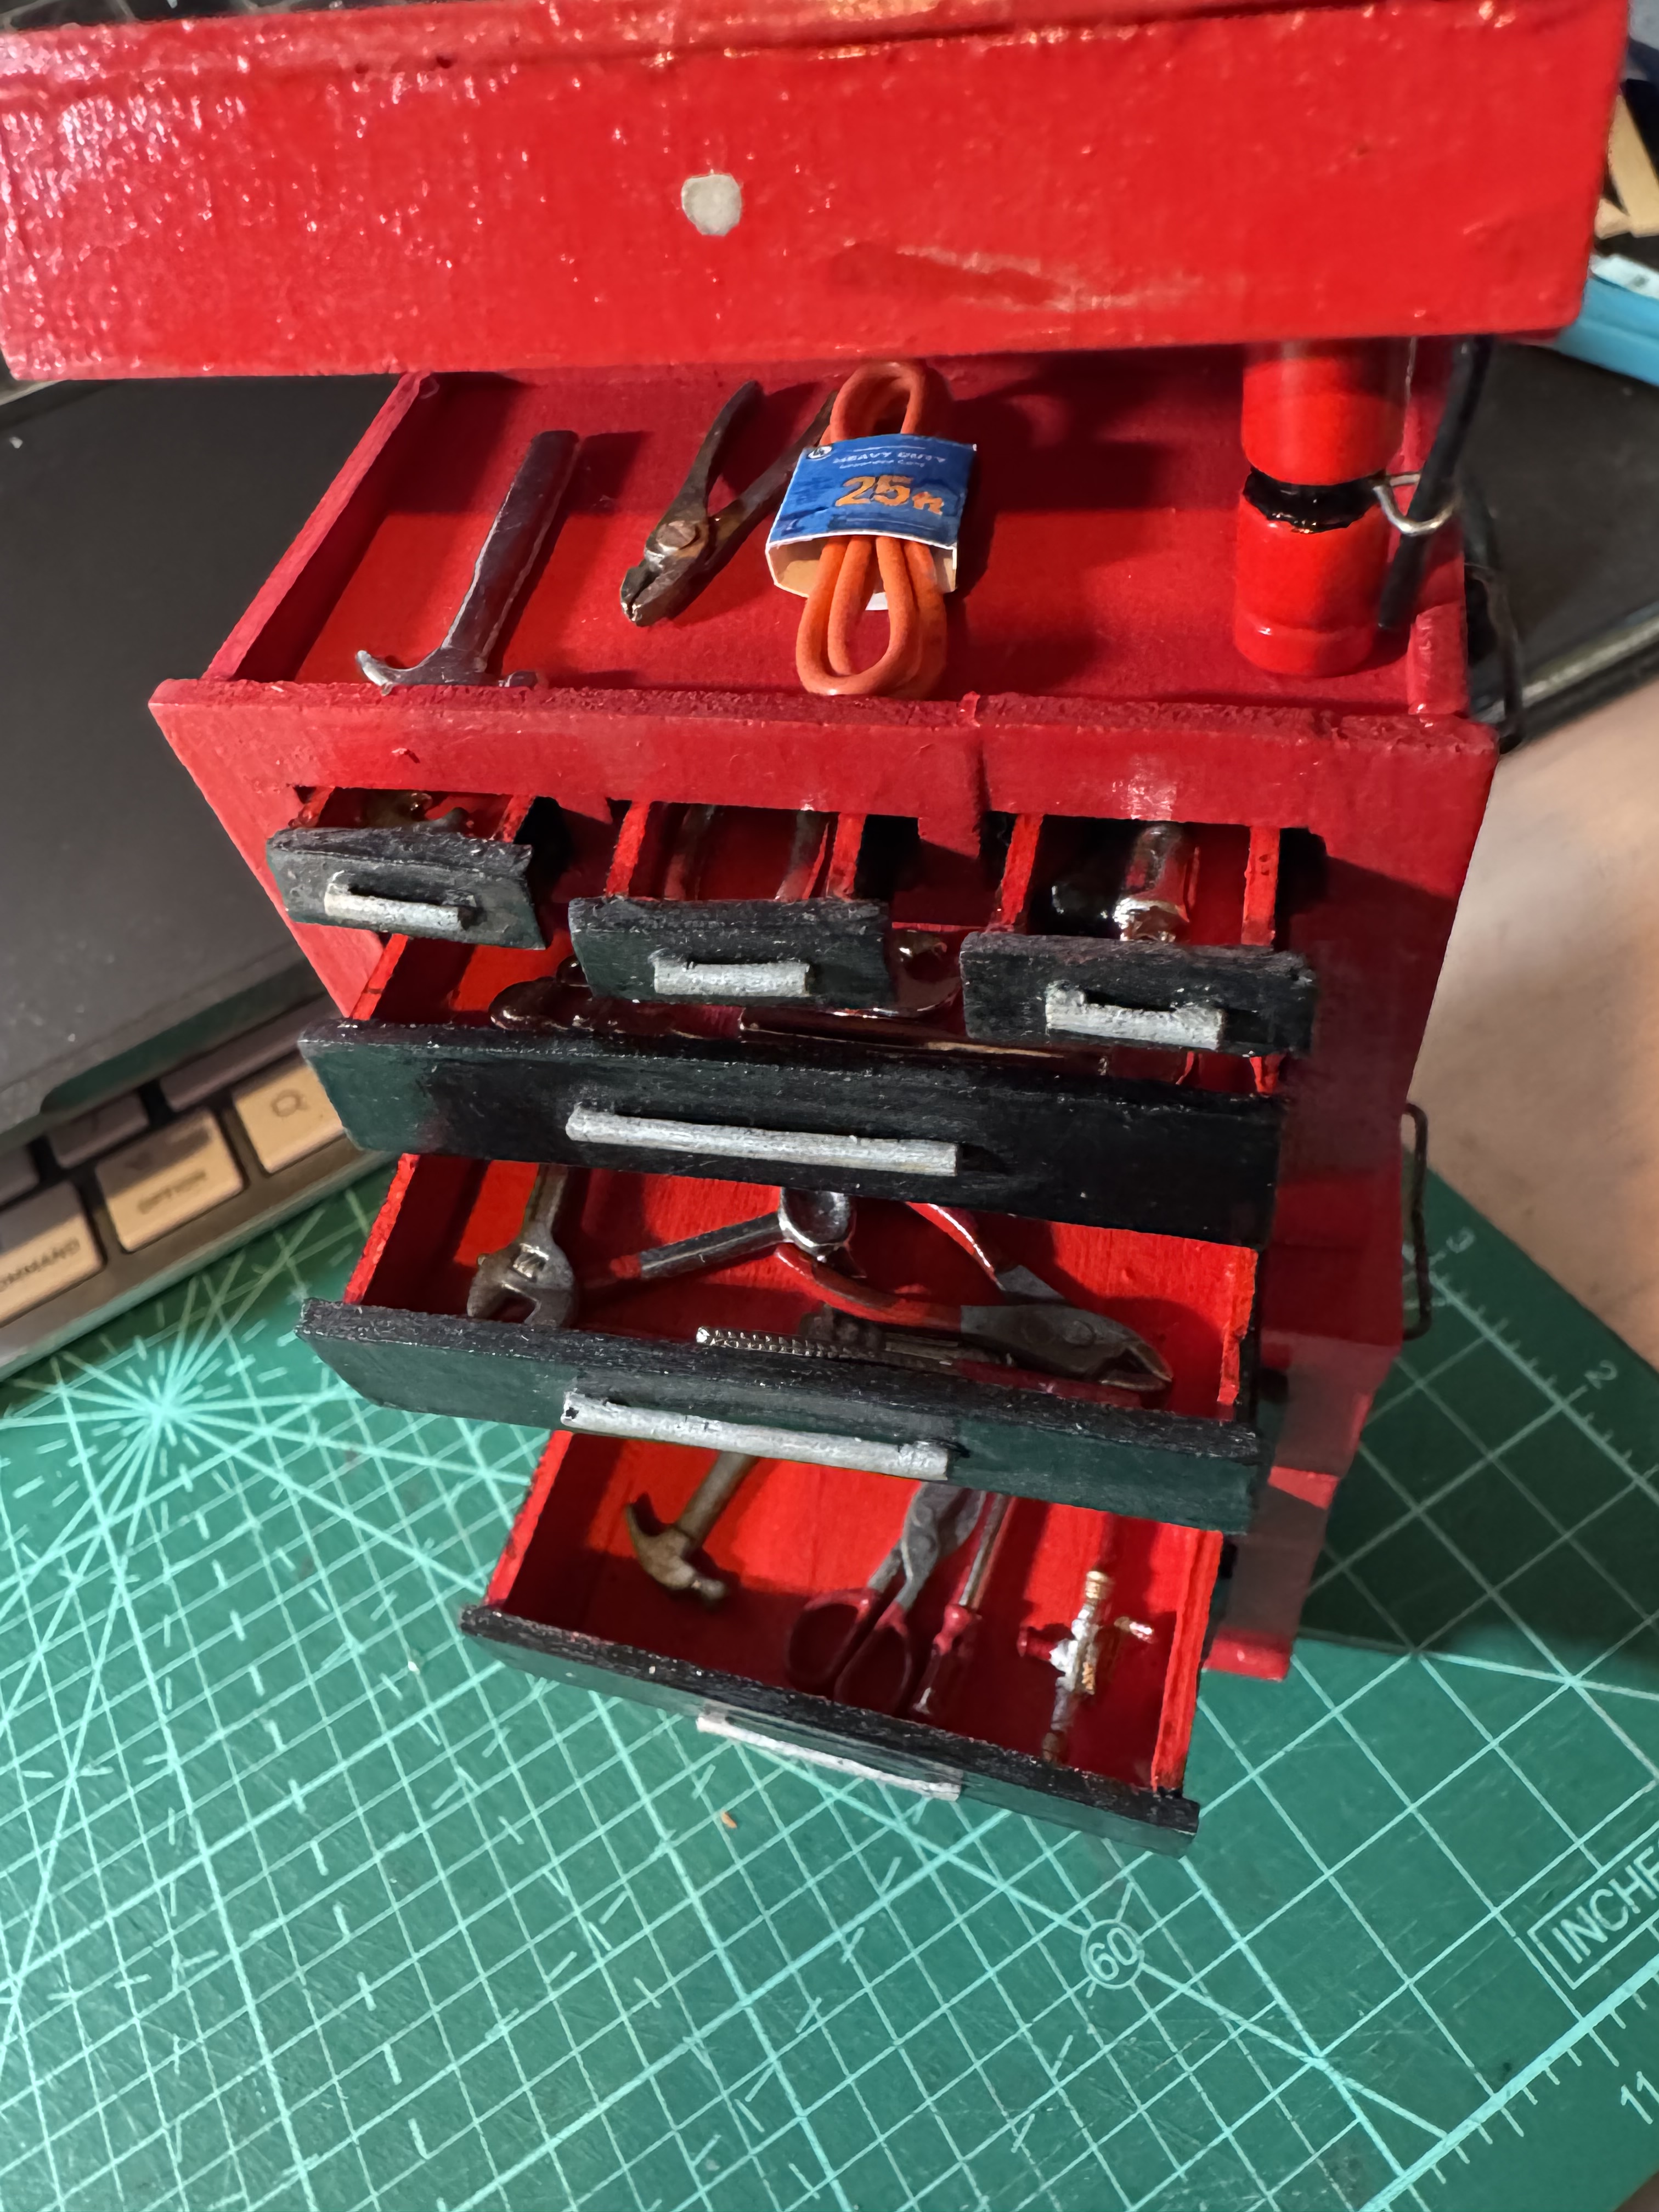
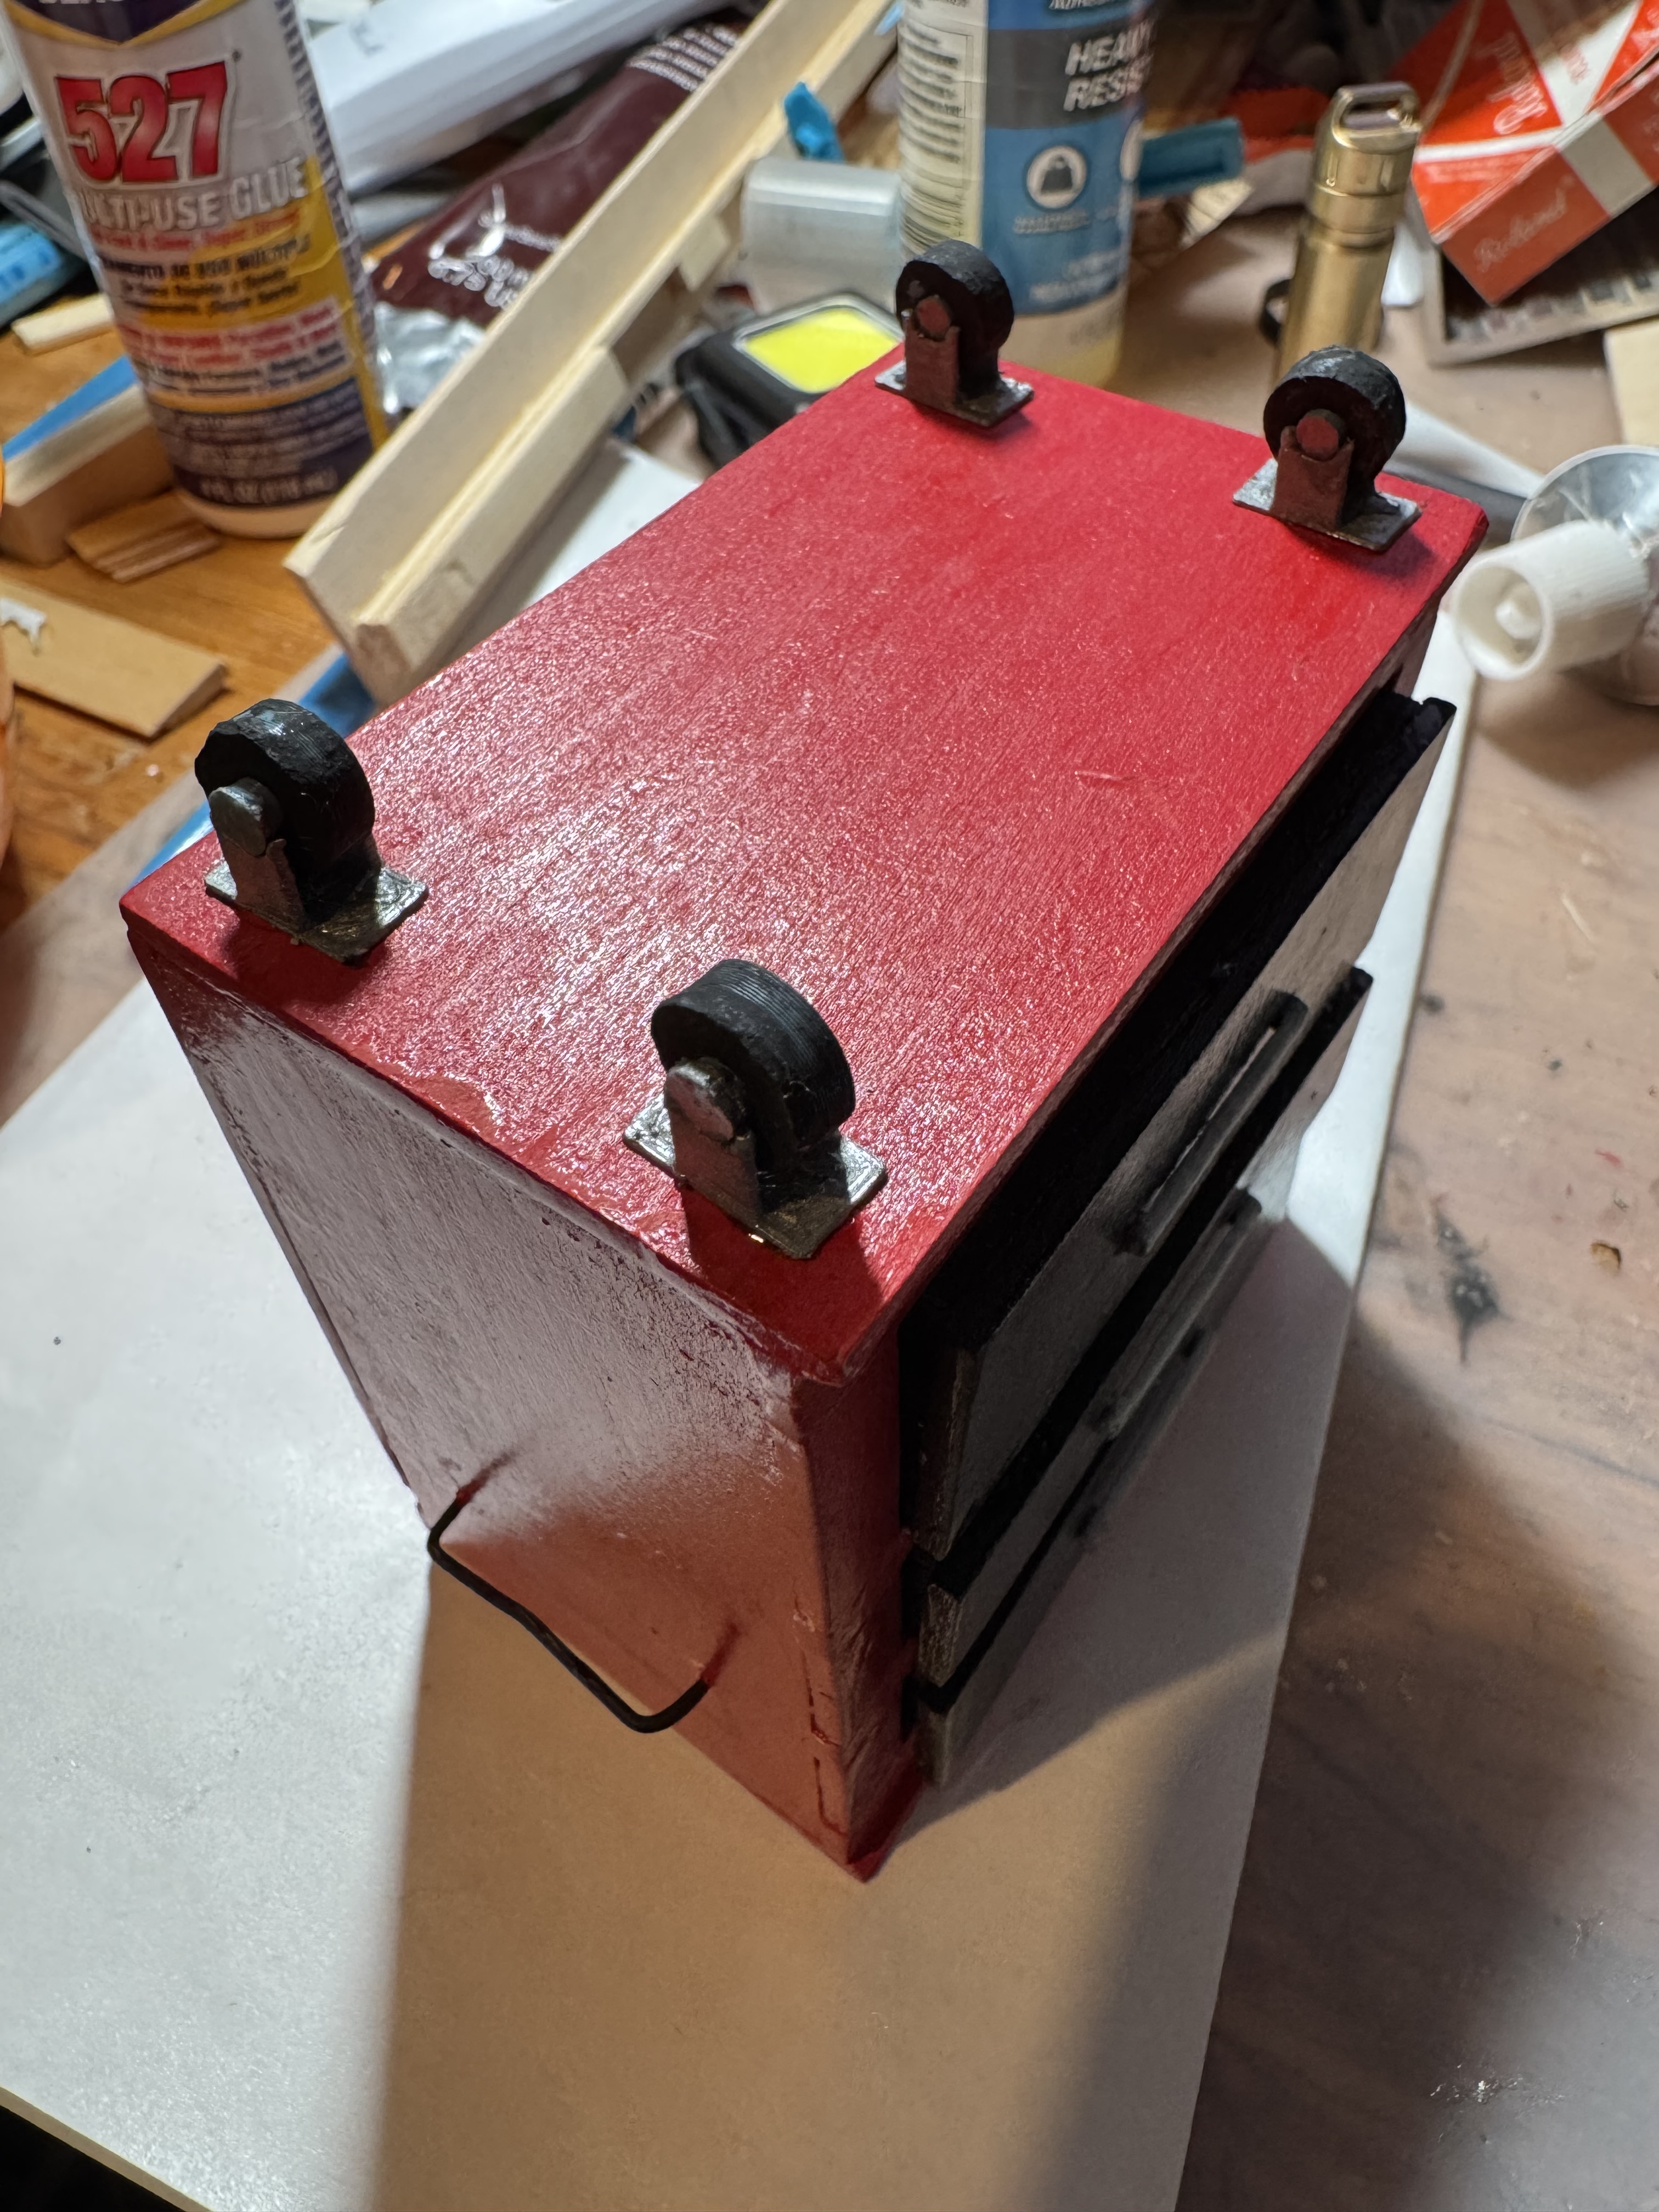
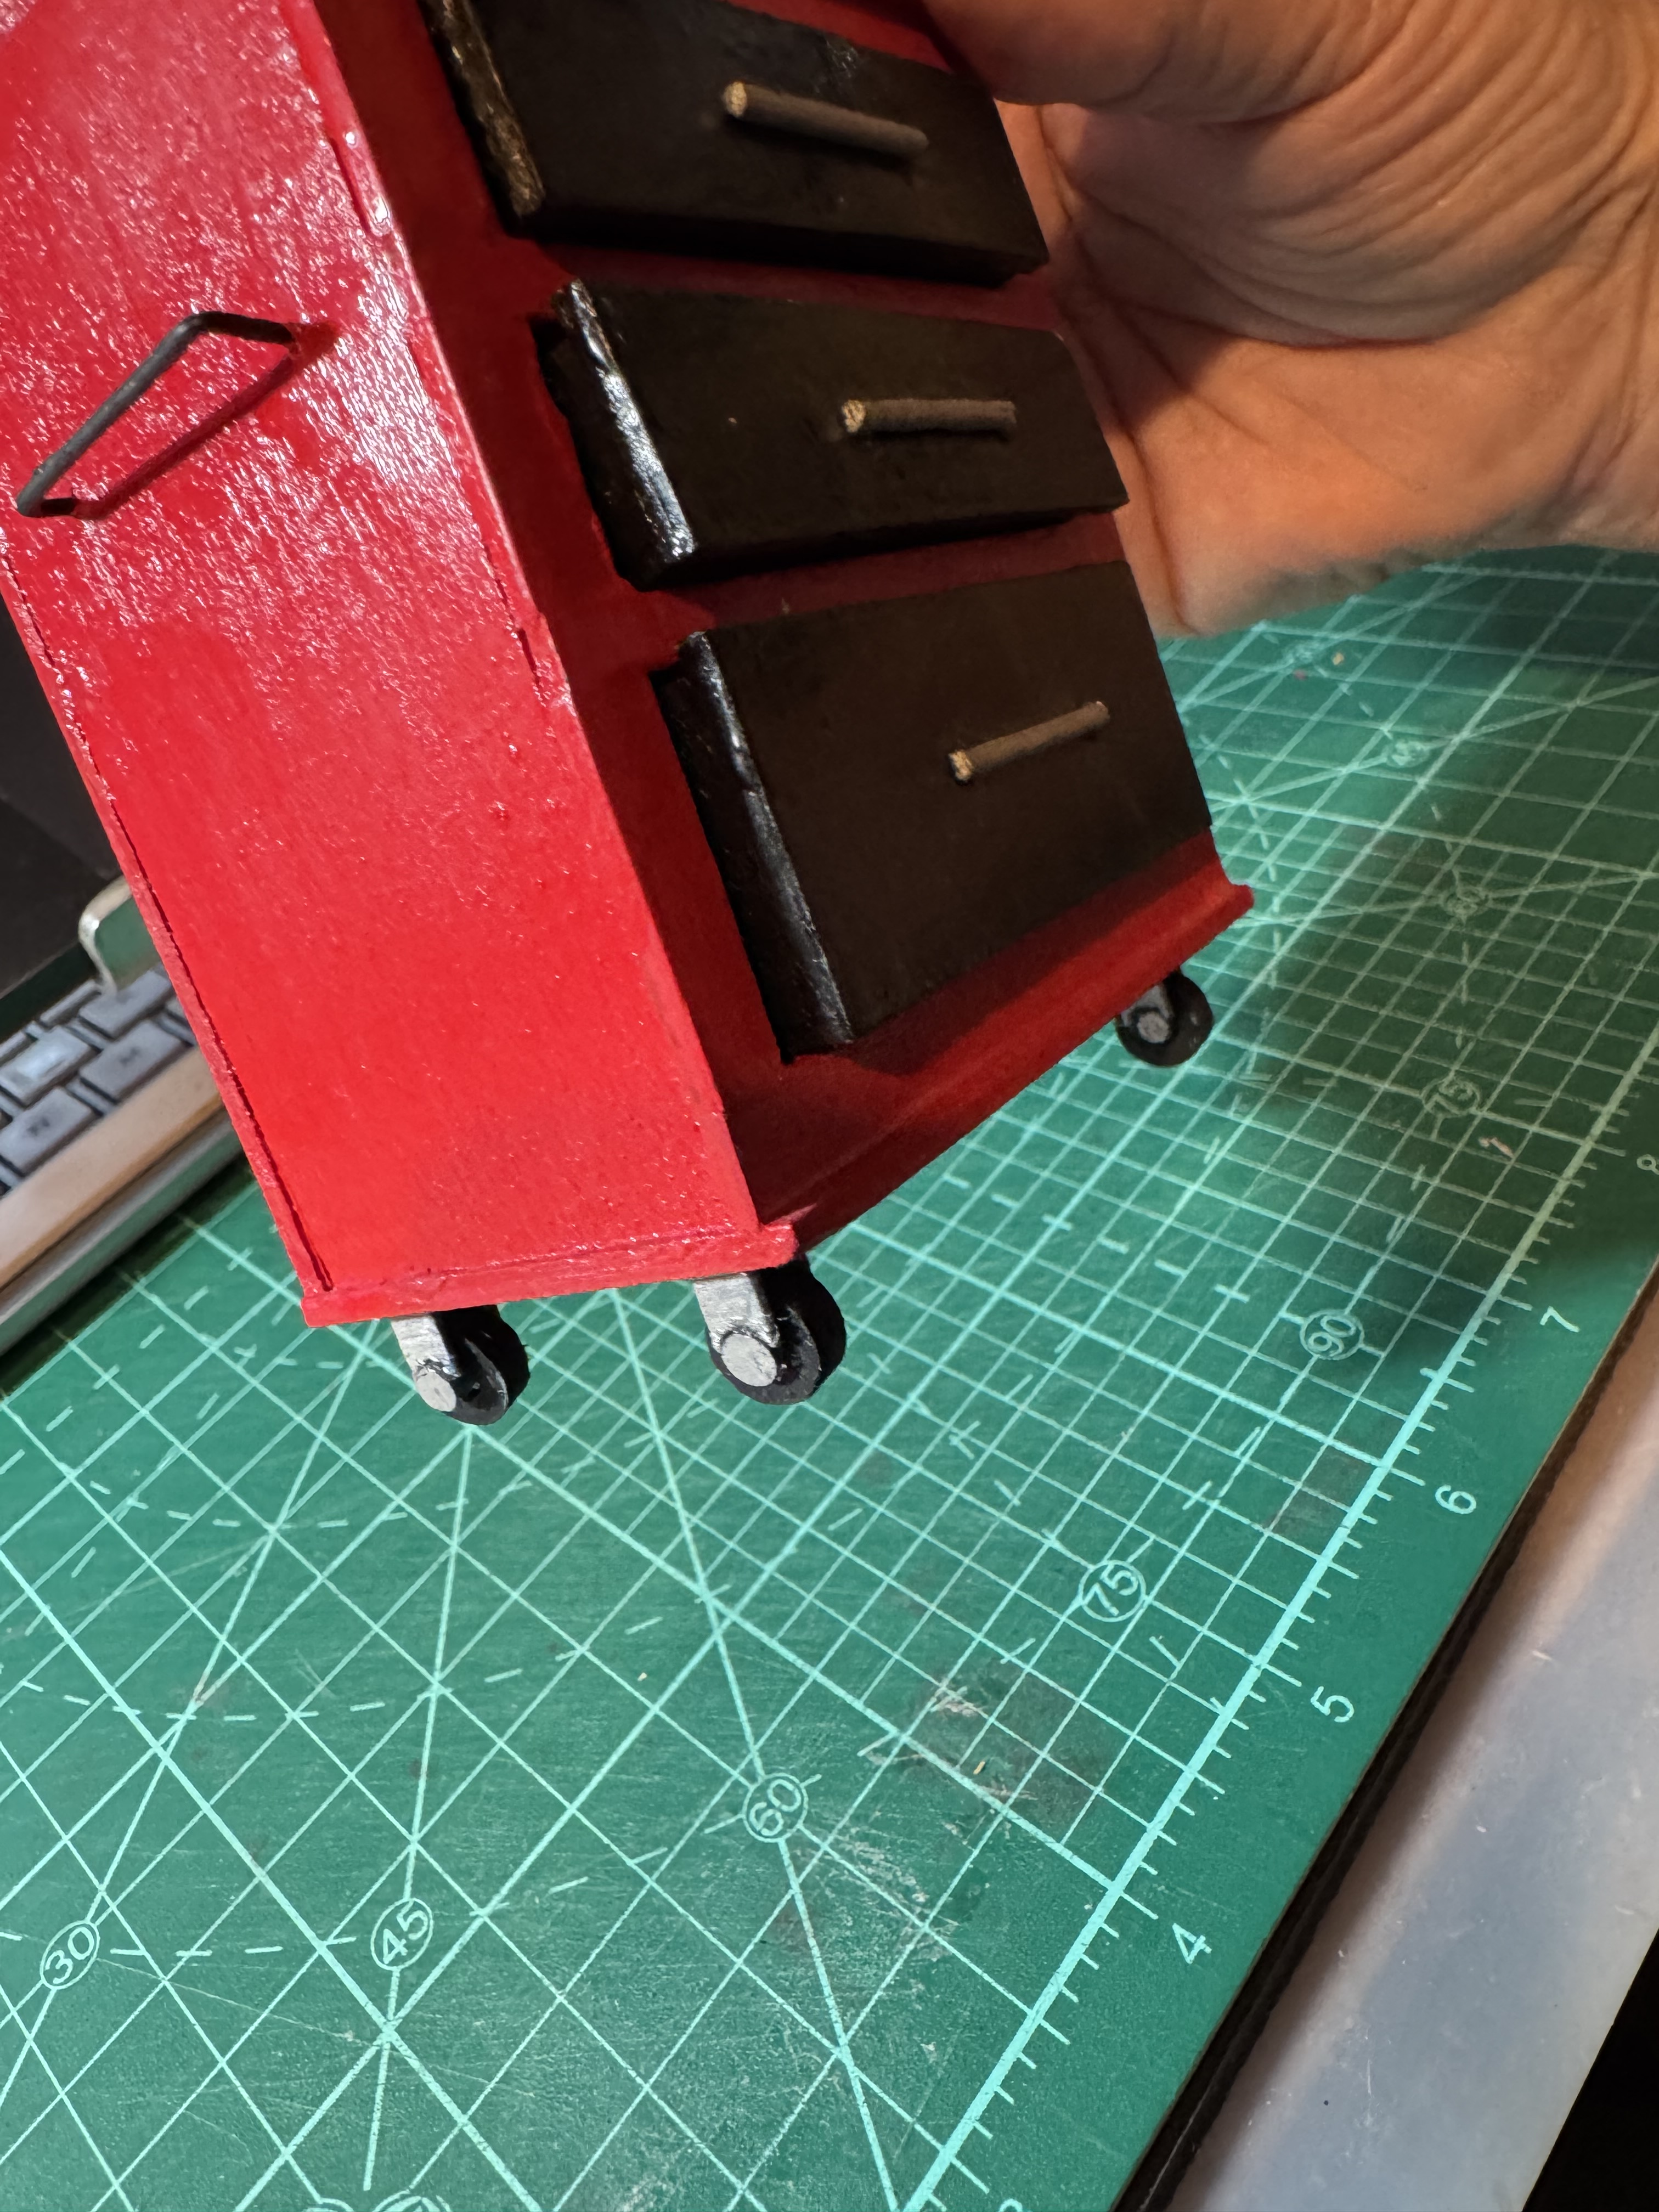
The drawer handles are toothpicks painted silver. The side handles are bent paper clips. The drawers are loaded with miniatures tools. The wheels were a challenge until I got the 3d printer. I designed the castors so that the wheels turn, but sadly the castors do not pivot. Maybe a later iteration.
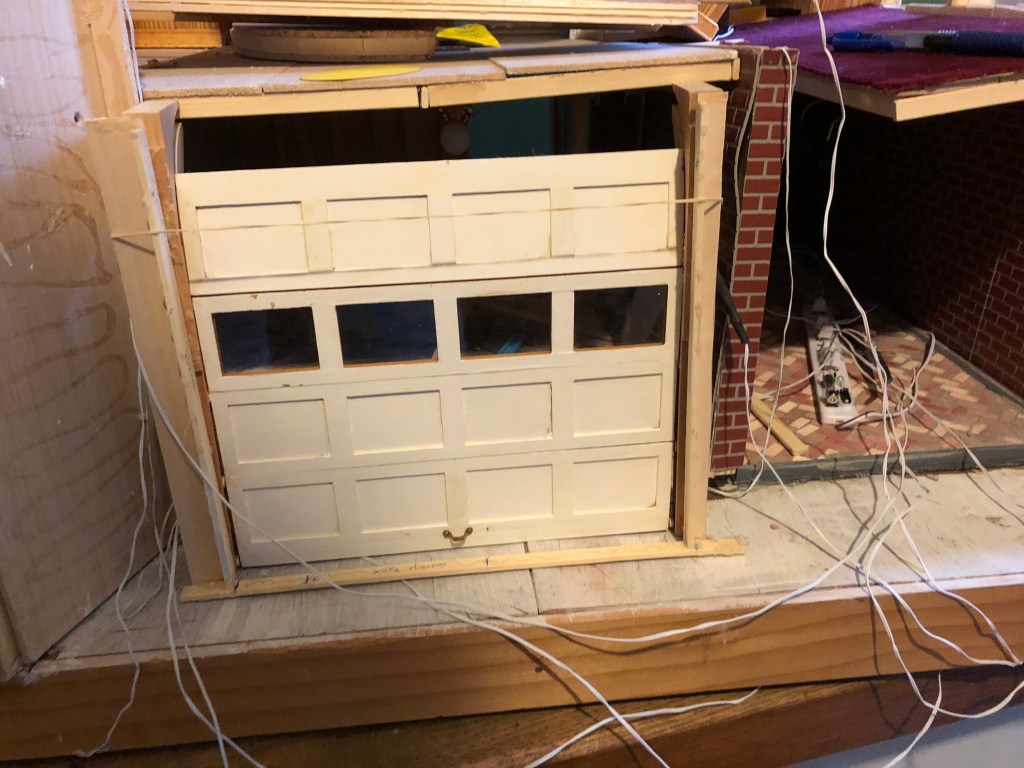
I bought the working garage door way back for the first version of the house. From the start it was fidgety to install, with tracks on the ceiling for the door to roll up into.
.
To the right of the garage door is a window looking into the garage. It’s in the hinged panel on the “kitchen wing” that opens to reveal that side of the garage, the dining nook and kitchen, and the upstairs den.
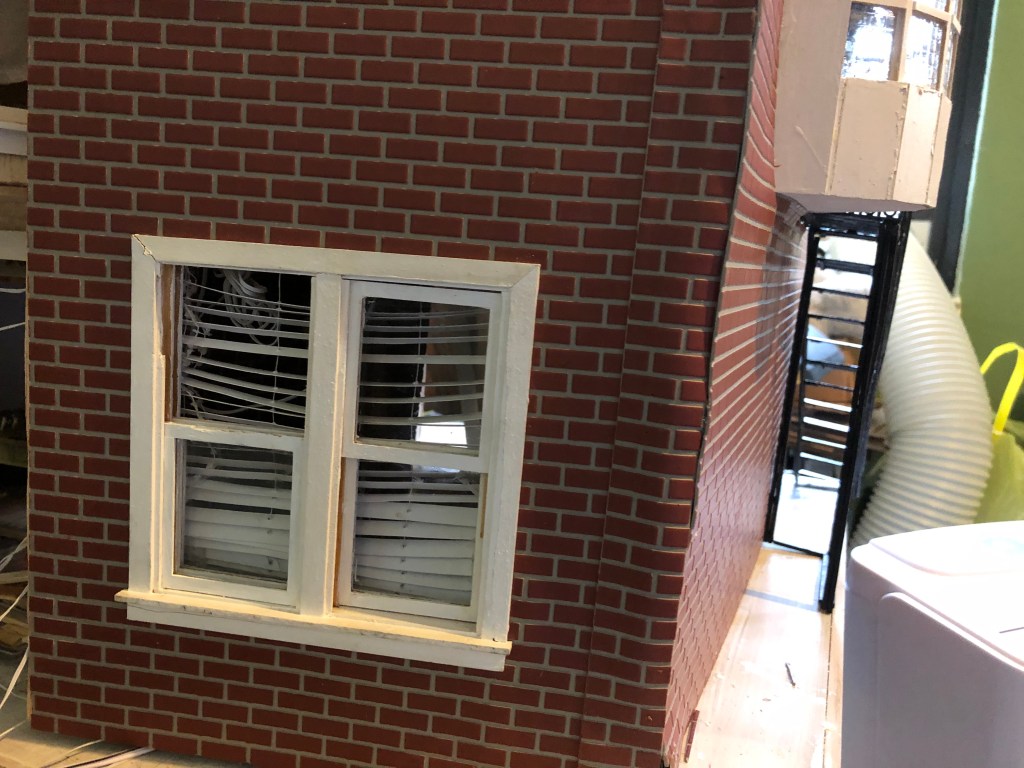
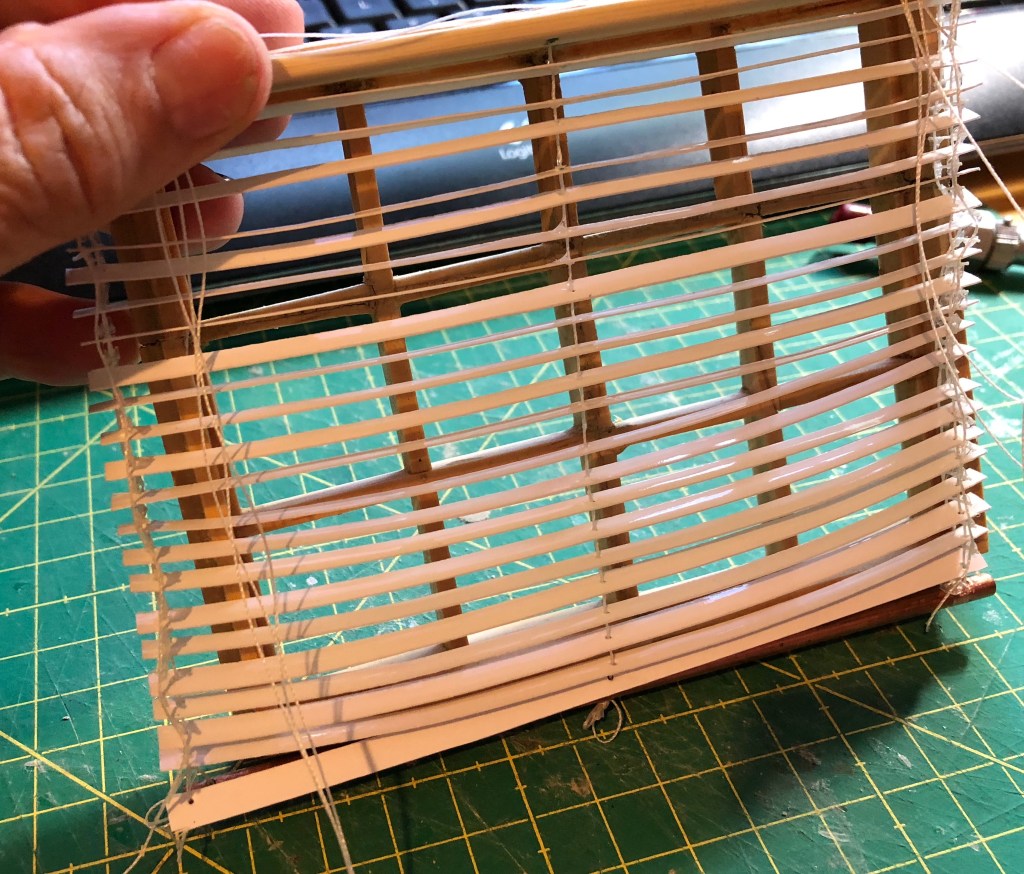
I was thrilled to find a tutorial on making working dollhouse size venetian blinds. The slats are photo paper, cut to size with holes drilled in the ends and center. The “cords” are heavy thread. While the blinds do work, they are touchy–best set and left alone.
Working our way around the building, this is the second incarnation of the fire escape that we know must exist, but never saw. That’s the kitchen door, and the kitchen window with its blind inside. And of course the glass semi-circle that houses the spiral staircase.
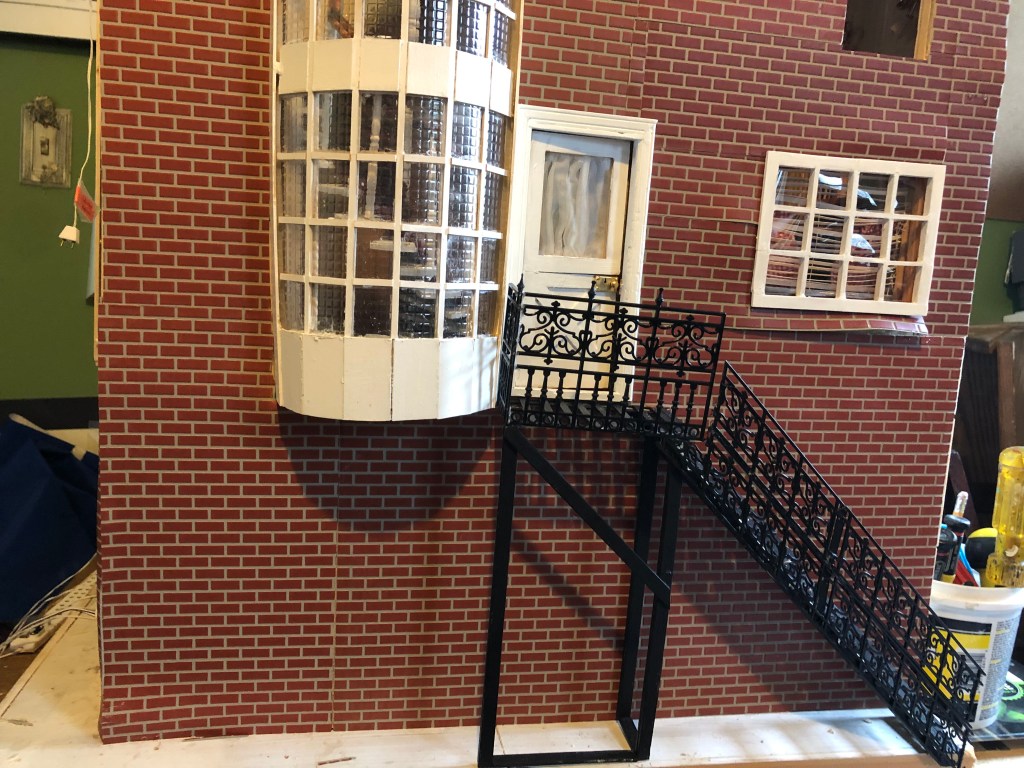
The stairs are handmade, with notched bamboo strips to hold the steps and also used for the vertical supports. I bought the fancy railings.

The back of the dollhouse is a “cutaway” of the building’s interior. The entire back side of the garage, and of the living room/closet are hinged. The stairs up to Steed’s door swing along with the landing and walls. On the left, the panel that forms the left wall in the kitchen (if you were looking into the kitchen from the dining nook), is also hinged. This gives you a view into that end of the garage, the kitchen, and upstairs there is a bathroom.
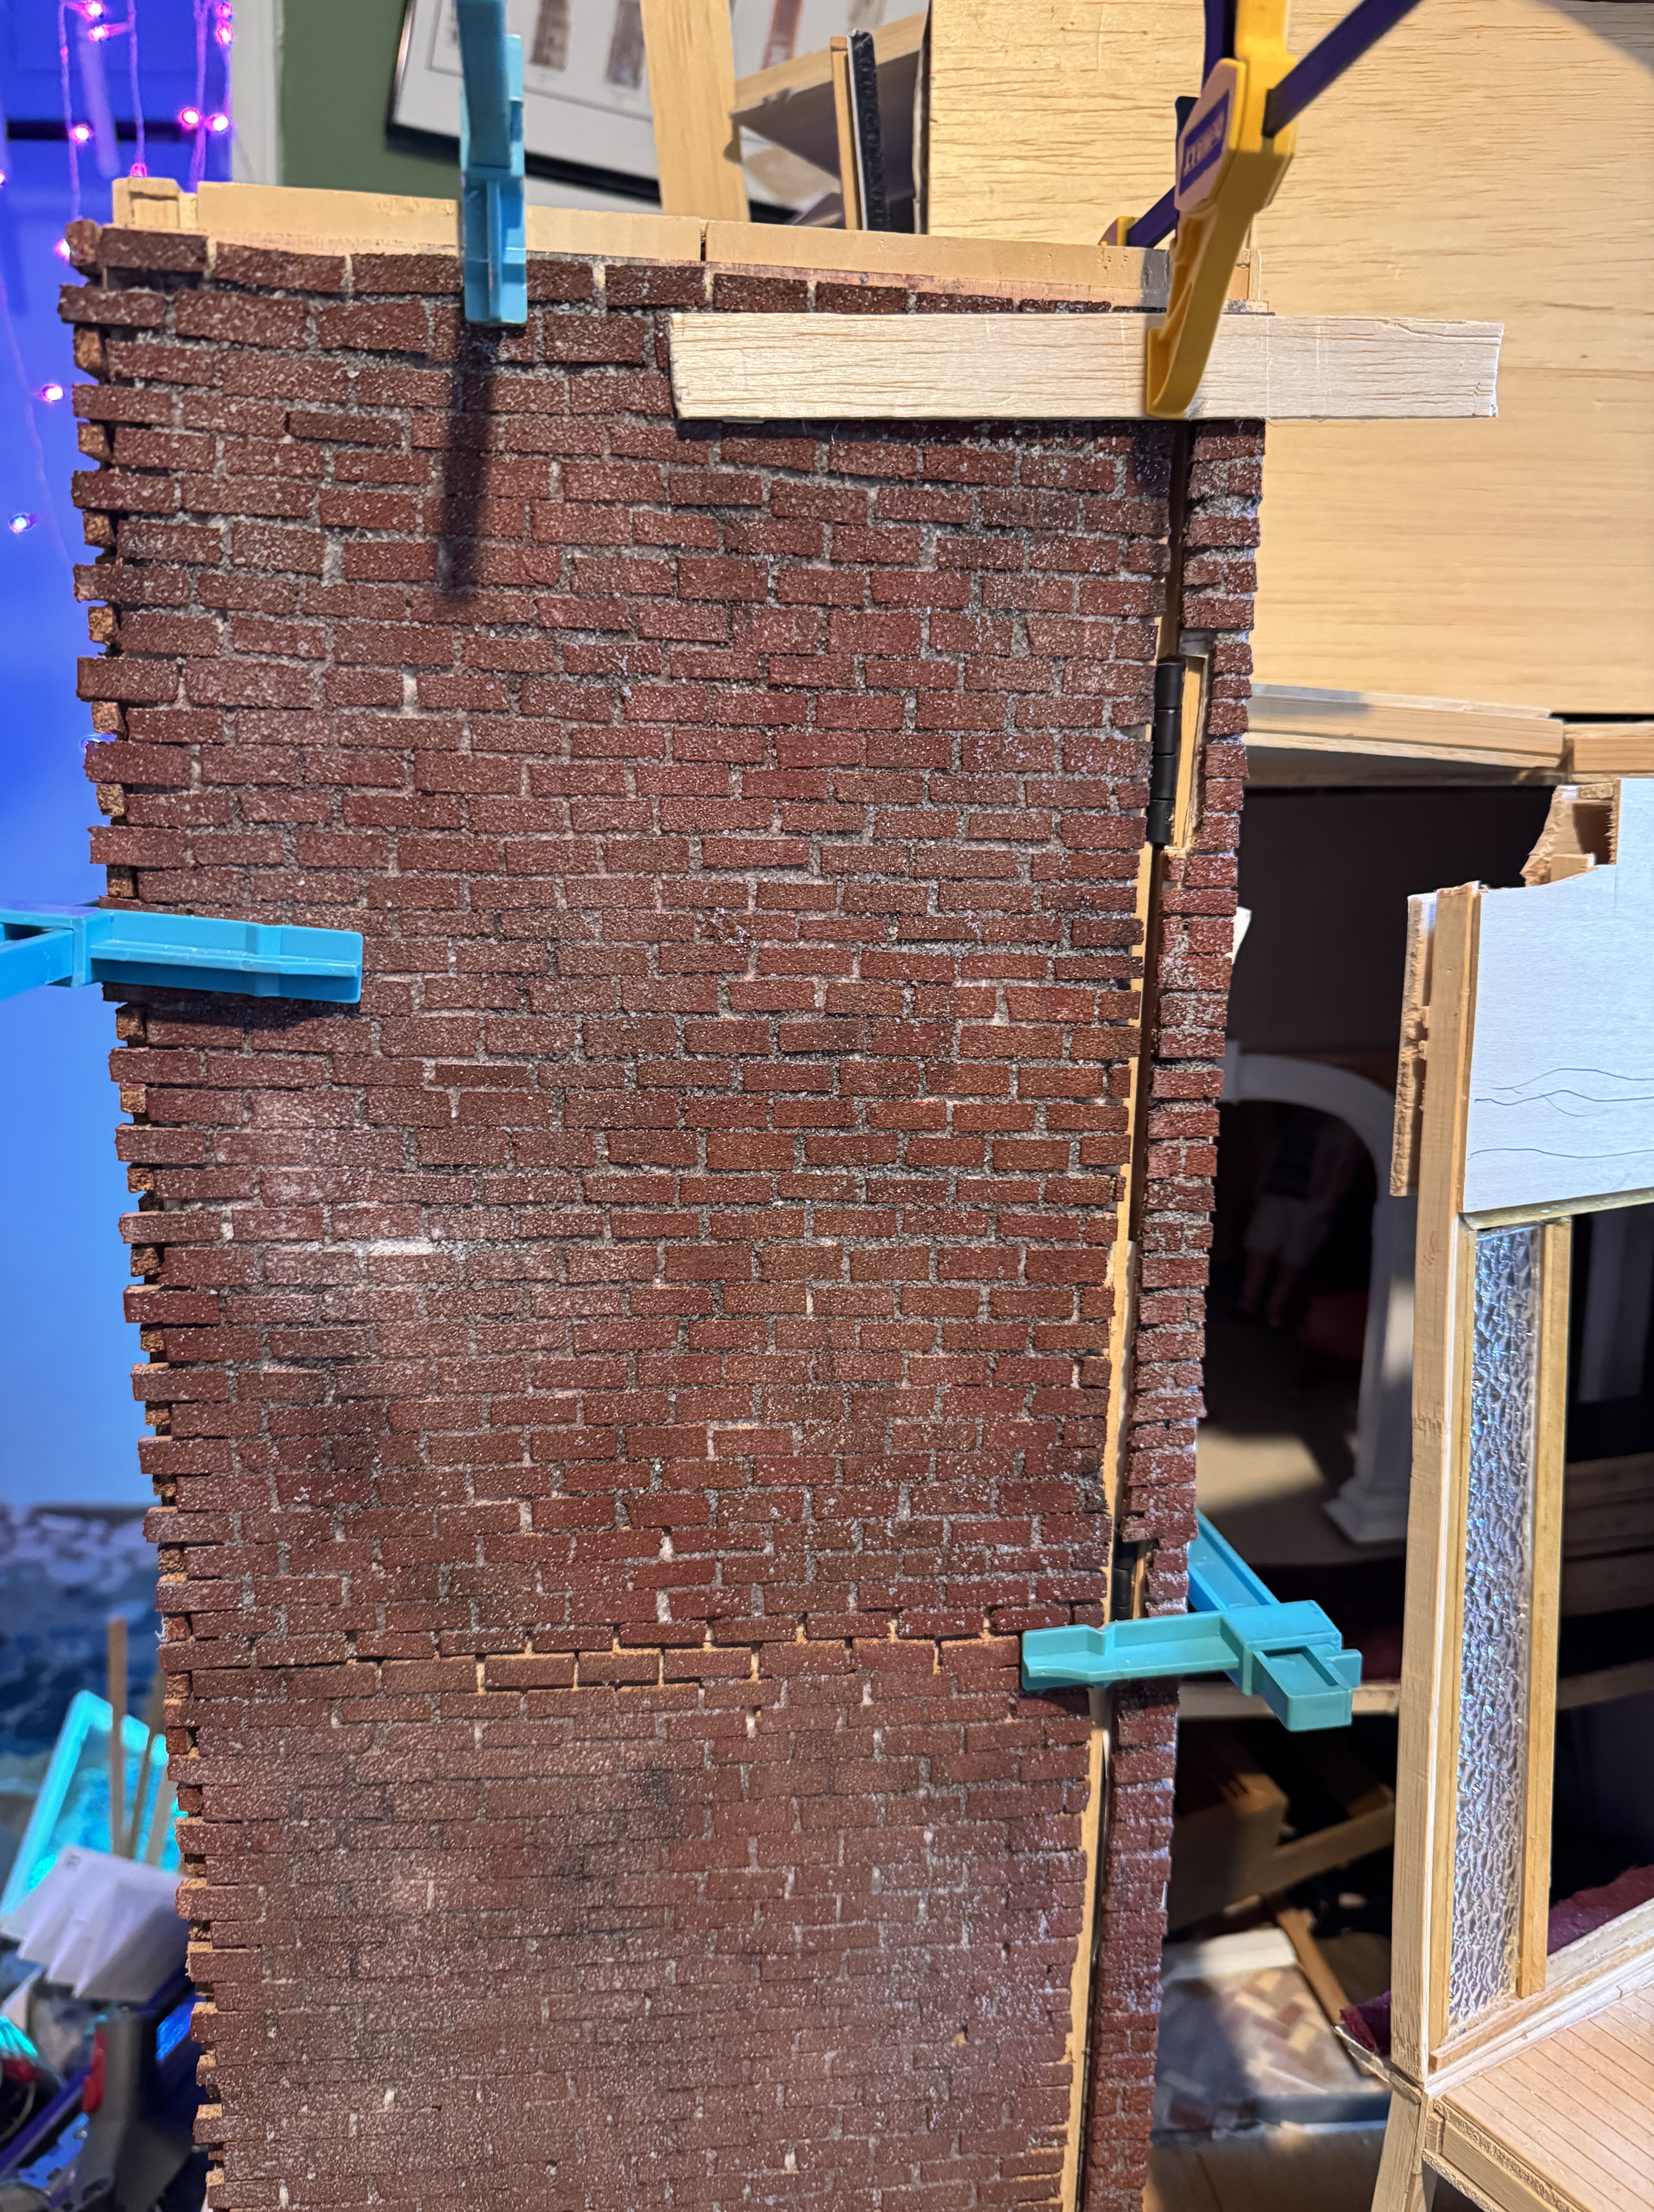
After a long period of focus elsewhere in life, in the summer of 2025 I came across a video on line with instructions for making realistic bricks from cork. It made sense to me — the texture of cork looks similar to brick. So I dove into the rather long process.
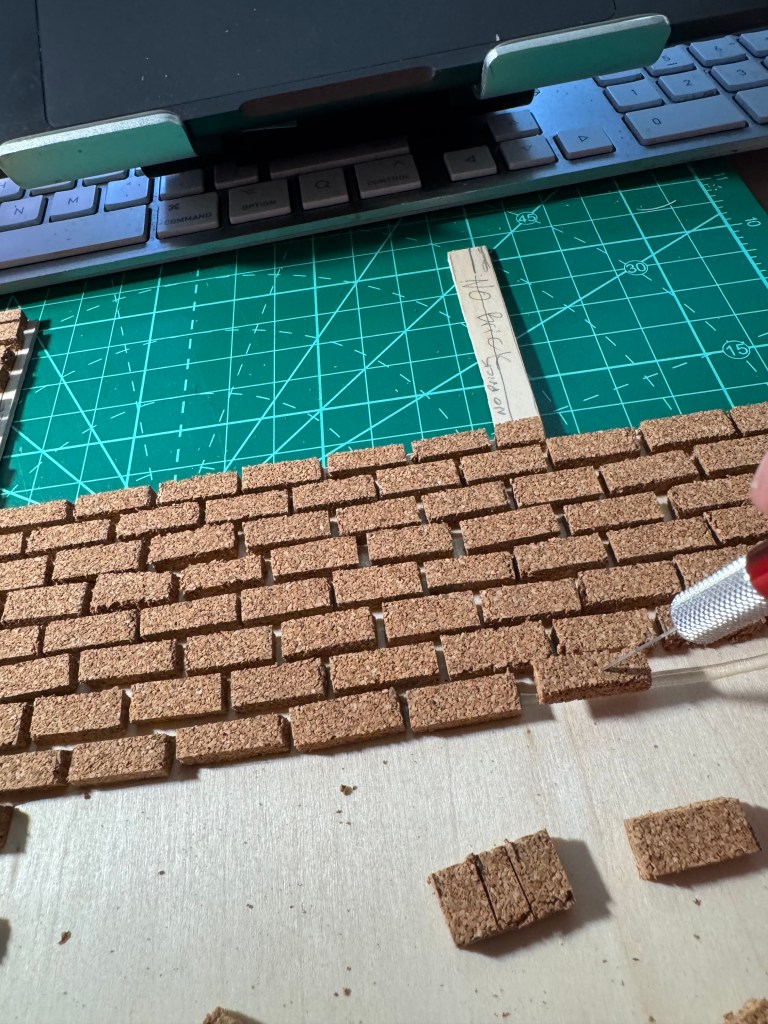
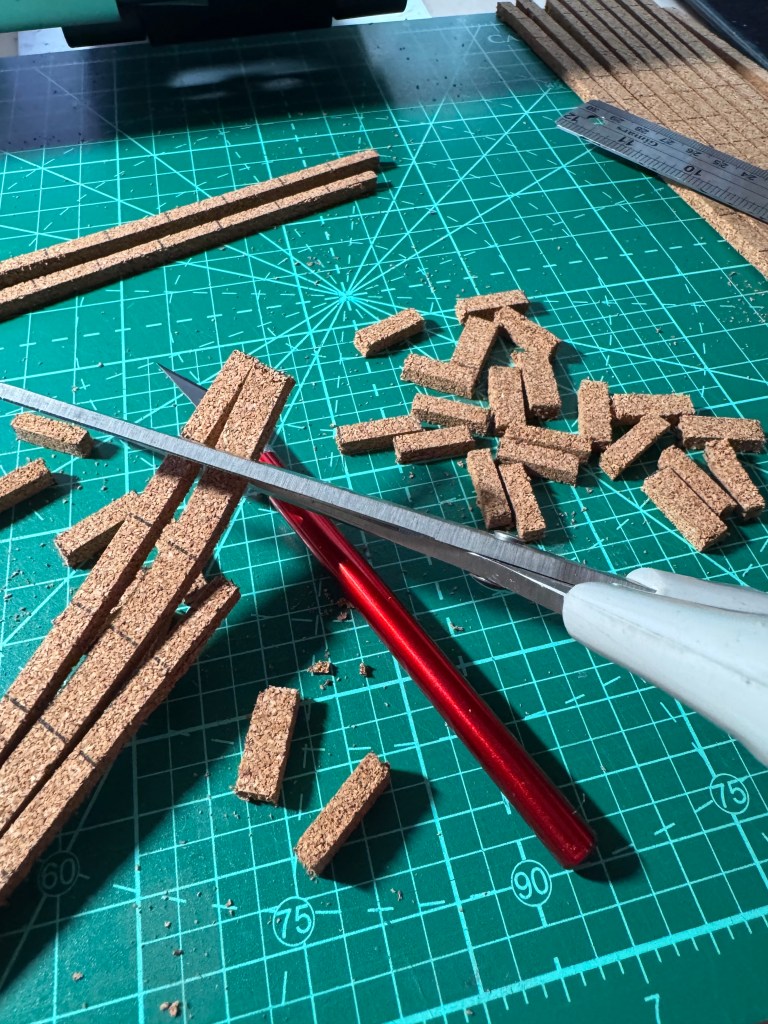
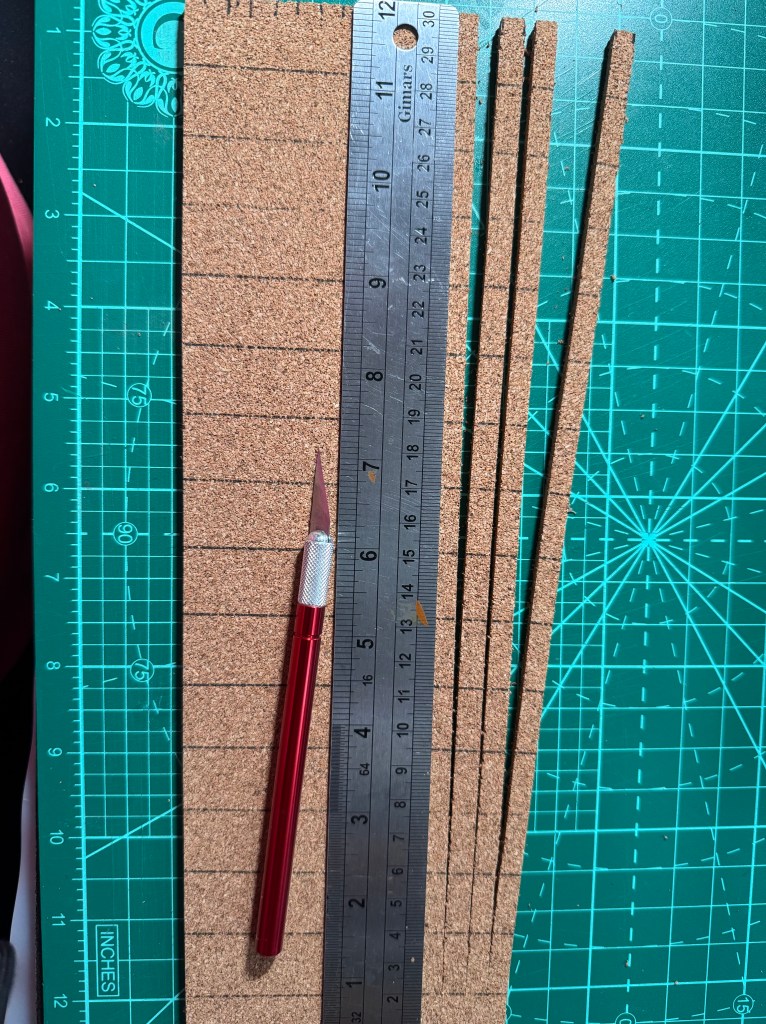
I ordered 12 x 12 cork sheets and 12 x 12 basswood sheets. I marked the cork for 1/4″ by 3/4 ” inch bricks. And started cutting. Scissors are pictured here, but I soon stopped using them as they didn’t give as clean as cut as a fresh knife blade. I measured and cut the basswood sheets to cover the house exterior with openings for doors and windows. And I glued the “bricks” onto the wood. Where sheet edges would meet, I aligned the brick pattern. Also at corners. The house has a few challenging angles, and the hinged panels presented an extra problem.
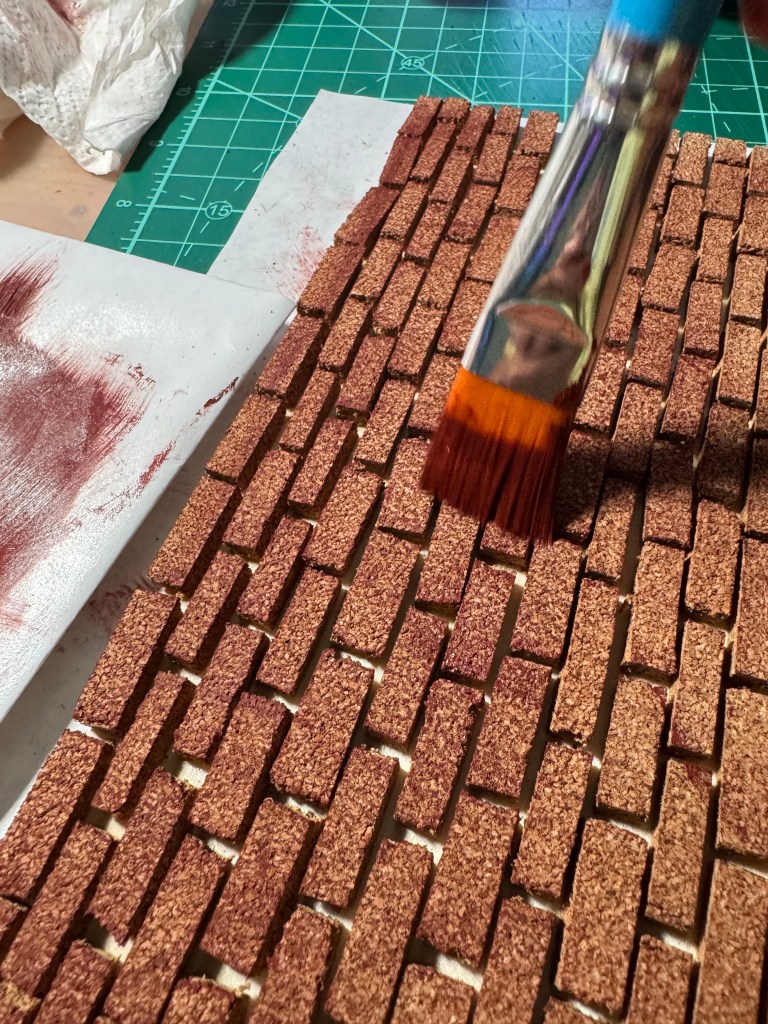
As I searched for the specific red shade oil paint specified in the instructions I started questioning my sanity. But once started… I should explain that the instructions made it very clear that only oil paint would do — Acrylic is anathema! Finally I gathered the indian red, matte black, mineral spirits, and Liquin — a bonding agent used with oil paint. I also got a measured beaker to mix up the grout “paint” made from the last three items.
First the bricks had to be dry-brushed with the red. I made a point of creating ALL of the walls (or so I thought) before cracking open the paint, so I had quite a stack of assorted shapes and sizes. Unfortunately, I was not able to find indian red alkyd — a fast drying formula. So after dry brushing, the wall sheets needed to sit and dry. For days. Weeks, actually. Essentially, the project ground to a halt while I did some traveling.
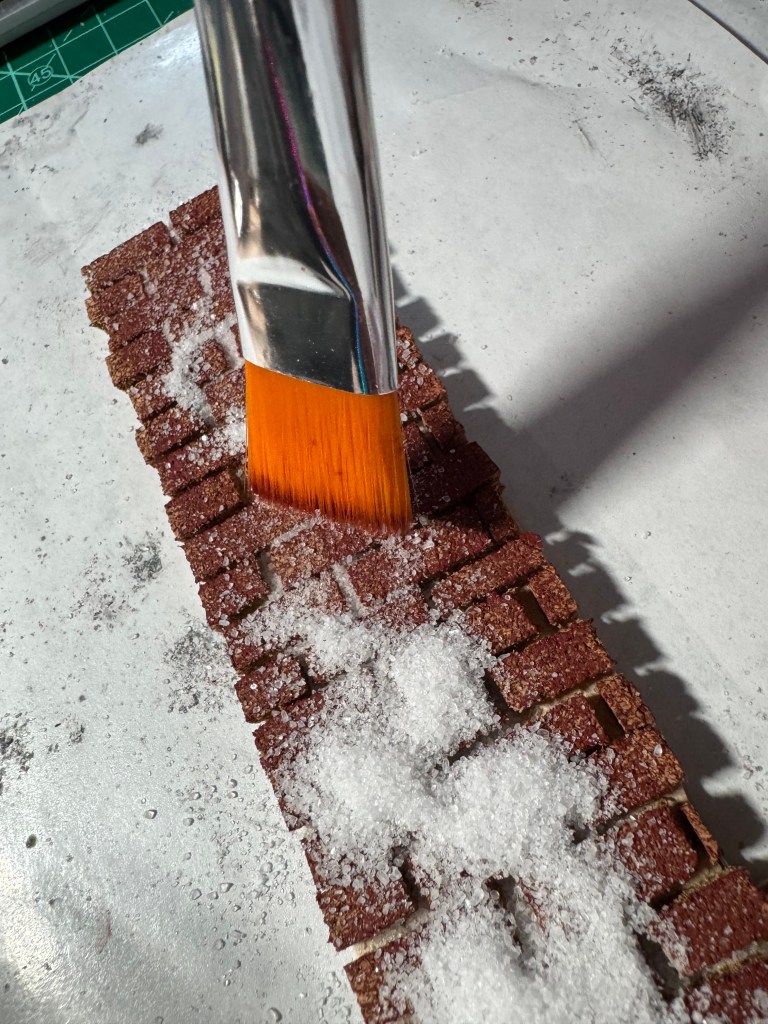
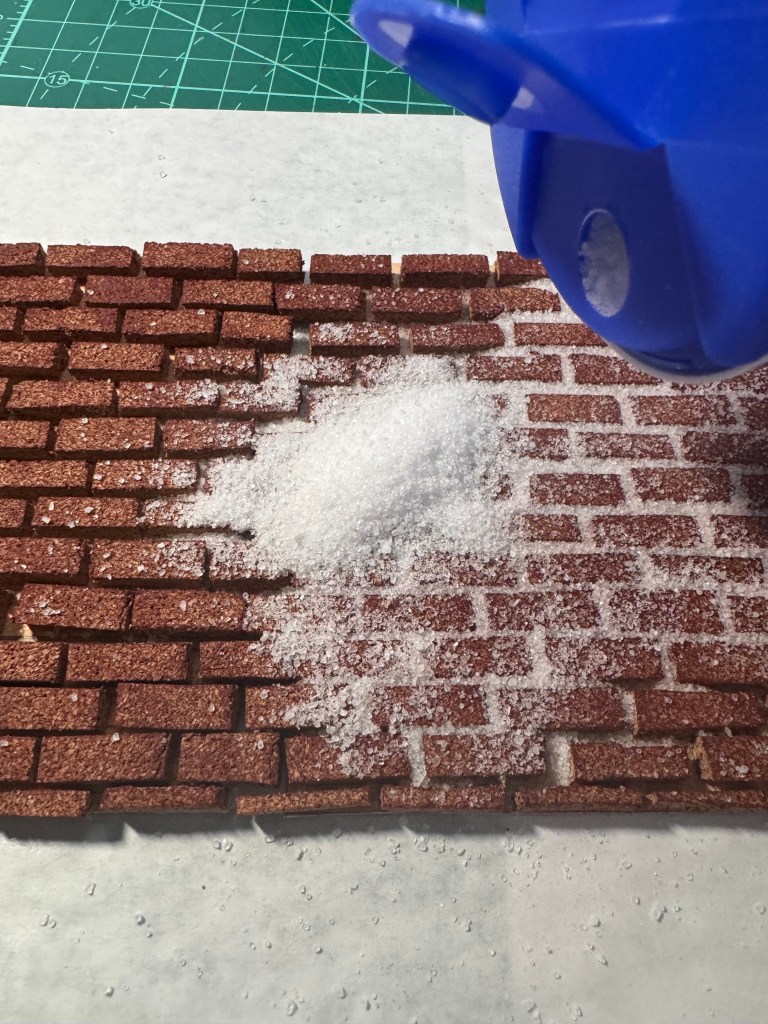
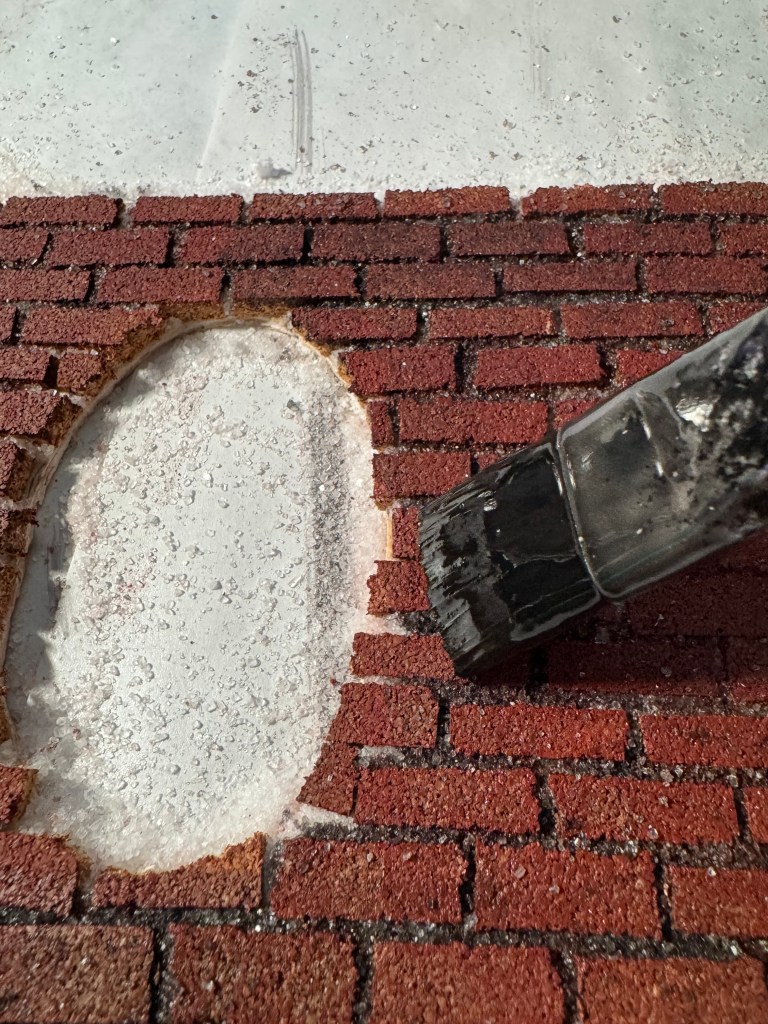
Fortunately, the black paint is alkyd. When the red was dry it was time for the mortar. In addition to the magic ingredients listed above, it required salt. Lots and lots of salt. I mixed up the mineral spirits/black paint/Liquin potion in my beaker, carefully measuring the proportions. I laid newspaper on my desk, and laid a brick panel on it, and dumped a pile of plain old table salt on it. I used a paint brush to gently spread the salt so that it filled in all the spaces between the bricks. Then I brushed on the potion, which was supposed to stain the bricks as well as the salt and also bind the salt (the Liquin).
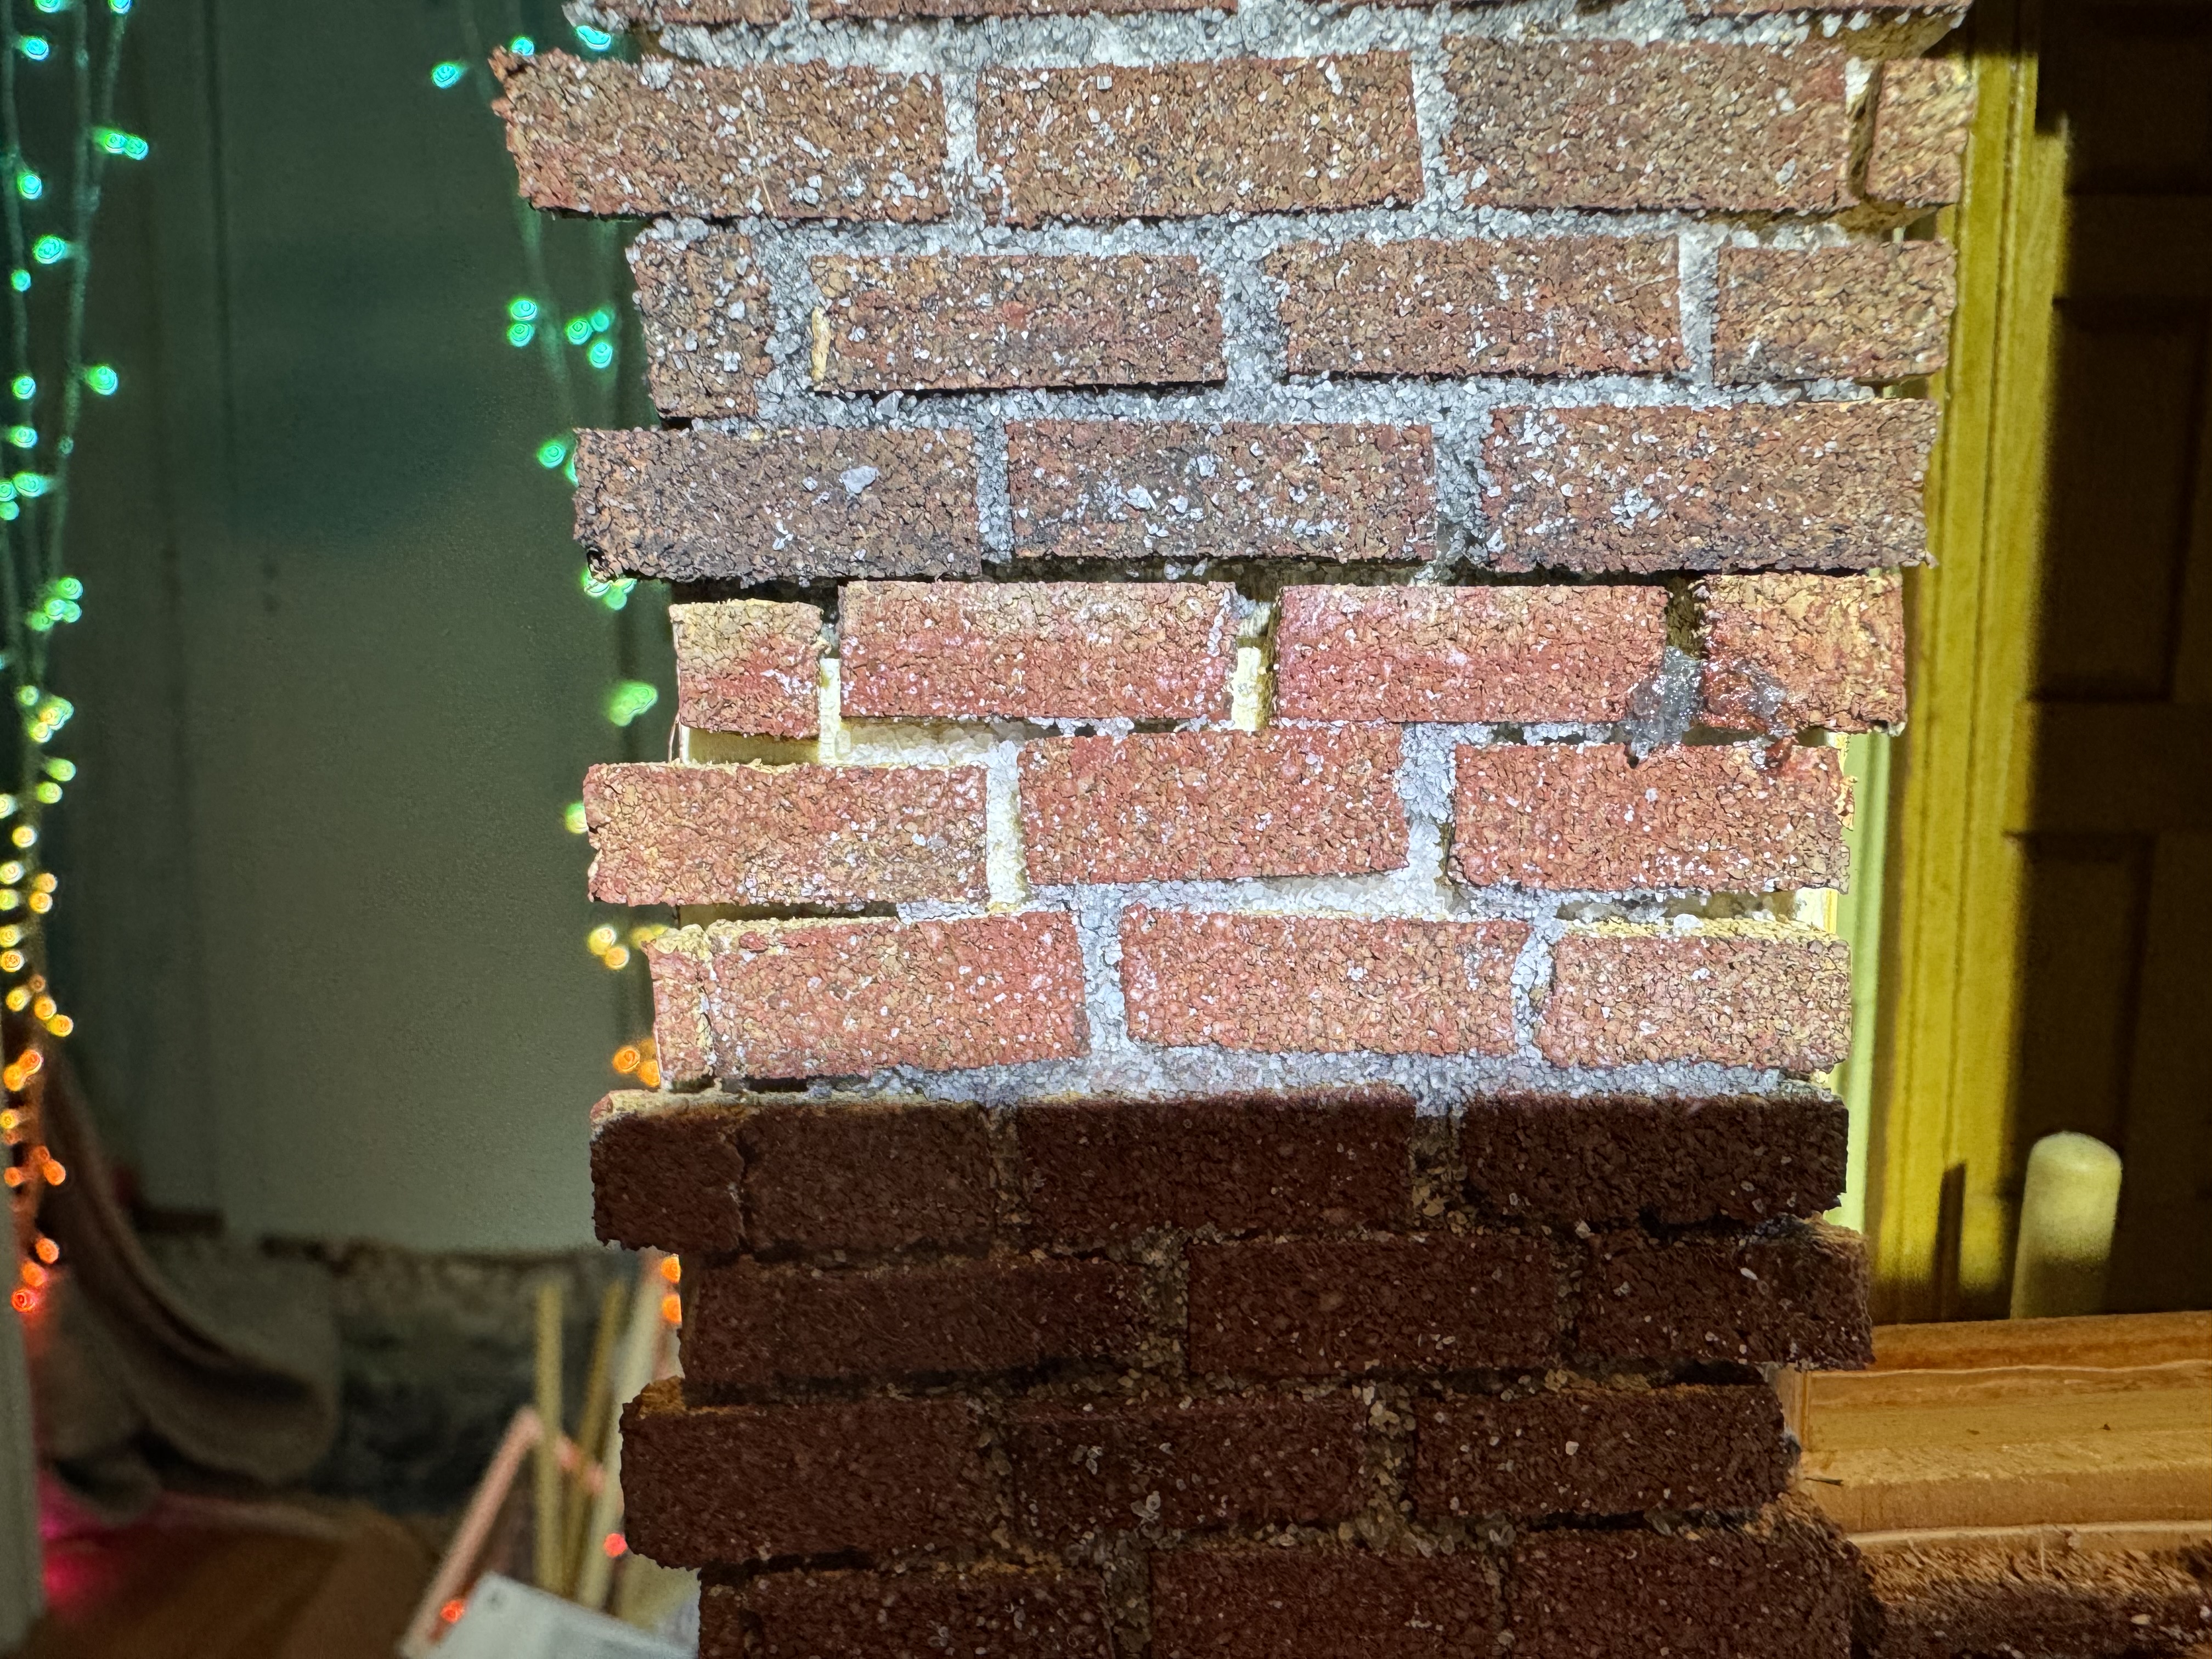


My first batch of potion had way too much black. I had ruined the first (fortunately smallish) panel of bricks. I diluted the mix with more mineral spirits and Liquin, taking a guess at how much now because clearly the proportions provided in the video didn’t work for me.
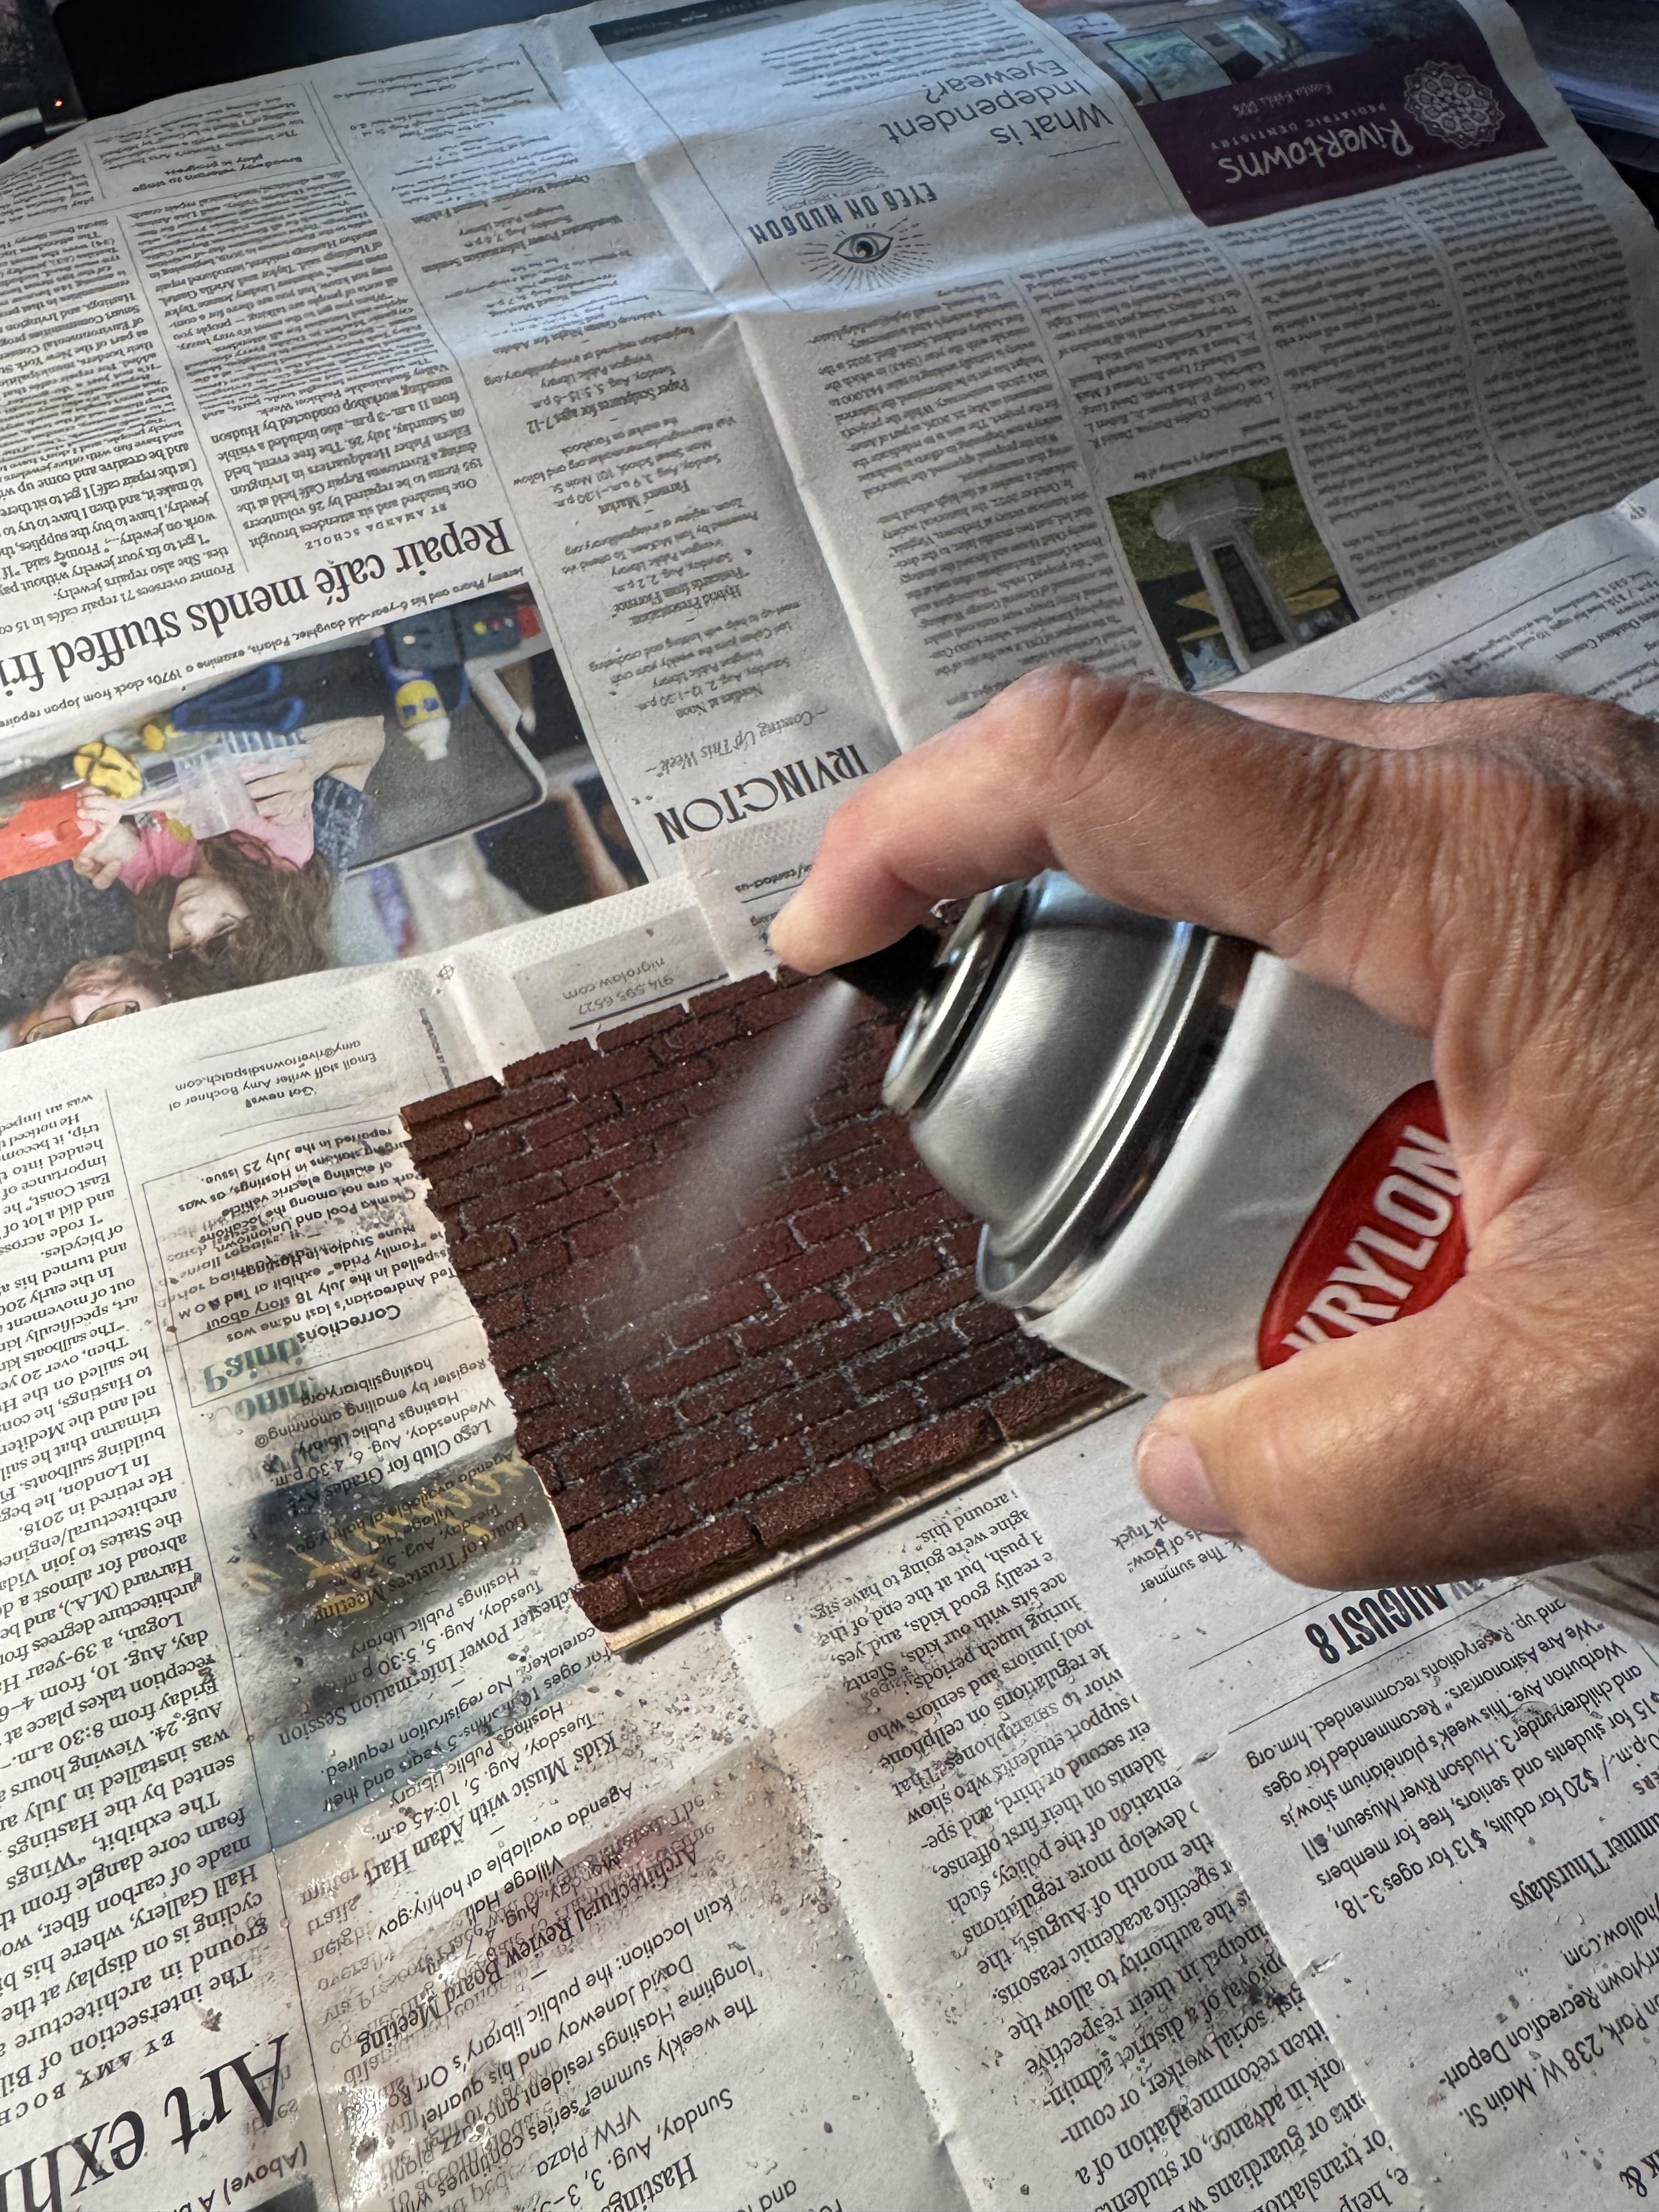
My next batch was much better, adding a black patina to the bricks without actually painting them black. As the mineral spirits evaporated, the salt was revealed to look like dark grey mortar. Next I sprayed several coats of a matte acrylic in the hope of further securing the salt. After that had time to dry, I took up the challenge of attaching the panels to the house.
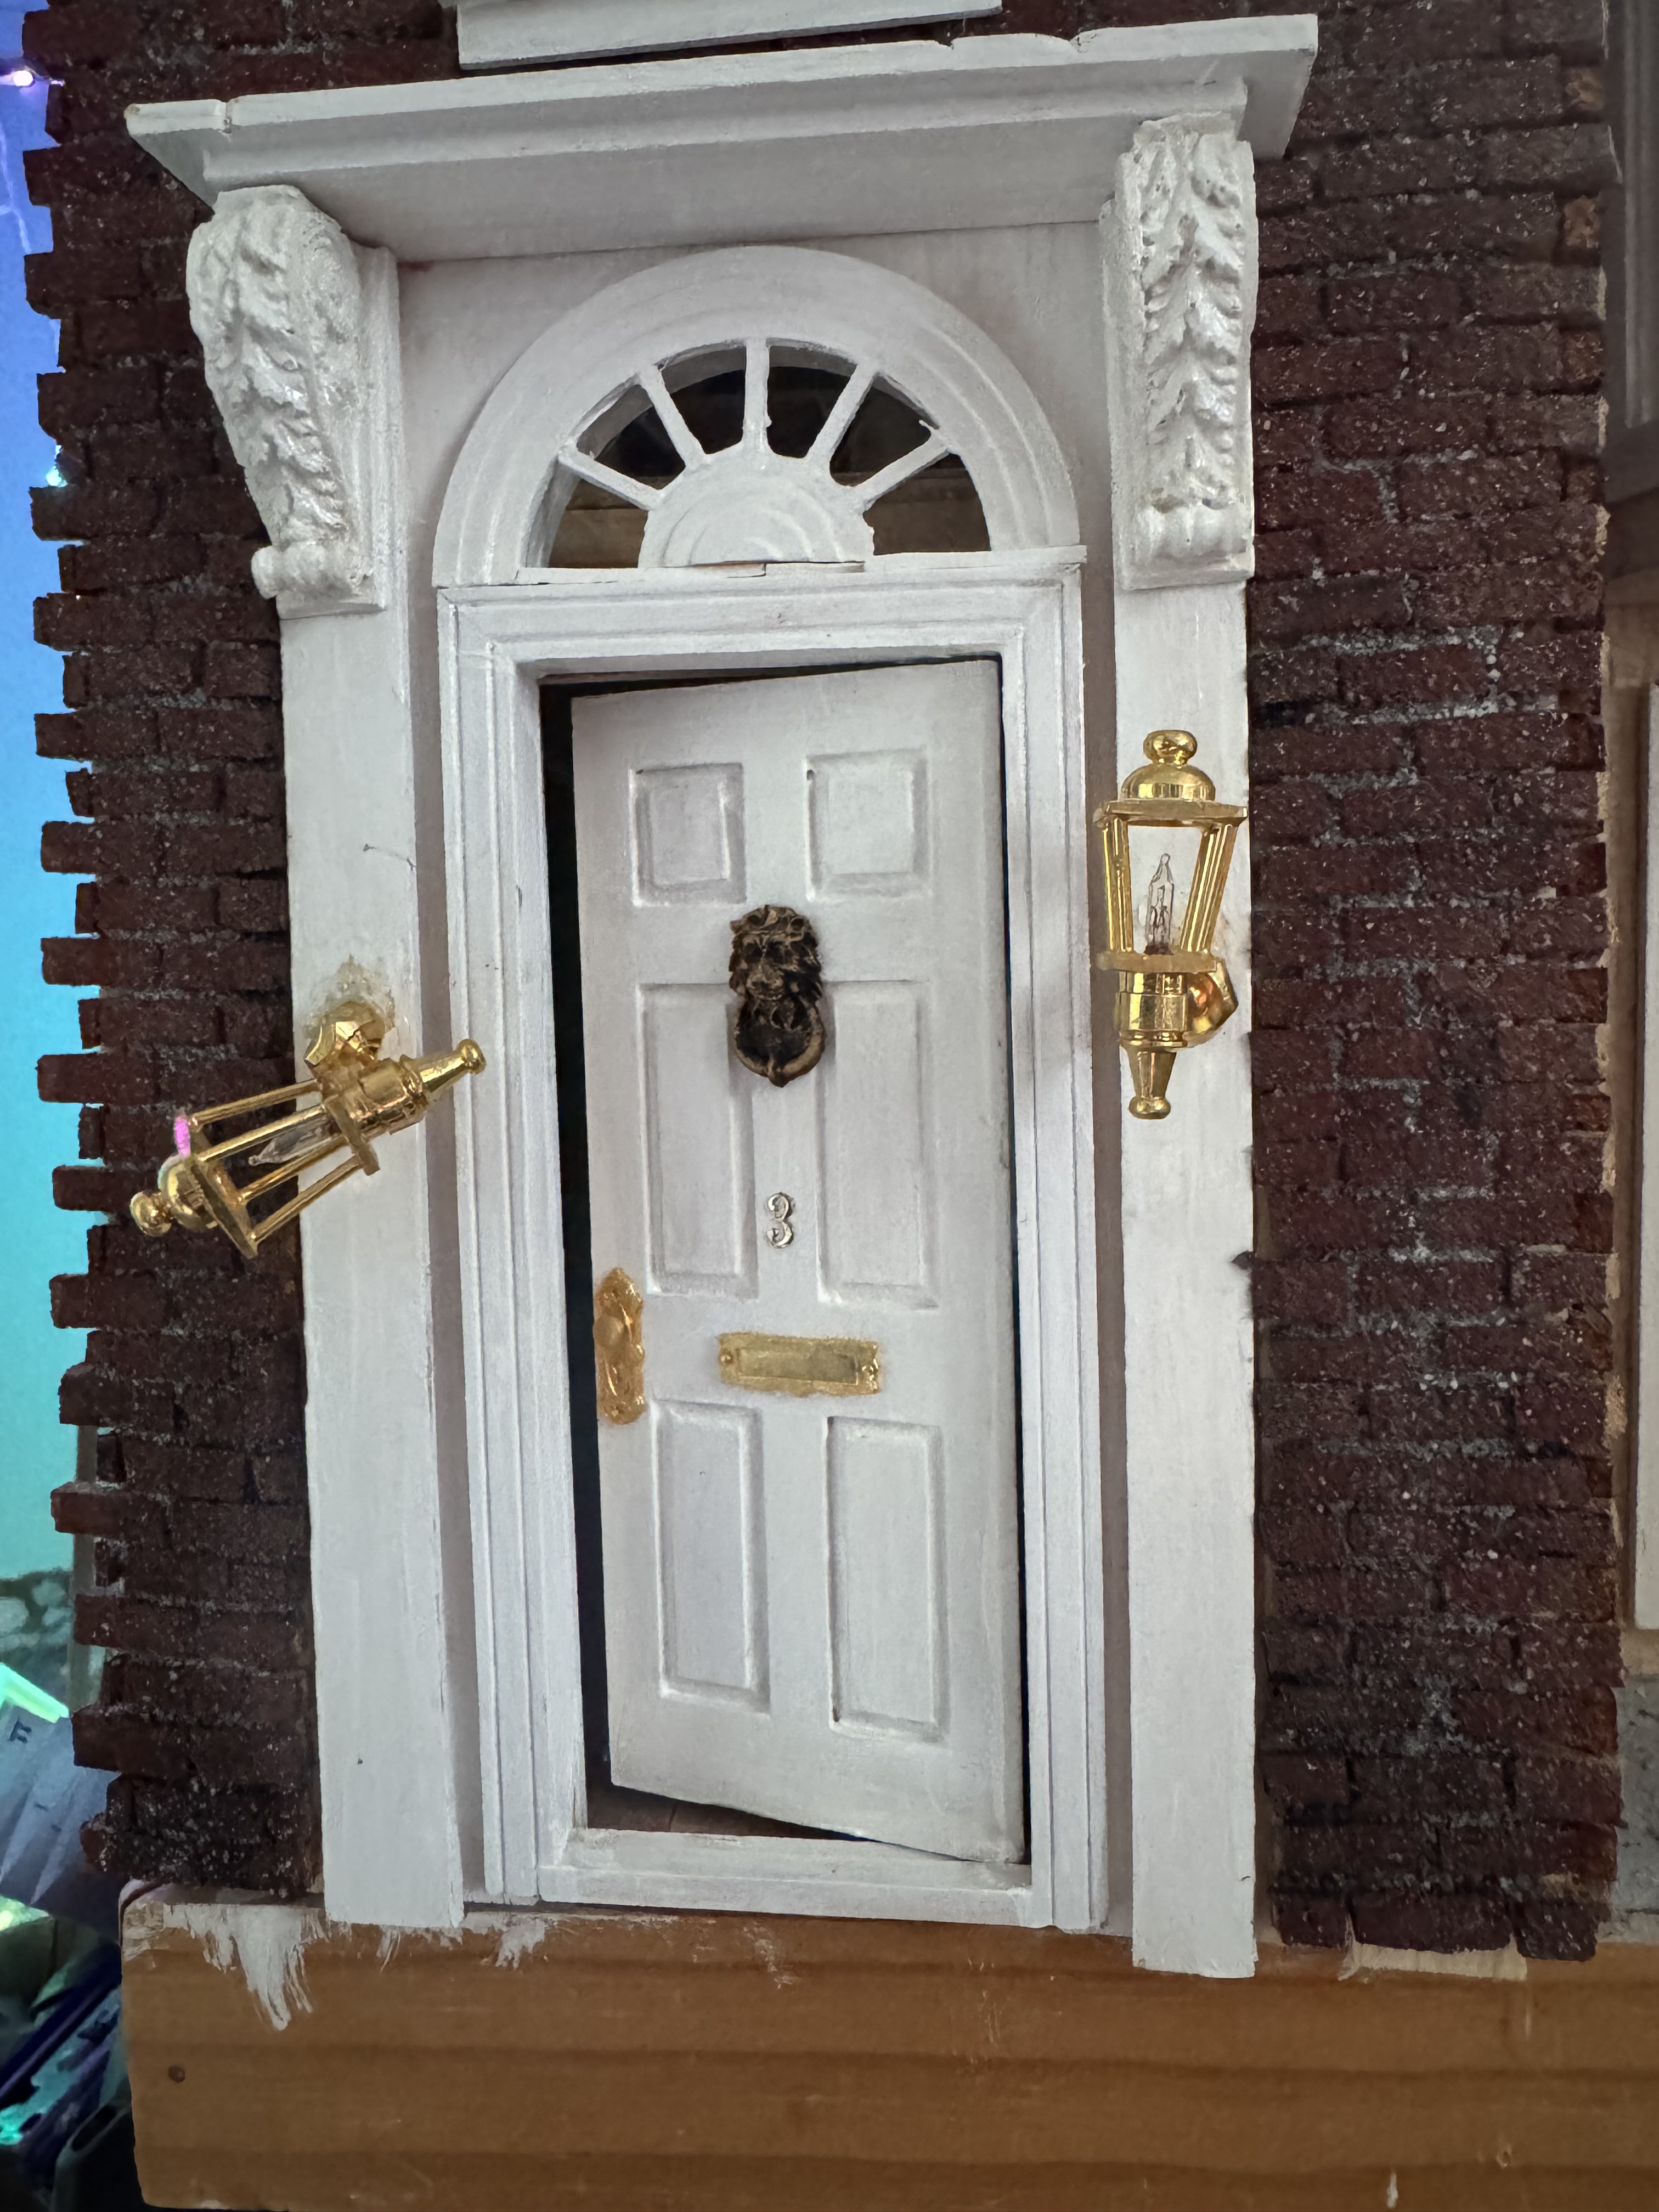
Some faces were covered in vinyl brick sheets that I’d purchased (seen in photos further up). A few years ago I thought they looked great. Today I think they look terrible. So off they came. Next I tried museum paste to affix the new sheets. Museum paste is a sticky but removable substance used to hold items in place, usually on shelves. Nope, not gonna hold on a vertical surface. I resorted to my strongest glue, E6000. It’s a thick, sticky substance that sets up quickly and holds very well. In the photos above, the new bricks are in place around the front door, and yes, the coach lamps came loose. I have reglued those with E6000 too.
As I made the brick panels I knew I would have to do mortar touch up where they meet and on the corners. As it happened, I also had to touch up a lot of places where the salt fell out despite the liquin and acrylic. However, on the whole, the salt mortar does stay in place and looks quite authentic.
I also have some color variation, having had to make more of the “potion” that ended up being lighter.
So I became a miniature bricklayer, “pointing” my cork bricks with a mixture of salt, black paint, Liquin, and mineral spirits. It’s a black, grainy sludge that I smoosh into the cracks with a pottery tool. And where bricks are much lighter than their immediate neighbor, I can stain them with it to soften the color transition.
This project brought me face to face with an area I’d been unhappy with for a long time: The apartment front door and exterior hall. The building entry is on the same side of the building as the garage door, but the apartment front door is upstairs on the other side. A hallway leads from the exterior front door with the coach lights to a second hallway with a staircase up to the apartment door. Under the stairs is a door into the garage. My original design has all of that exposed, because it would be within the larger building. But bricking over the rest of the exterior made me want a complete look.
There was a hitch, though: The wall with the apartment door and the staircase in the hall is hinged. In fact, it was one hinged panel for each floor. External walls had to open in a way that allowed for the width of the upper hallway floor and staircase. Fortunately, the upper floor is not as wide as the lower, so there’s room for an external wall to fit aligned with the dollhouse base.
First I decided to make the two existing hinged panels one, removing the option to open just the garage floor or just the apartment floor. This solved some structural problems, too and made that wall more sturdy. Then I designed the new exterior walls. In this case I did want two, stacked, because one would be quite heavy and require hinges that would be very out of scale with the house. They needed to be an L shape, with a hinge where they attach at the end of the halls, the same place the inner hinged now single wall is attached. They would have a short wall, the width of the hall, then a long panel at a right angle to the first, covering most of the hall, and finally a shorter panel hinged to that. This allow me to open just the short panels to get to the apartment front door or the garage back door below it, or swing the full panels out to also swing out the inner wall and get into the garage or the apartment.
But wait, there’s more. As I mulled over my plans I recognized a flow in my original design. The apartment has a divider wall just inside the front door. It’s the one with the arch. With that in place, when I swing open all my big panels, I can still only see that wall. It blocks easy access and viewing of the living room. “It has to be hinged,” I said. Out loud. Crap. It has lights and therefore wiring.
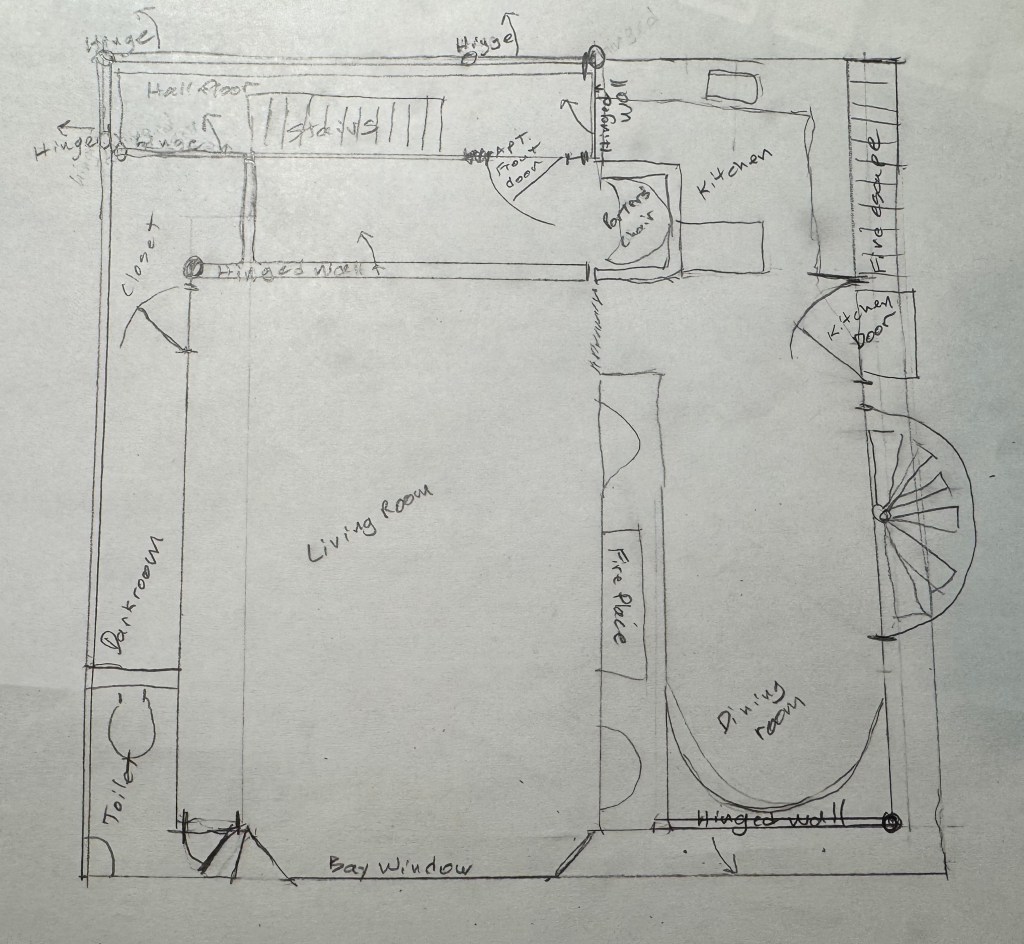
The top of this rough diagram of the apartment floor (as opposed to the garage floor) shows the original apartment wall that was two hinged panels (one for the garage floor and one for the apartment floor. These two panels support the upper hall, staircase to it, the apartment front door, and below the stairs a door into the garage and an opening to the hall leading from the building front door. That hall way is under the left side of this drawing with the front door in the lower left corner, below the toilet.
This diagram also shows the other hinged panels that have been part of the house for years: In the lower right, the hinged wall at the back of the dining room, and at the top, toward the right, the hinged wall that forms the short side of the kitchen.
The new exterior walls are on the top and upper left in the diagram. The inner wall (formerly two stacked, now combined) is hinged to the inside surface of the left wall of the building. The exterior walls (two stacked) are hinged to the top edge of that wall, catty corner to the hinges for the inner wall. Fortunately, that vertical is square pine rod, not the basswood or bamboo used elsewhere. The short panel hinged there swings out and allows the inner wall with its floor and stairs to swing to about 90 degrees. Hinged to that short panel are a larger panel and a shorter one, both hinged to swing outward so they can be moved wll out of the way.
Finally, the inner hinged wall is about a quarter of the way down from the top of the drawing. It is actually two walls — the wall with the arch that extends across the living room, and the short closet wall that sticks out from it near the left end. That’s the part that has lights on both sides.
It was not difficult to detach the wall without damage — dried glue surrenders to a knife and gentle pressure. The wallpaper tore, but I had plans to replace it all anyway. For that reason it made sense to remove the baseboards and crown moldings, too.
Unfortunately, I had efficiently wired the wall lights in this section with hardly any slack in the wires, and that trusty knife accidentally severed one of them in the removal process. And even if I could easily reconnect it, it had to have more slack in order for the wall to swing open. In come a new construction item: wire connector nuts. I’d seen them used on Facebook and ordered some for possible use. I severed the wire for the other wall light. Then I opened up the section of wall that the wires come through to get to the soon to be hinged wall. I stripped the ends of all the wires in there and connected wire nuts. Then I attached new wire on the other sides of the nuts and fed that out to the soon to be hinged wall. I stripped the light wires in that wall and attached another set of wire nuts (four for each lamp). Then I connected my new wire, allowing plenty of slack, to those wire nuts. It was fiddly and tricky and occasionally frustrating as the original wires were so short, but eventually when I turned on the power all my bulbs lit up.
The swinging wall is, fortunately, well made and didn’t need any reinforcement. This was not true of the standing wall it would be hinged to. I put together a new vertical — this time using stacked bamboo sticks glued together. Bamboo is very stiff and dense, so it holds small screws very well. Aligning and screwing in the small hinges was another exercise in patience, but after several breaks and redos of some things, the wall was attached. I sat in front of the house and swung out first the big outer panels, then the inner apartment wall, and finally, holding my breath, the hinged inner wall. Had I measured the clearances right? Was the closet wall going to hit the other closet wall? Would it clear the carpet?
The answer is yes. The only restriction is anything in that part of the closet has to be moved before opening. I’ll deal with that design/decoration issue later.
THIS STUFF IS OUT OF ORDER.
With most of the brickwork done, over President’s Day weekend 2026, I was inspired to recreate Steed’s dining table. I only have a couple screenshots that show bits of it. I can’t think of a single episode where the characters actually used it. But nonetheless, it’s there in the flat. One photo shows a round table, marble topped, with a black wrought iron base. A circle of little rings within larger rings is under the table top. And the base is four curved legs on a round base. At least, that’s what I can glean from the photos I have.
I spent a good part of a day modeling it in Blender. I’m not at all skilled with Blender, so my models are combinations of basic shapes. I can make a circle and resize it, and make a flat disk, a cube, etc. I realized very quickly that the table, as a whole, would not print on my PLA printer. So I broke it into component parts. The top and base and two rings the same diameter as the top to go below and above the smaller rings were easy. For the legs, I trimmed a cylinder to make a half circle, then stretched it to make the right curved, but not fully circular shape. The small rings with the even smaller rings inside of them were a problem. After five failed prints (with tweaking of the model in between each) I admitted that they were just to tiny for my low-end printer to handle.
I looked around my office/hobby room/writing den. I know I have a box of assorted o-rings around here somewhere. I couldn’t find it. But I did find the box of heat shrink tubes for wiring. The second largest was about right for the larger ring. The smallest was a little big for the smaller ring.
An afternoon of slicing tubing, then cutting the little rings to make them smaller spilled into the following morning. They were tiny and fussy, being rubber they bounced away when I sliced them, and resisted some types of adhesive. I could not perfectly match the design in the photos, where the smaller rings sit in the lower half of the larger rings. Okay, maybe I could have if I’d been willing to spend five more hours.
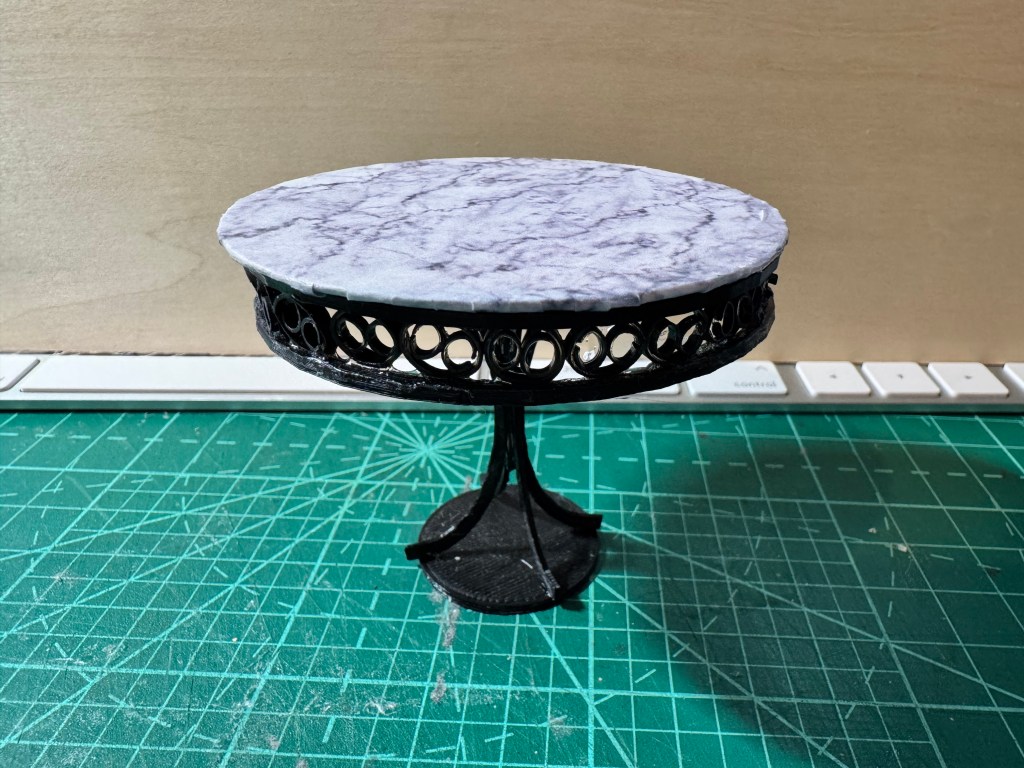
Finally, I found a photo of white marble online, scaled it down, and printed it for the top. It was a little unstable with that small base, so I printed a larger disc. Then I tried to push a chair with arms under it and discovered it was too short. So I printed a third disc, a little larger than the last, and gave the table a three-tiered base.
I was unable to find a chair matching the ones in the photos of the set, so I settled for Chippendale chairs from House of Miniatures. They had two vintage barewood kits, two chairs each.
While studying this photo of the dining nook, I realized something I had missed in all the years I’ve been working on this project: The back wall is curved. Setting aside what this might mean structurally (is this little room in a tower? Mews buildings don’t have towers!) I realized I had to redo my model.
No, there was not a chance I would tear down and redo the exterior to match the curve of this room. But I had to make the wall a semicircle.
Down came the long guns and pictures already on the wall. Back to Blender I went to make a semicircular wall. Unfortunately, the print failed at about 2.5 inches. But it wasn’t really unfortunate, because that 2.5 inch curved wall revealed a problem with my design. That back wall is one of my hinged panels, giving access to the dining room and kitchen. The original flat wall was no issue — the long guns and pictures were attached to it. But a full half circle wall attached to the original wall would not swing out (hinges are on the left as seen in the photo above). I went back to Blender and made my half circle a shorter segment of the arc, then cleaned the printer nozzle and got it going again. The rest of the semicircle had to be curved wall panels attached to the side walls.
Studying this photo also reminded me of a design flaw I’d built into the structure of the house — it’s not quite wide enough, so there is not enough room for the paneling on the left with the wall sconce. Except now there could be if I made my back wall slightly narrower. This would also allow me to cover over the hinges on the spiral staircase enclosure that is further to the left, not shown in the photo. And I’d have enough room for a wall sconce. Nevermind my wiring design doesn’t account for a wired lamp there. That’s what change management is for.
Fortunately, this room is directly above “wiring central” in the garage, the place where all the wiring comes together to connect to the exterior power source. So adding another light here is very simple.
I credit Ian Duerden, a fellow Avengers fan, who’s gorgeous renderings of Avengers sets inspired me to go him one better with three-dimensions. And I have to thank Cal Westray, who’s many, many captured images from the series have provided me with details of decor and construction.

Mia, just terrific!
Will you populate with a miniature Steed and Emma?
Well Done!
JohnnyO
LikeLike
Bravo! This looks amazing. I salute you for the amount of time and effort bc I could ever have that much patience. 🙂
LikeLike