In another post I wrote about my struggle with sciatica. A result of it was a hiatus on lap swimming. For weeks my pool bag sat, first in the car where it normally lives, then inside my apartment because the car was going for repair.
As the sciatica abated, I decided to charge up my swimming MP3 player so I could get back to the pool. I looked for it. It should be attached to my goggles in a small black pouch. It wasn’t there. I unpacked the whole bag–sport towel, turkish towel, fins, snorkel, gloves, zorries… I could not find the goggles and MP3 player.
The goggles were custom fitted, not cheap. Luckily, my source had a holiday sale and I’d already bought a couple more pairs. But I need my music to zone out in the pool. It was possible I’d left the pouch in the locker room when I last swam. I remember feeling off that day, after that swim, and the sciatica had flared up the next day. So I might have been distracted enough to leave them. Thing is, it was months ago. The odds of my stuff being in a lost and found were very low–so low it was not worth the effort to go there and check. And my cynical nature, or maybe life experience, told me calling and asking someone to look for it would not be productive.
So I ordered another MP3 player–the same model, as it happens because I didn’t find anything better. When it arrived I loaded it up with my swimming playlist, adding some tunes to it in the process. A few days later I made my way to the gym for the first time in months.
Once in the locker room I opened the pool bag and took out the smaller bag of stuff that goes poolside. I shoved clothes, shoes, and the larger bag into the locker. And I looked down at the bench and saw a black pouch.
“Seriously?”
Yes.
I have no idea why I did not see it when I checked the bag at home. I took everything out! But I do have a black microfiber towel for drying my zorries, and all I can think is the black pouch was tangled up with it. So I have two waterproof MP3 players, not to mention the goggles I thought lost. But hey, now I can rotate them so I never get a “low battery” message.
My two-ish year odyssey in chiropractic care, orthopedics, surgery, and rehab started with Sciatica.
In late 2023 I recognized the return of the sciatica that I’d first suffered the previous summer. When it first occurred I had no idea what it was, and envisioned blood clots and torn ligaments and tumors. During a telemedicine visit, the doctor identified sciatica with great confidence and referred me to physical therapy. With several sessions during which I learned appropriate exercises, the pain reduced significantly. So much so that I thought the problem was fixed.
This second time, the pain rarely let up enough so that I felt able to do the exercises. I spent several weeks in agony, much of that time laying on the couch–fortunately one week of it was when I was off work between Christmas and New Years.
In early January I made an appointment with a chiropractor. Soon I was receiving spinal decompression therapy. I call it “the rack.” I was attached by a belt to a machine that stretched my spine at the suspect location. It helped. But I was still in pain. My chiropractor watched me walk and said he could not fix my back until I fixed my knees and my gait. An MRI revealed four herniated disks in my lumbar spine, and a nerve test pointed to the root cause of the pain (L5). My Chiropractor focused the treatment there.
I got stretched a couple times a week, and as the weeks went by the pain, and then the “tinglies” in my calf abated. The L5 disk was placing less pressure on the sciatic nerve.
At the same time, my already dodgy right knee became unreliable. One morning, standing in the kitchen making coffee, it just gave out. I managed not to fall by clutching the door jamb and leaning against the fridge. I was shaken by the weakness. I bought a folding cane.
The inactivity forced by the pain, and then the knowledge of how delicate my lower back and knee are, prohibited me from feeling able to go to the gym. I couldn’t imagine caning my way to the locker room. I could imagine being asked for a doctor’s note allowing me to be there.
Finally, on tax day, I made myself go. In fact, both knee and back had been doing better for some time. I took the cane, but walked from the door to the locker room not using it. I stowed my stuff in a locker and walked unsupported to the shower and then the pool. The most frightening part was walking on wet floors in zorries—but that was already unnerving before all this started.
Luckily there were two open swim lanes so I didn’t have to share. There’s really no problem with sharing, but I always feel like I’m in the way of the fit, fast athletes. I have a right to be there, but it still takes away a little of the enjoyment. I’m sure the few swimmers who are slower than me look at me the same way.
I had been regularly swimming a mile before all this happened. This time I set a goal of swimming twenty laps–less than half my old minimum. My left leg was okay. My right thigh was not. This is likely unrelated to the sciatica or my arthritic knee, but rather a result of sitting at my desk for long hours and not stretching. I pushed through it and swam 22 laps, or 550 yards. My last swim, months before, was 45 laps and 1,125 yards.
Somehow, this successful swim is what spurred me to make an appointment with an orthopedic surgeon. As my chiropractor said, I had to fix my knees.
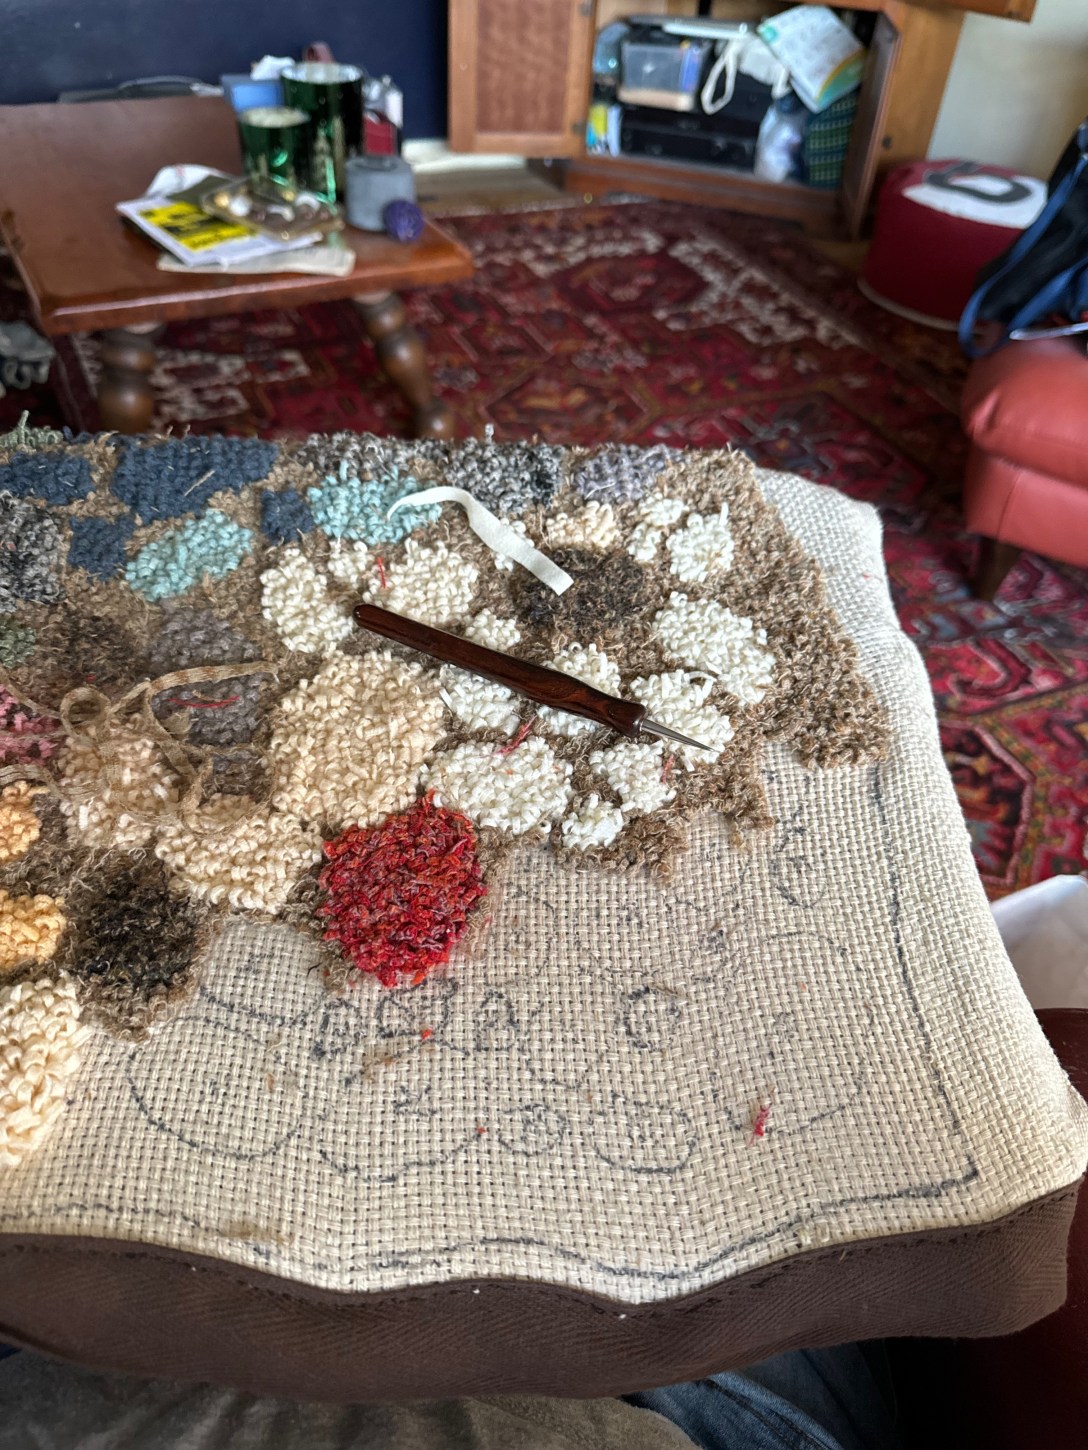
I remember sitting around the kitchen table after dinner, my dad working on a tall ship model kit, my mom hooking a rug depicting a tall ship under sail, and me drawing terrible pictures of ships to join in the family activity.
That rug is tucked safely away at the back of my linen closet–it’s very fragile. I have no idea what happened to the model ship.
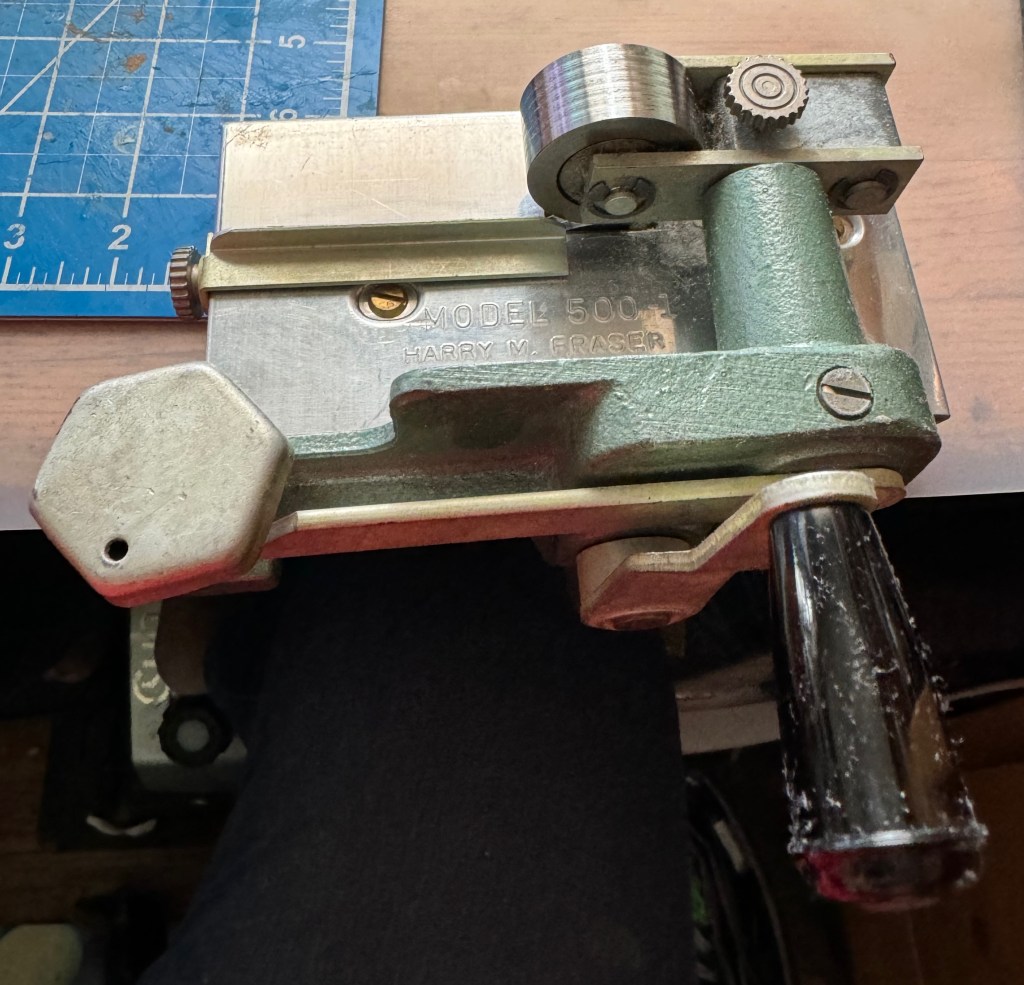
Rug hooking is a very old craft, in which thin strips of, usually, wool fabric are pulled up in loops through a coarse fabric backing–often burlap. Classic hooked rug designs are often rustic–farm scenes, animals, ponds or the sea with boats. It is possible to purchase kits that include the pattern printed onto the backing fabric and a supply of the required wool. Or you can buy the printed backing and the wool separately. Many practitioners dye plain wool themselves. Most practitioners have a wool cutter to turn the fabric into strips.
My mother’s wool cutter.
My mom continued hooking for quite a few years, but I only remember two of her rugs–the ship, and a large floral with a brown background. I don’t know what happened to that one. I do remember her stirring a huge, steaming pot as she dyed one of my brother’s wool Marine uniforms black for the ship’s rigging (he’d been discharged, and he left it at her house, it was fair game). And I remember her going to “hooking class” with her two best friends, each of them hauling rugs, bags of wool, and hooking frames, to wherever the class was held.
A few years ago I re-entered the world of rug hooking with a kit. Then I undertook an original design. Five years later that rug is (almost) done. It was a mental and creative support during the pandemic, and the act of hooking–concentrating on placing the next loop of wool, and the one after that, is meditative for me. You might think “but it’s a rug, you’re going to walk on it!” And that’s true. But it’s also to point–the feel of warm, soft wool under bare feet that conjures reminds of me my creativity and patience.
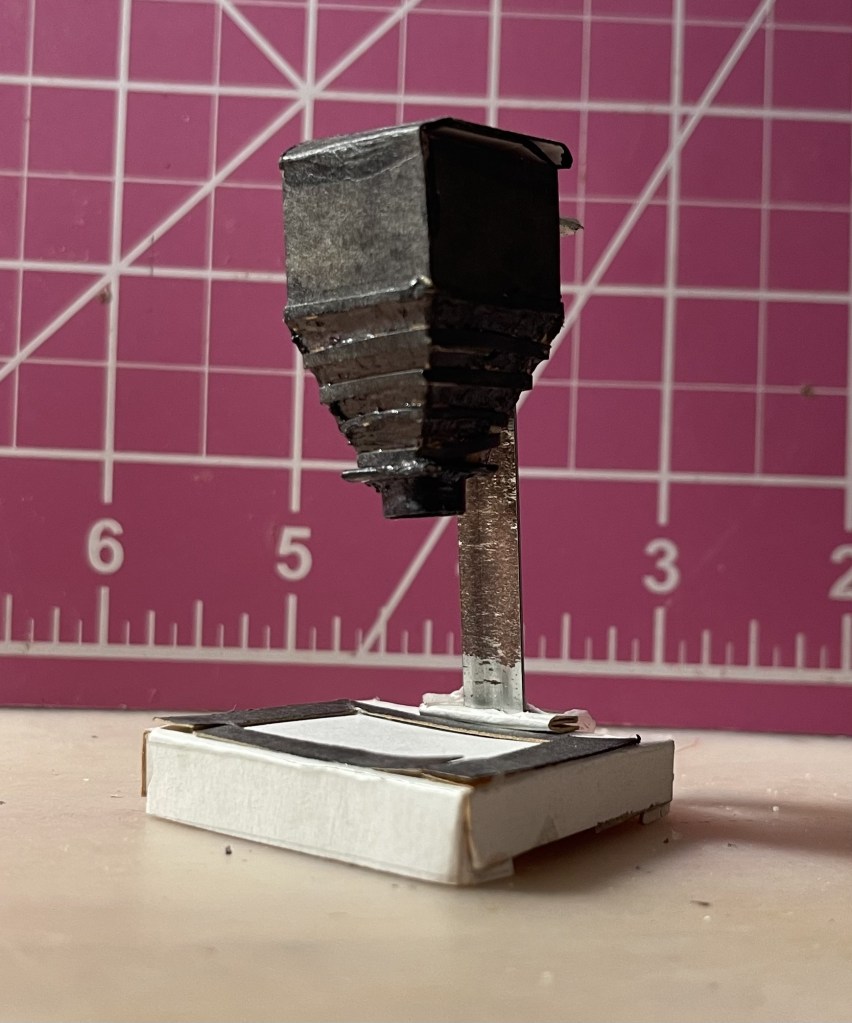
A few years ago I hunted for a photo enlarger for my dollhouse’s darkroom with no luck. I could find miniature cameras and typewriters and computers, but not a single traditional photography enlarger like I learned to use in college. But that’s what Steed’s darkroom has to have.
My card stock enlarger.
So I made one out of cardstock and a metal bar from a hanging file folder. I was not entirely pleased with the result, but I moved on. I made cardboard chemical trays for processing photos, and printed logos from photography chemical and paper packaging to paste onto unlabeled miniature bottles, cans, and boxes. I carved tiny clothes pins from toothpicks and printed tiny black and white photos to hang on a drying line in the darkroom. I bought a red gel to insert into the light fixture.
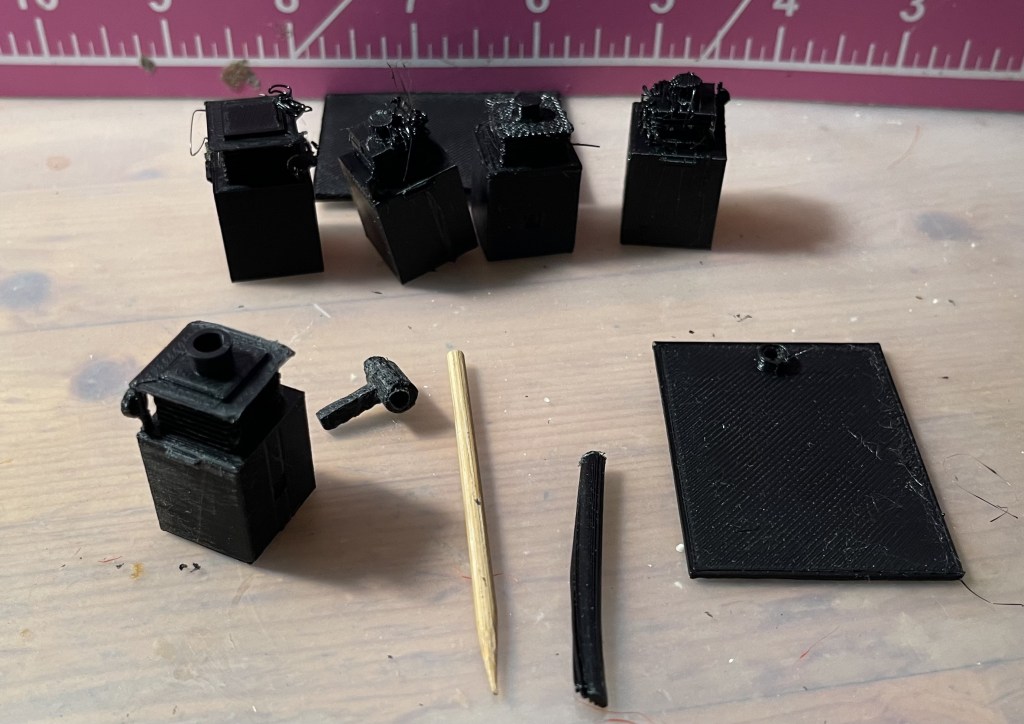
After finishing the fire escape, it occurred to me to search Thingiverse, a database of downloadable 3d printable models. Of course there are loads of dollhouse miniature scale models. Actually, any model can be printed dollhouse miniature scale, although fine detail will be lost. But I did not find a 3d modeled photo enlarger.
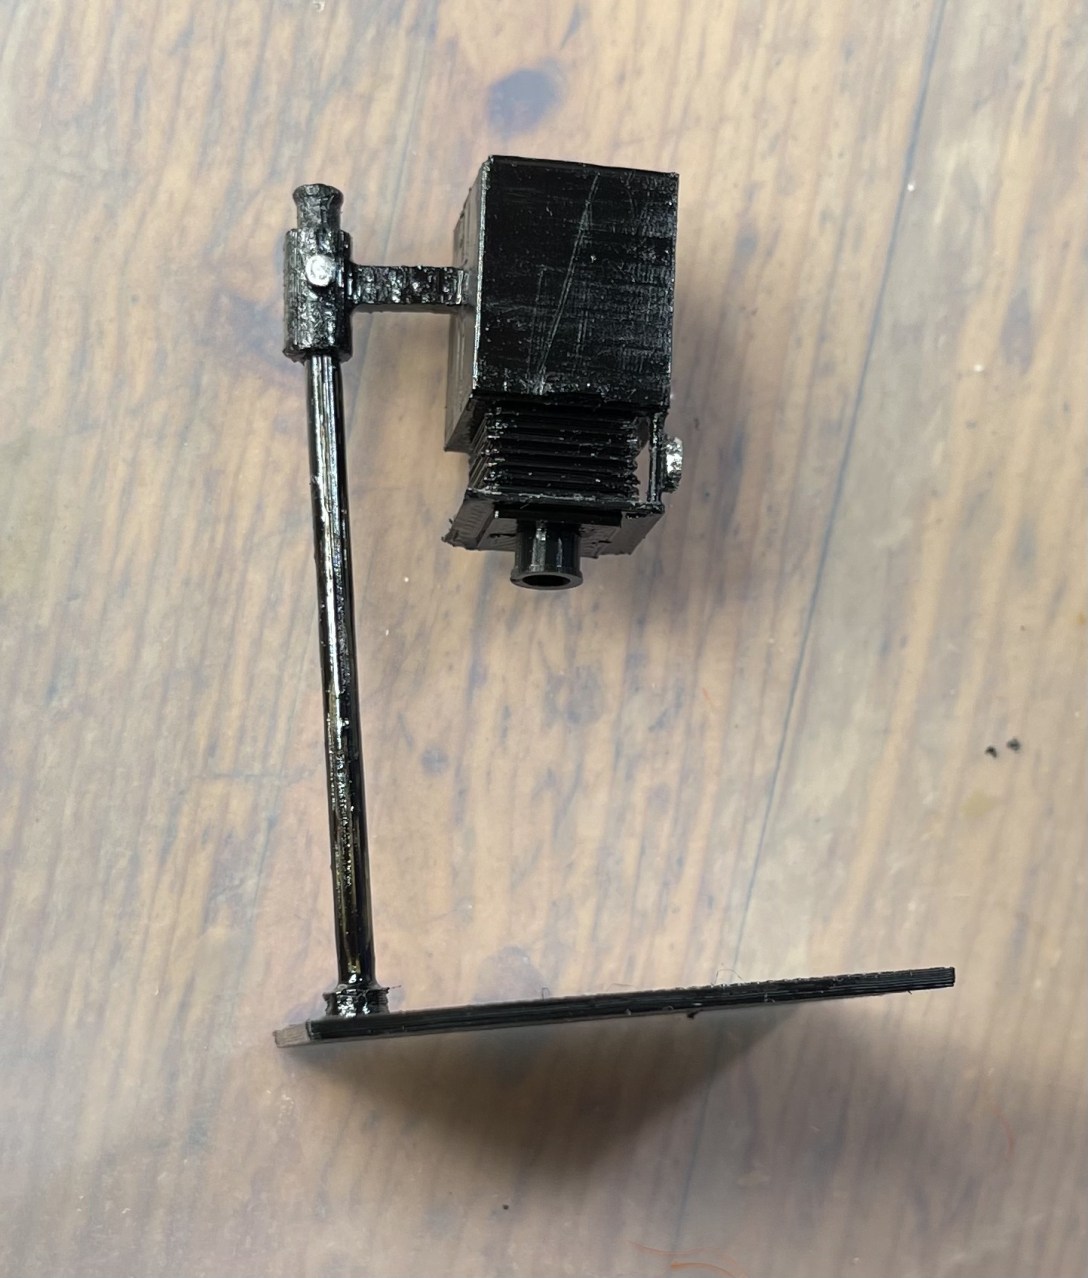
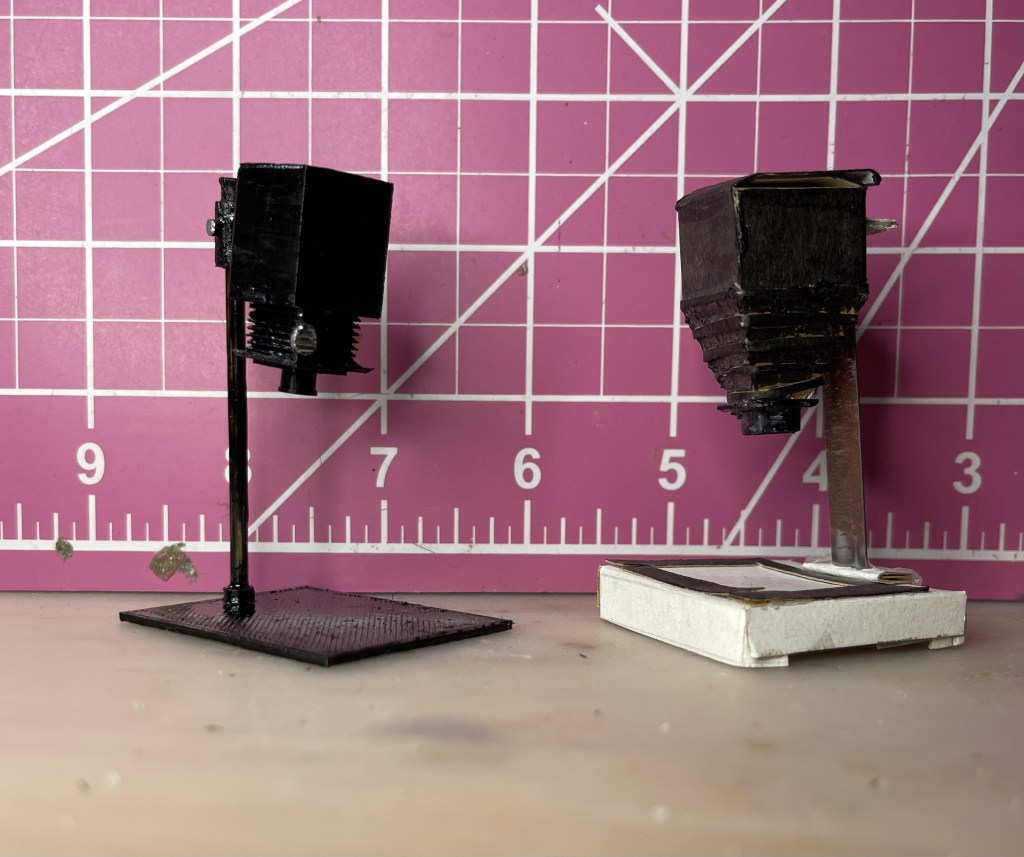
It took a few tries–row of failed enlarger heads in back–to get a good head, mount, and base. The vertical post is a failure, replaced with a bamboo skewer.
So I made one. As with the fire escape, it took a few tries. I model it, print it, and evaluate the results to modify the model. For a short few minutes I considered making the head hollow with the lens hole open and inserting a tiny light inside to shine down on the base. I could put a tiny lens and a negative to project down onto the paper… But either I would have to put the light in while it was printing, or make the enlarger head in two pieces. And either I’d have wiring running down the post, or have to fit in a battery. And if it had a battery, I’d have to reach into the tiny darkroom to turn it on and off. Also, where would I source a 2 millimeter lens and negative image? I stopped there, proceeding with my unlighted enlarger.
When the combined post and mount for the head failed to print, I salvaged the mounting part, cut off the miss-printed vertical post, and got a bamboo skewer from the kitchen. Conveniently, my modeled post was supposed to be 2.8 millimeters, just like the skewer.
The expansion portion of the head–what in real scale would be accordion folded fabric to accommodate adjustments to the lens position–was a plastic clogged mess. I made the folds larger so the printer could print one-fold per layer. I also reduced the layer height to get finer details.
Even my best print needed some touch-up, which I did with fine files and X-acto knife. The bamboo had to be painted, so I put a coat of black enamel on all the parts, and chrome on the two knobs.
It’s not perfect, but it’s orders of magnitude better than the original, and for the moment that’s good enough for me.
It’s been a few weeks since I invested in my 3D printer with the intention of printing a new fire escape for my dollhouse. At least for starters. I do realize one doesn’t buy a printer to create a single object. Since then, I’ve discovered more and more possible projects and experienced both satisfaction and frustration with my efforts.
But for now, I want to provide an update on that initial project.
Unsurprisingly, I had to scrap that first model after I learned a bit more about using Blender, the modeling application I’m learning.
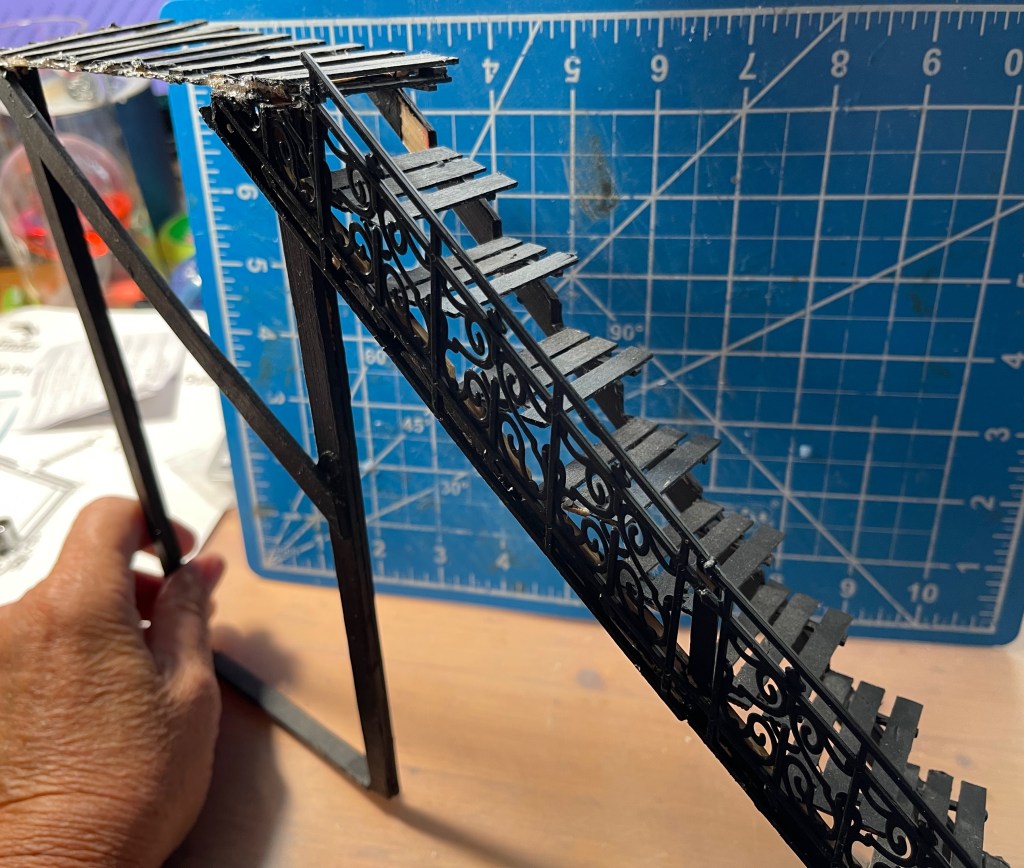
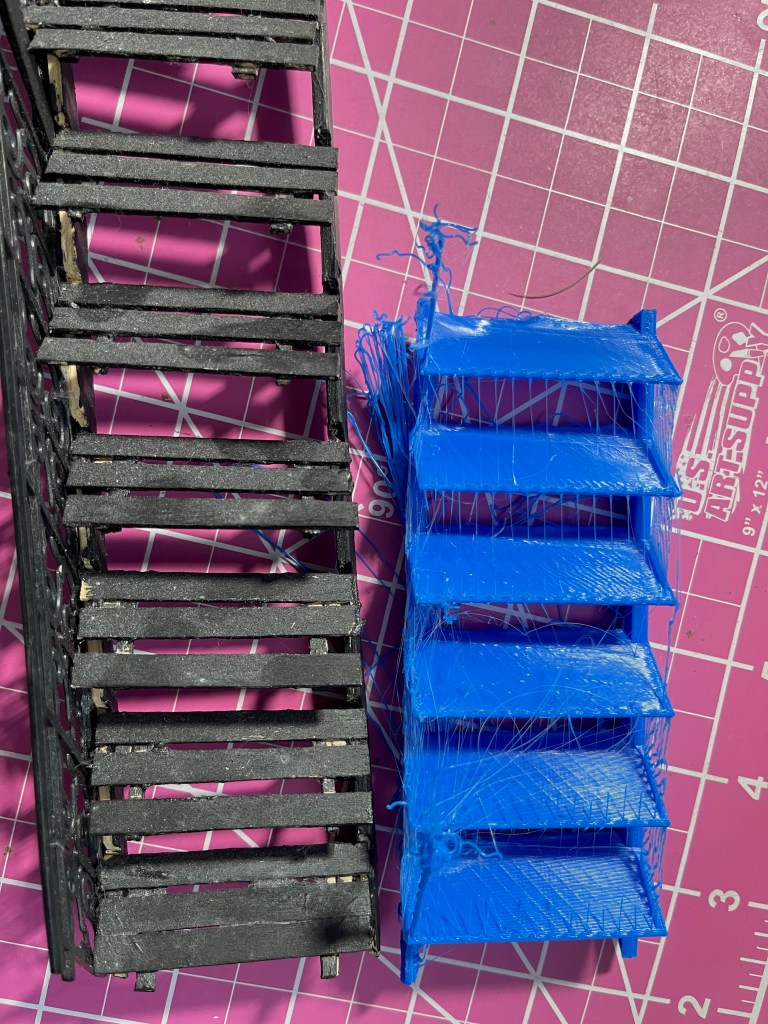
I created a new lower half of the fire escape model and was astonished when it printed relatively properly at scale. Using that model file, I created the upper half of the stairs and this time I added some tiny bolts to the tiny plates where the two halves would join. When they printed correctly I was pretty nearly elated. Onward to the top of the steps. This one was tricky because the horizontal railing needed to mesh with the angled one on the stairs. By working in the same model file as the top half, I was able to design the platform with the correct angle. And a couple more of those clever little plates with bolts on them.
This one gave me printing problems and I had to learn more about positioning the model for best results. It took two or three prints to get an acceptable result. And I still had to reprint the railings. I try not to think about the plastic, but on the other hand, I’ve probably only scrapped the equivalent of a liter plastic bottle.
All three pieces had a lot of “stringing” where the print nozzle extrudes a fine hair of plastic when it moves between printed objects. There are settings to get rid of this. I’m still trying to find the right combination.
The next steps were cleanup with X-acto knife, sandpaper, and ultimately a micro-sized metal file to get into those tiny angles. I glued the three main pieces together and glued on the re-printed railing pieces that hadn’t printed well the first time. I decided to live with some weak points in the railings because it’s an old, weathered fire escape and iron deteriorates.
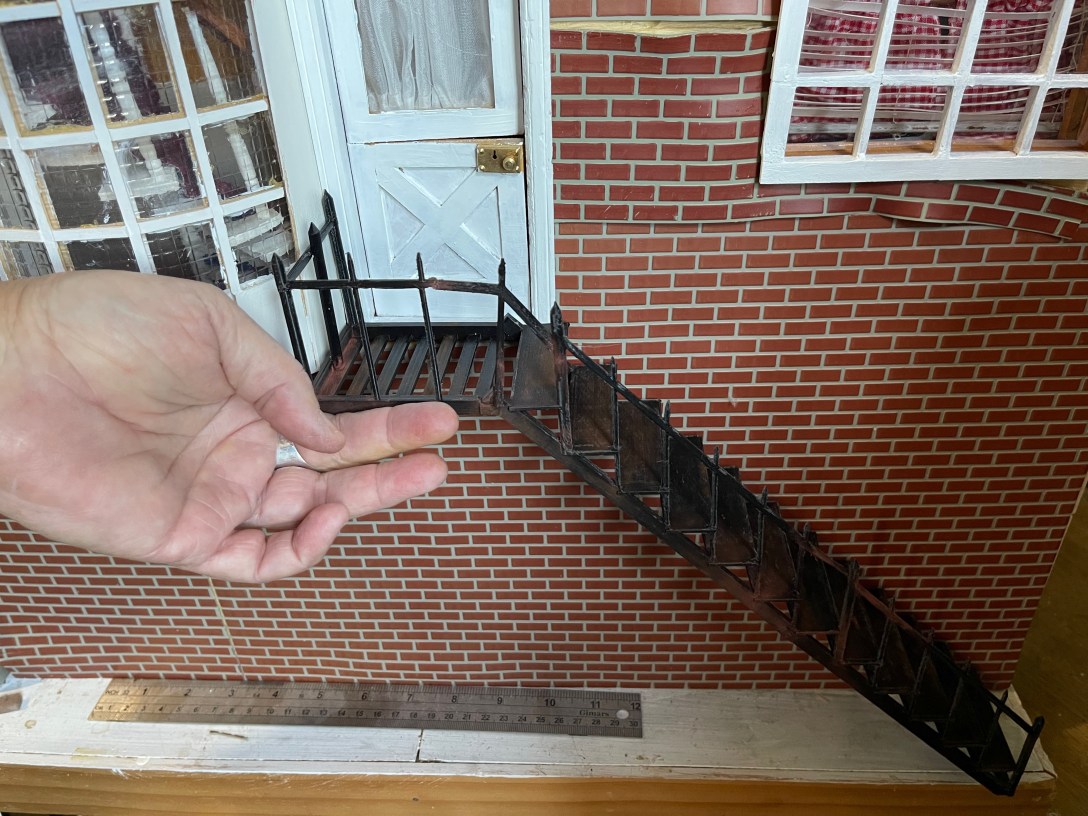
The printed fire escape–about four pieces in all–glued together.
Finally, I got out aging powders–fine powders in various colors like “rust” and “grungy black”–and a brush. Remember, the fire escape is outdoors in London. It’s gonna rust.
Not yet attached, but in place. Yeah, those vinyl bricks need some attention.
Next project: replace the waterwheel on my garden mill.
About a week ago I was bemoaning the fragility of the fire escape on my dollhouse. It had once again detached from the wall and been damaged. “I should 3d print it!” I thought, reading that 3d printers have become inexpensive. “Then it could be one sturdy piece.”
Except I didn’t have a 3d printer, nor did I know how to create a model of my staircase (or much else).
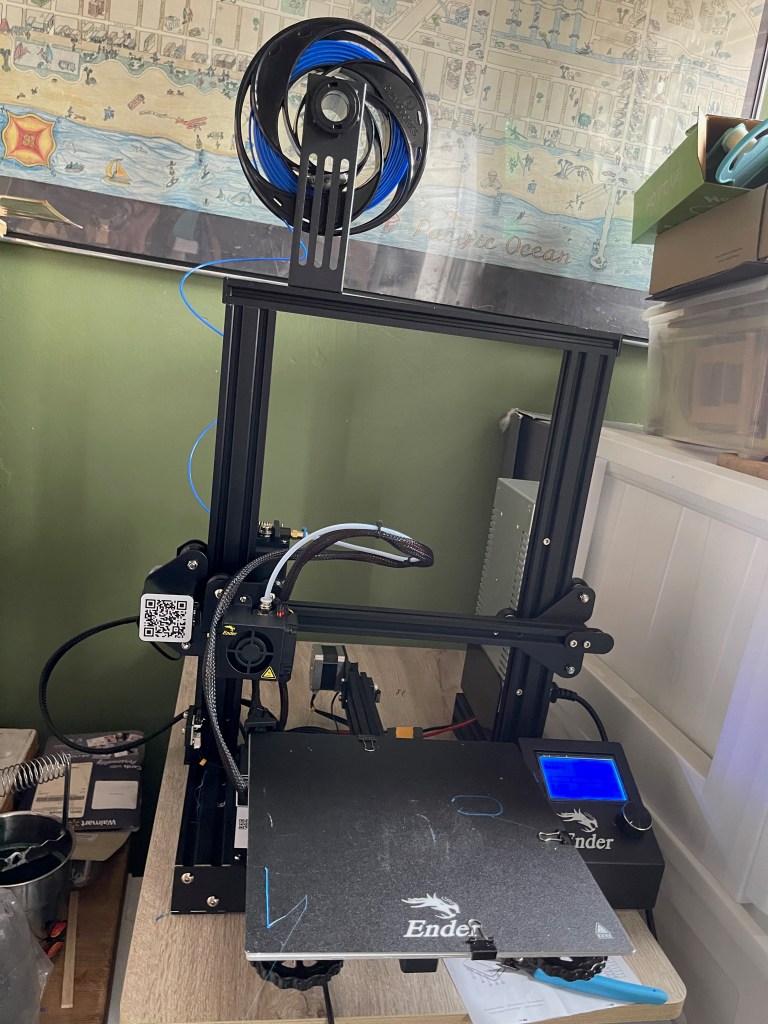
Never one to let reality stop me, I researched inexpensive 3d printers and selected one. Then I watched several “how to assemble your printer” videos.
“It’s okay, I’ve built a lot of Ikea furniture.”
And it was okay–mostly because the videos told me it was going to take a couple hours so my expectations were properly set. The included instructions were no worse than any other Chinese product–in fact the translation was better than many. However, when it came to the wiring it lost me. One photo showing a bunch of sockets, but no clear direction for which of the four four-pin plugs went into which of the four four-pin sockets. I figured out the plugs on short wires could only go to the same size sockets near them. The rest had little tags with X, E, and Z on them. But sockets had no such labels. I realized these referred to the axis, and each axis has a motor. But I didn’t know which was which. Finally I found a manual on-line that helped.
And that’s the sum total of the documentation. No user manual. No guide to the menus and commands. No help with connecting it to my computer (answer: you can’t). It has a micro USB port, so I thought I could plug it into the computer. Nope. It also came with an SD card, a USB card adapter, and an SD slot next to the USB port. I set aside the puzzle of talking to the printer for the moment because I still had to solve…
Where to put it? My little office/craft room/music room is cluttered with a capital C. Oh, but on top of those plastic storage bins would work, except then I would have to move it to get into them and I suspect moving it is not good for it.
Back to Amazon to order an adjustable height laptop desk to go over the storage bins.
And while I waited for that, I researched modeling software. Yikes. I’ve done my share of poor Adobe Illustrating, but never in three dimensions. What’s more, 3d printing is still a pretty hacker-ish activity, with loads of people out there sharing videos and posts about fine tuning their cobbled together systems, blending skills in Rasberry Pi, design, materials knowledge, and who knows what else?
I resolved to take it a step at a time. First, let’s find software to draw my staircase. I tried out Sketch Up–the free web-based version–first and after hours had managed to draw some cubes. So I went to Blender, a native application, and within an equal amount of time had created a six-inch section (because the printer can’t do the whole thing at once, so no matter what it’ll be in two pieces) of my staircase. Unadorned, plain surfaces, no banister. But it looked like a staircase. Yay Blender.
The desk arrived and on Saturday I shuffled things around in the office and got the printer set up on a stable (I even checked the level of the table top!) surface.
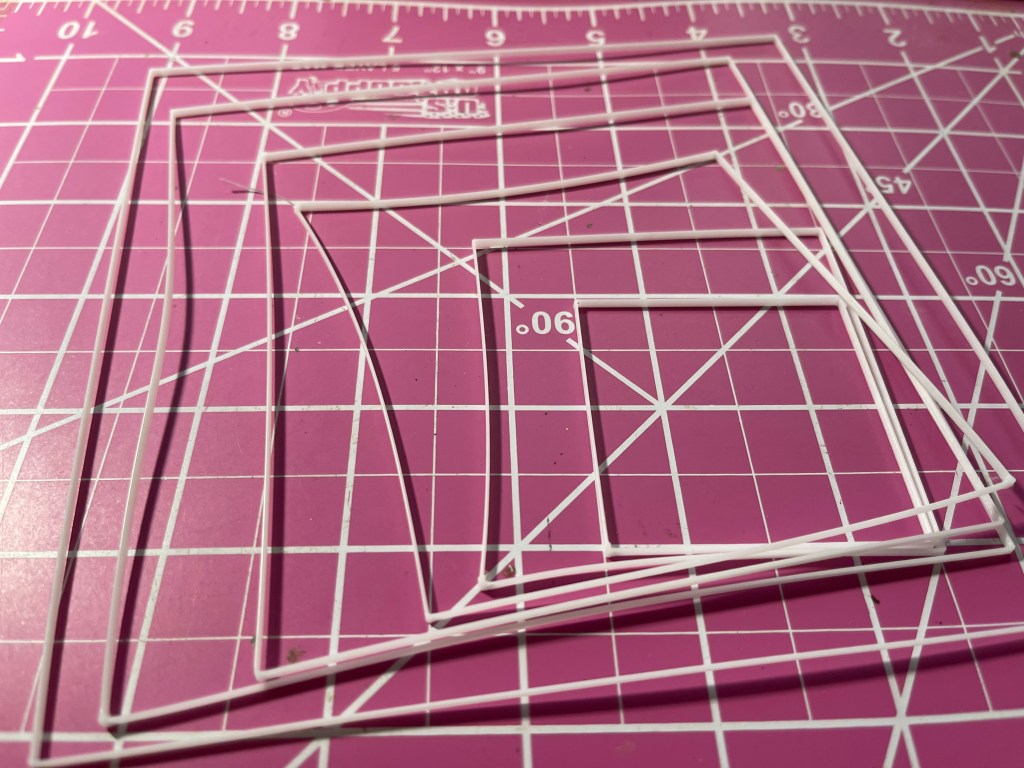
In my research I learned about leveling the bed–the surface you print onto. I found videos, and one creator who linked files to help. I learned to transfer the files from my computer to the SD card and found the “Print from Media” command on the printer. Amazing–the print head moved around over the print surface and stopped so I could check its distance from the surface (slide a slip of paper in between) and adjust the bed up or down in each location. Next I learned from another video how to load the plastic filament into the printer (Ah, there’s a spring loaded arm I have to move!–like I said, absolutely no user manual). And finally I printed the test file–a set of squares.
A few minutes later there they were on the print bed: seven 2mm high by .5mm wide white plastic squares.
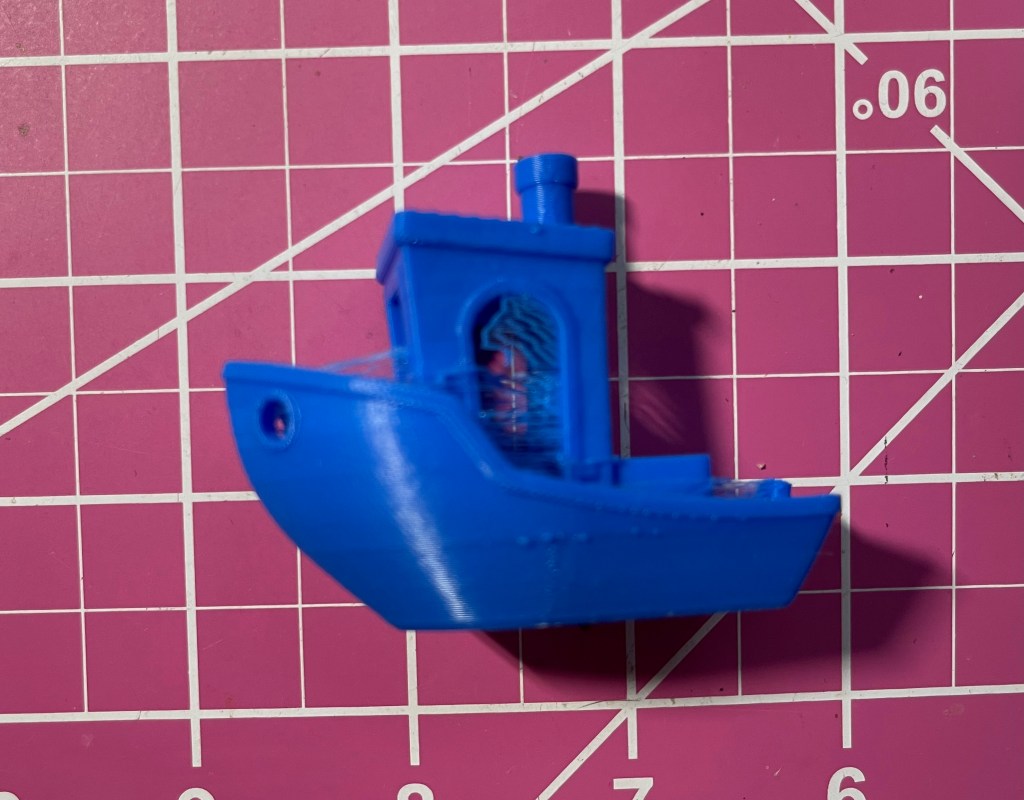
I’d read about Benchy, a cute little tug boat model that’s used to test printers. I found the files for it on thangs.com, a library of free model files. Enter the next piece of software: the slicer. Slicing software prepares the 3d model for printing. I took the coward’s way out and downloaded the Mac slicer from my printer’s manufacturer. I loaded the Benchy model file into the slicer and there it was on screen: the little boat. I hit the “slice” button and when it finished I exported to a format for the printer. Then I had to transfer that file to the SD card, the whole while fearing I’d drop the little card or damage the contacts.
Soon my printer was working on Benchy. About ninety minutes later I had a little blue boat covered in plastic cobwebs. I reviewed a video on what Benchy tells you about your printer and how to fix some of the problems it reveals. My platform was a little too low, and those cobwebs are called “stringing,” left when the nozzle moves across open air between parts of the print.
One step at a time, I said. I re-leveled the bed and reprinted Benchy. That helped the first issue. Then I researched “stringing” and spent a while in the slicer looking for the right setting to change. Found it. Changed it. Re-sliced. Sneaker netted the card to the printer and printed again. Oh well. Clearly I’ll need to mess with that setting some more.
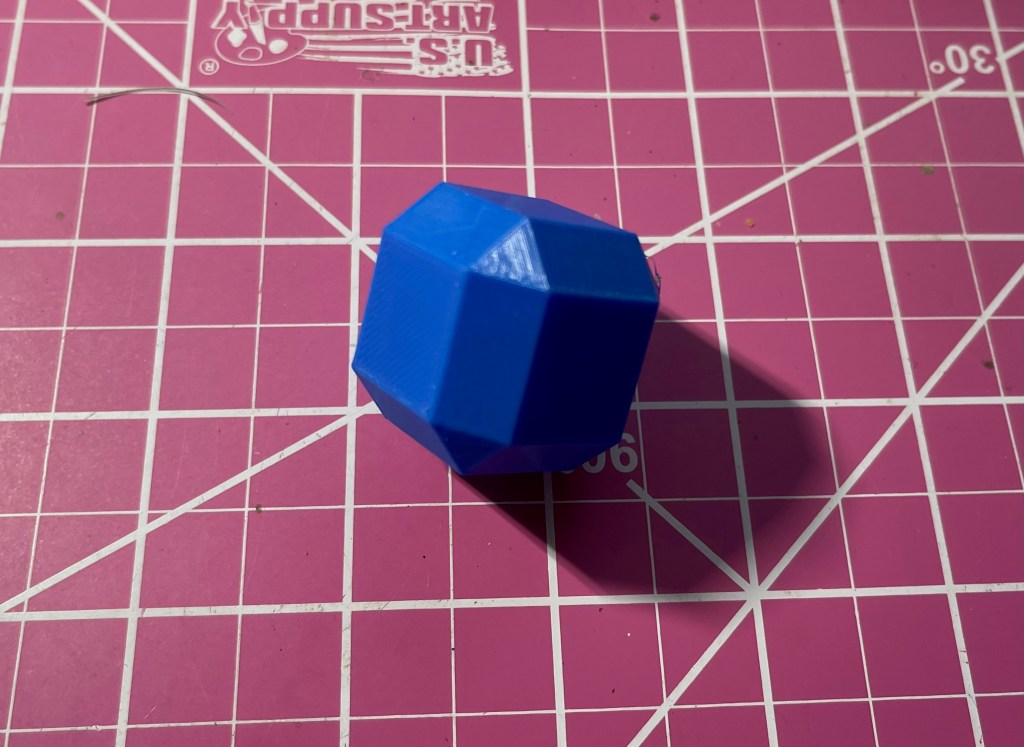
Back to the modeling software–I wanted to print something I made myself. That’s the point of this endeavor, right? So I set aside my staircase and modified a basic cube, exported it from Blender, opened it in the slicer, and there it was, sliceable. This was especially exciting because I’d tried this with the staircase and the slicer didn’t display anything. Or so I thought.
So I sneaker netted the cube and printed it. My first original design!
But by then I was sick of the sneaker net and researched how to get my printer to talk to my computer. I had downloaded a phone app that connects me to my printer manufacturer’s cloud, but the app has to be able to talk to the printer, and the printer, as purchased, has no connectivity other than the SD port and that mysterious micro USB (still no sign of the printer when I look at my computer’s printer config manager). I looked into drivers, and the only info I found was a snarky comment on Reddit to someone else trying to do what I’m doing saying “make your Mac work like a PC.”
Okay, I did find that I could get a wifi “box” (yes, literally called a “box”) from the manufacturer. Whether this box would make my printer a network printer, or whether it has a WiFi network built in that I’d have to join (a la GoPro) was unclear because, you know, no user manual nor even a clear description on Amazon. I ordered one.
The “box” plugs into that Micro USB port. And it talks to the phone app. And the app talks to the cloud. So does the slicer on the computer.
I thought, “okay, it’s time to try to print my stairs.” I knew this would not be my final print, this is just a working model, just an attempt to understand how it all works. Plus I still have the “stringing” problem. But I just had to do it.
I figured out that the model was so small the slicer was show it, it was just tiny–I had to zoom way in. I found the scaling controls and made the model the desired six inches long. At least I knew that unlike with photographs, resolution of the image isn’t relevant in a vector model. I sliced it and uploaded it to the cloud. On my phone, I located it in the cloud and commanded the printer to print it.
And that’s how, in just a week, I’ve 3d printed half of a (granted unusable) fire escape for my dollhouse.
Sure, the steps don’t align with the original, but that’s okay, the printed ones are spaced more to scale. And the newel posts at the top and bottom are a complete mess. They were too fine to print. And I didn’t even do the railing. And then there’s the stringing.
None of that detracts from my sense of accomplishment for going from “3d printing? How does that even work?” to “I just printed a first pass at a miniature fire escape” in a week.
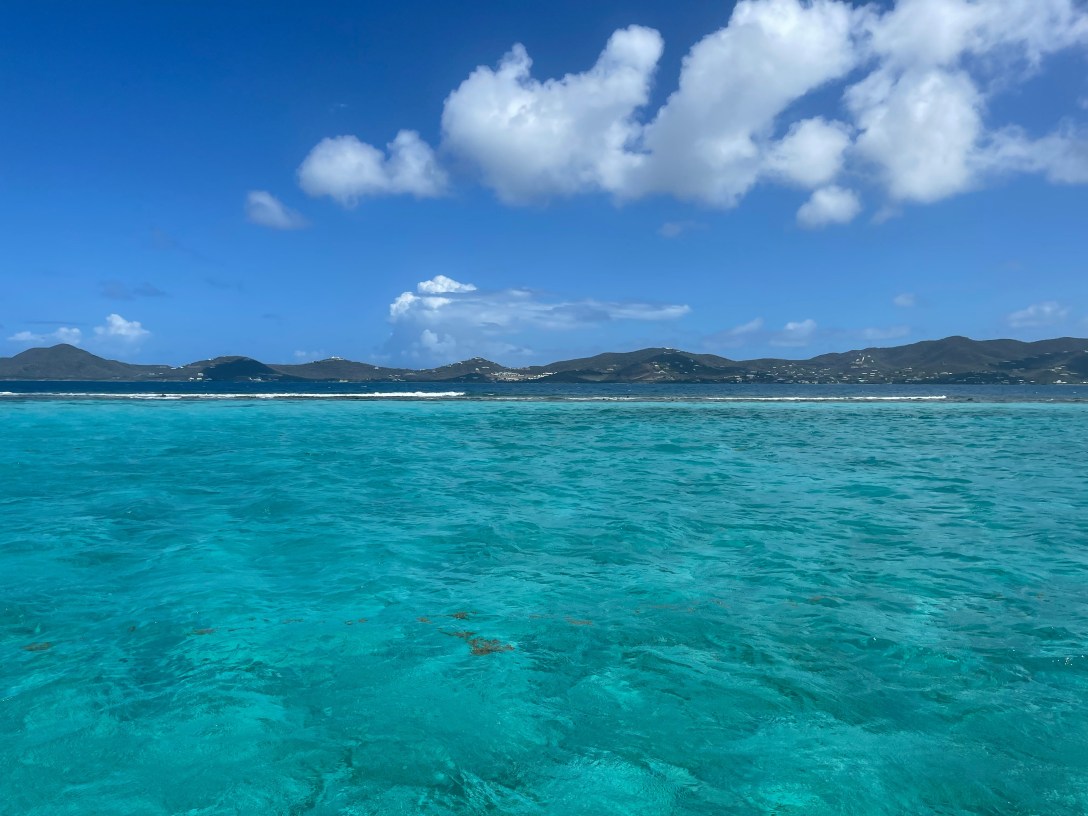
This happened in the middle of a sailing trip during which we planned to visit the US and Spanish Virgin Islands (the latter are part of Puerto Rico). One could argue that the entire nine days of sailing was in paradise, and one would be correct. But we did not plan to spend five days of it secured to a mooring in Gallows Bay, Christiansted, St. Croix.
When we arrived in Gallows Bay on the third day of our adventure, our skipper–the guy who had organized the trip–did not feel well. Indeed, he’d spent a couple hours of the trip from St. John sleeping below. Most of us couldn’t spend more than a few minutes down there as the boat heaved on the swells, so his need for rest had to be very powerful.
Naturally, one of our group produced a Covid 19 self-test and the result was positive.
Cue the tense group dynamics.
We were all vaccinated, most of us with two additional boosters administered fairly recently. Two of the group have regular, close interaction with family members who are immune compromised. One of them also self tested that evening and the result was negative. He put on a mask and continued to provide moral and informational support to our skipper. The other put on a mask and said our leader should leave the boat immediately. Instead, he stayed outside, having us hand his dinner, and then his bedding, up to him in the cockpit. He called his wife and his doctor and his insurance company and studied the CDC protocols.
In the morning, our skipper and his supportive crew went ashore and took a taxi to an urgent care facility. The rest of us waited on the boat swimming, reading, and inevitably discussing what would happen next.
They came back a couple hours later and reported the same results, which were now officially recorded. The rest of us gathered our shore gear and left the boat to make the same trip to urgent care. Our skipper packed a bag, made a hotel reservation, and left the boat in the care of our other crewmate.
After the longest taxi ride imaginable, we checked in at urgent care. Our crew mate who cares for her aging mother is also self employed with insurance that does not cover her outside of New Jersey. She was charged $100 for the Covid antigen test. The rest of us produced insurance that covered the test. The doctor had us stand outside while she swabbed our noses, then told us to wait there for the results. An eternity later she returned and said, “you guys are all clear.”
That’s when I realized just how stressful this whole thing was–when the uncertainty about whether I’d have to pay for a hotel on an expensive island, maybe not be able to fly home on schedule, was eliminated the relief made me almost jubilant.
This is when I decided that although this was not what we had planned, we were going to spend five days in paradise, so we might as well make the best of it. The other three agreed.
We texted our crew mates about the results, and we had the taxi drop us at a restaurant just outside the marina for a late lunch/early dinner. We urged our other healthy crew mate to walk over and join us. Good thing we didn’t wait to order, because we were half-way through our meals when he turned up. It wasn’t until later that I realized he felt strongly that the five of us should be in quarantine on the boat, not eating at an indoor restaurant. He also was no longer willing to do any scuba diving because it would put him in close proximity with the other divers on the boat.
Distinctly different opinions about what we should do regarding Covid certainly shaded our five days in paradise. Our two crew with the immunocompromised family at home entered into frequent heated discussions about CDC guidance and protocols. The rest of us repeated what the doctor had told us upon delivering our negative test results: don’t get another test unless you become symptomatic. Our crew mate with the New Jersey insurance was adamant that she would not pay $100 for another test. So our other concerned crew mate became determined to find a pharmacy that would provide him the six monthly self tests provided by Medicare, even though all of us said no, we would not do those tests either.
Despite these conflicts, we rented a car and drove the length of the island, all crammed into a small SUV joking and laughing a lot. The next day four of us went to the beach at a nearby resort, and the day after that we signed on for a catamaran voyage to Buck Island, a mostly underwater national monument. Our fifth crew mate refused on the same principle as his no dive boat decision. The rest of us felt the likelihood of us infecting anyone–if in fact we did have Covid despite the negative tests–in the open air on a beach, and on a sailboat, was very low.
At last the five days ended, our skipper felt much better, and another Covid test was negative. Early in the morning of the sixth day he returned to the boat and we dropped the mooring to sail north. We had a couple more days–not enough to visit the Spanish Virgin Islands, but certainly enough to visit Christmas Cove on St. James Island and the pizza boat, and to snorkel in Caneel Bay on St. John.
Even as many places and people begin to view the pandemic as if it’s in their rear-view mirror, it is not over, and it can still disrupt lives. Our only recourse is to adjust and adapt, or we’re destined to lose sight of the joy and lessons that every life experience provides.
Read the full story of our USVI sailing adventure.
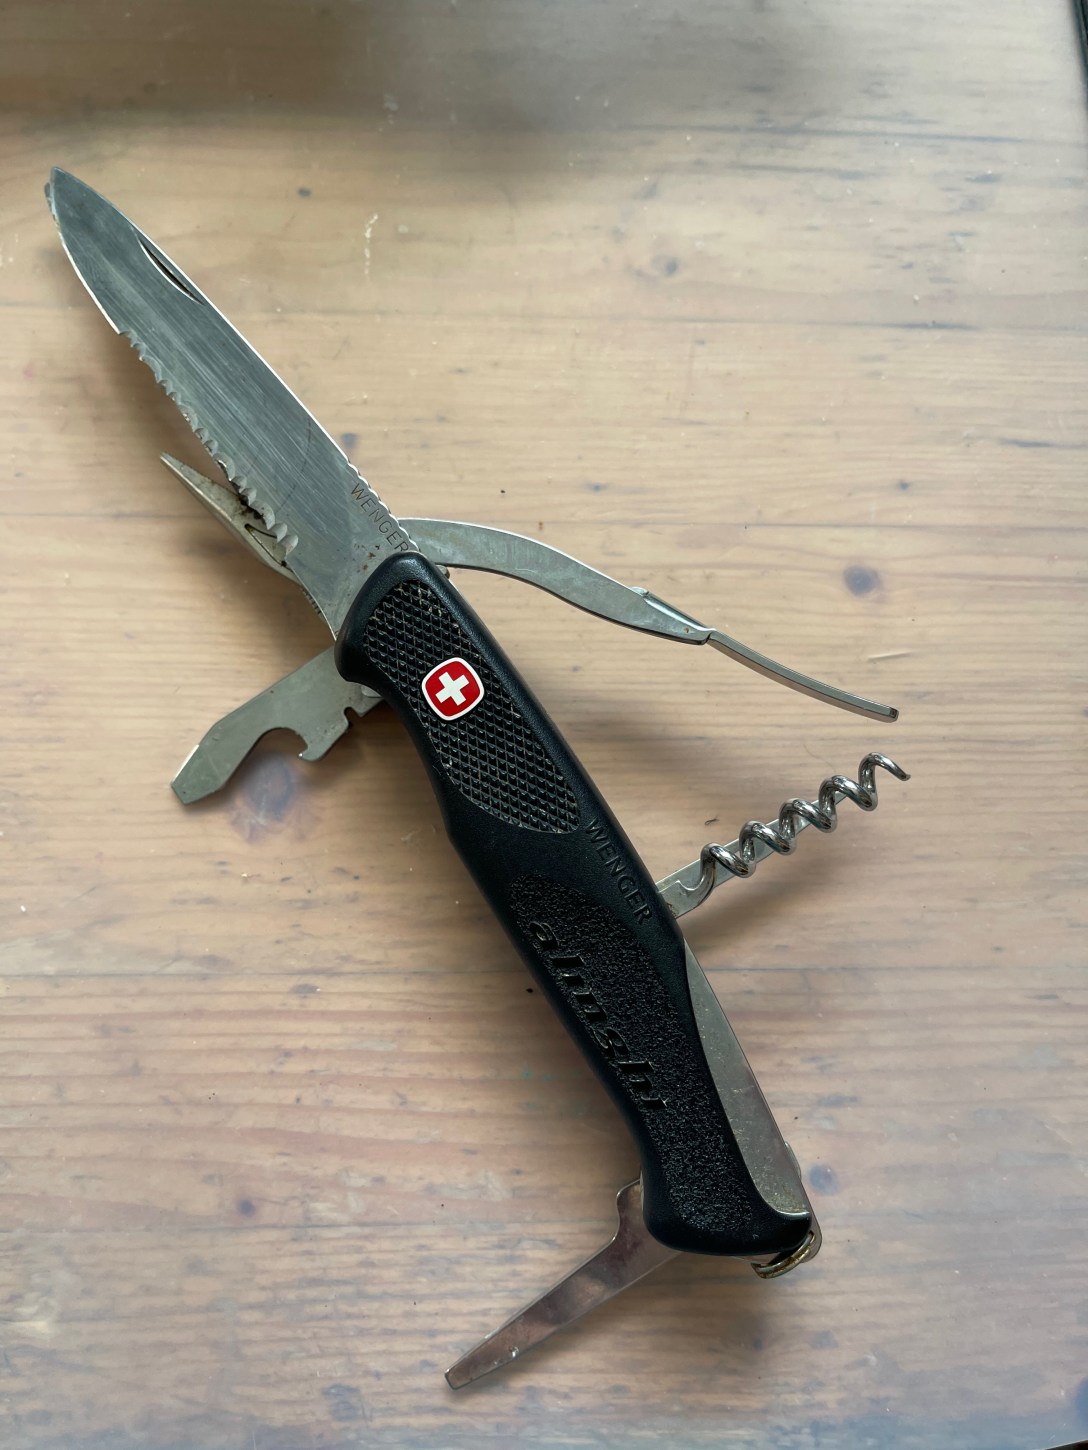
You didn’t know it was lost, I realize, but I have been acutely aware of its absence for many months. I bought it in Zurich, Switzerland years ago. It’s a special edition Wenger Swiss Army knife with the perfect set of tools for sailing.
When I got back from St Martin in February of 2020, carefully unpacking my bag was the last thing on my mind. I dug out the dirty clothes and delicate electronics, then stored the bag with snorkel gear and assorted sailing stuff inside.
In June of 2021 I was packing for a sailing trip with friends. I could not find the knife. I searched through the bag from 2020, as well as various other pieces of luggage I use for sailing trips and where I store travel stuff.
No knife. I was surprisingly upset. I mean, my degree of unhappiness at this loss seemed out of proportion, and I’m sure I was loading all kinds of emotional distress from the past pandemic year onto it. I reluctantly packed an older, totally functional sailing knife for the trip. I never needed to use it as we visited Martha’s Vineyard.
So that’s probably an important point: sailors carry knives or multitools for emergencies, or at last as a convenience should they need to unknot a line or tighten a screw. But it’s an emergency tool that you don’t want to have to use. Except for this particular knife. Many of my sailing buddies will recognize it because on a boat, I use the main blade in the galley, and it’s got both bottle opener and cork screw. It has a good heft to it and a comfortable grip. It’s a great knife, which certainly contributed to my sense of loss.
Last October I did not search again, it was too painful to put that much focus on the loss. I packed the blue knife and went sailing. And did not encounter a need to cut or tighten screws on that trip.
Yesterday I went to the storeroom to get a snorkel for an upcoming trip to the USVI. I have already packed the dutiful blue knife. Feeling around in the depths of that same St Martin bag I pushed aside fins, water shoes, and a produce hammock, and my hand wrapped around a rough, rectangular lump. My heart raced—could it be? Slowly–delaying the disappointment I feared–I drew the object out into the dim light of the storeroom.
I nearly wept. I was sure I had not left it behind. I had concluded that some dishonest baggage inspector must have taken it. But there it was in its case, freed from under the fins.
I also found the snorkel.
This has been a week of good fortune for me, with a promotion and attendant financial improvement. But finding the missing knife outweighs what ought to be the more important life milestones. The knife is a touchstone for my sailing lifestyle. Finding it means I’m back aboard in mind, body, and spirit.
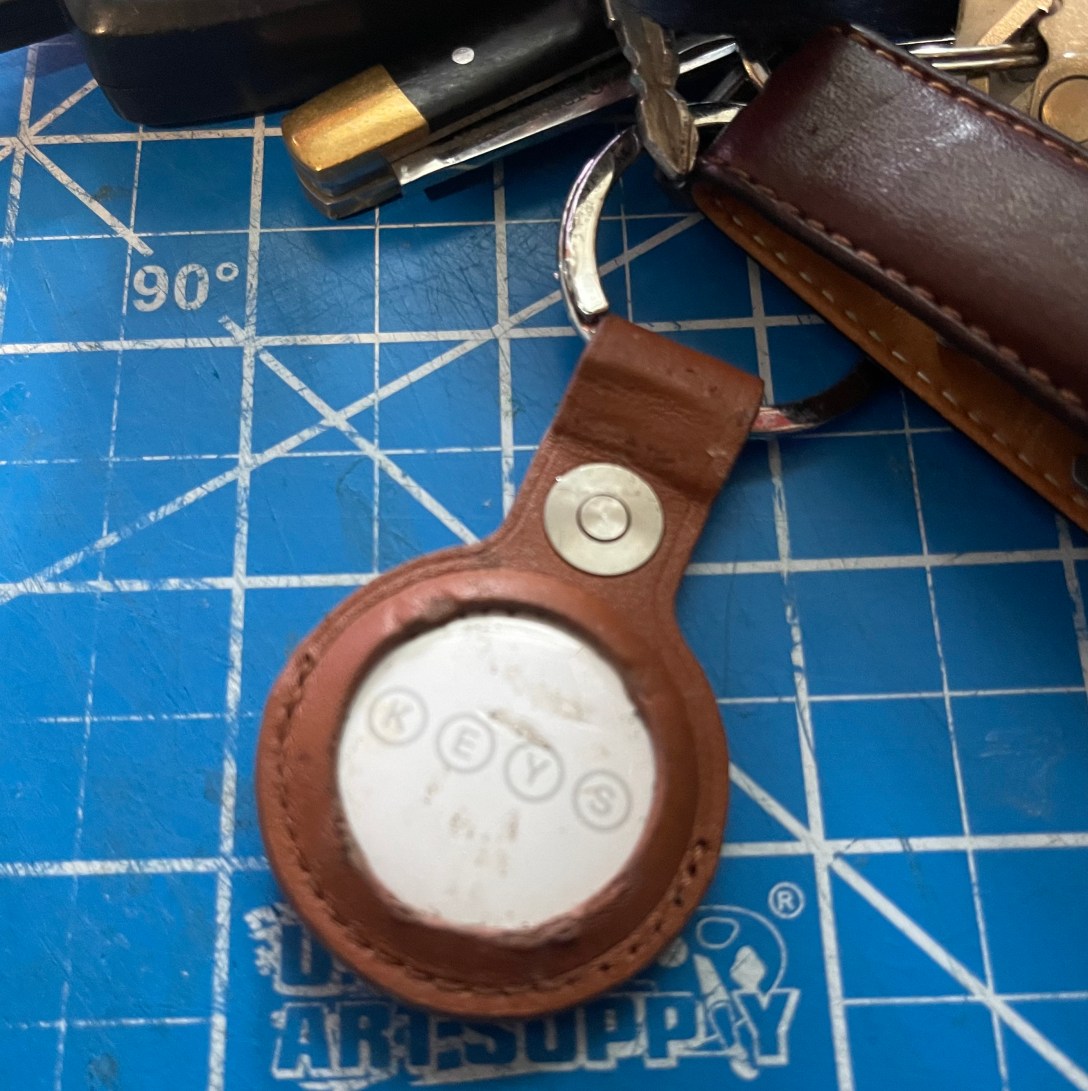
I impulse bought a couple Apple Air Tags—those devices you attach to your valuables so you can track their location. I put one on my keys and one in my handbag.
When I got to Cape Cod a couple weeks ago, I noticed that the one on my key chain was not. Damn. It must have fallen off. Embarrassingly, it was a while later that I remembered the point of the tag, and tracked it on my phone.
There it was, last seen a couple hours earlier in Waterfront Park back home. Now 230 miles away.
I had not been anywhere near Waterfront Park in months, so I knew someone had found my tag and carried it there.
But it’s registered to me, and someone else can’t “steal it.” It’s useless to them.
Over the next week while I was in Massachusetts I checked now and then, and it remained in the park, although the specific location wandered.
On the day I drove home, it was suddenly showing up in the middle of the Hudson River. Oh no! Did someone hurl it out a car window from the Tappan Zee bridge? Nothing I could do from I95 in Connecticut.
By the time I was home and could go look for it, Tropical Storm Eliza had arrived from the south in a frenzy. My phone showed the tag back in the park and despite the rain I had to go out for other errands, so I decided to look for it. Rain? This was the middle of the deluge that flooded NYC subway stations. I parked and sloshed through ankle deep puddles to the location shown on my phone. Nothing. I tapped the “Play Sound” button. My phone said it could not connect—too far away.
I was soaked. My phone was wet. The rain was so loud I suspected it would drown out the ding of the tag. Dejected, I drove away.
The next day was clear and bright. Late afternoon I was done with meetings and had no more work that could not wait for Monday.
I drove back to the park. The location app placed the tag in a different spot. Near a tree in the divider in the parking lot.
I parked and followed the little map on my phone. My Geocaching instincts kicked in: I examined the tree, the parking sign…. I tried the “Play Sound” button. Wait, was that a ping? Excited, I tapped again.
Ping ping PING PING ping ping.
Around the tree, check the knot holes. Ping again and check the sign. Ping again and listen. Listen. Listen. There! A bright spot in the grass at the base of the tree.
My tag was still in its leather holder pressed deep into the thick grass. It was dirty, the surface scratched—proof of its adventure.
Had the finder tossed it away in frustration? I’ll never know. But I do know that Apple Tags work. You really can find them, even if they aren’t attached to your valuable.
It is back on my key chain, secured it to a solid ring,
A little sort of ten years ago a friend and I booked a ten-day passage aboard a tall ship, sailing from Portsmouth, Virginia to Fernandina Beach, Florida. We were in it for the experience of rounding Cape Hatteras “on the outside.”
And what an experience it was! From the glory of dolphins playing in our bow wake at night, to the beauty of sunrise across the Atlantic, the trip had many amazing moments. It also included adventures that tested everyone aboard and resulted in major life changes for some.
I kept a journal during the trip, but my journals are not ready for mass sharing. I recently derived an actual narrative from that document and went through my many photos for some highlights.
When you’re ready for a nautical adventure that really happened, you can find it here: Rounding the Cape (2011). Events in the story will, eventually, show up in a Double Trouble Adventure.